
Seeing a dent or a gaping void in your living room wall is a massive annoyance. Maybe a doorknob swung open too fast, a piece of heavy furniture slipped during a move, or roughhousing got out of hand. Whatever caused it, you are now staring at an ugly blemish on your otherwise perfect paint job.
Figuring out how to patch a hole in drywall is a rite of passage for homeowners and renters alike. You absolutely do not need to hire a contractor to fix this, and you certainly do not need years of construction experience under your belt. I have seen complete beginners tackle this job on a Saturday afternoon with phenomenal results. We are going to walk through the exact steps, tools, and pro tips you need to make that frustrating hole disappear like it was never there. Read on to discover everything from picking the right joint compound to feathering the edges so smoothly that nobody will ever know the wall was damaged in the first place.
Why You Should Never Ignore Drywall Damage?
Leaving a hole in your wall might seem like no big deal if you can just hide it behind a bookshelf or a strategically placed poster. But ignoring drywall damage often leads to much bigger and more expensive headaches down the road. Your walls do a lot more than just hold up your paint. They act as insulation, soundproofing, and a barrier against things you definitely want to keep out of your living space. An open hole completely compromises the integrity of that barrier, allowing drafts to slip through and energy bills to creep up during extreme weather.
It also creates a highly inviting doorway for pests. Mice, spiders, and roaches love to travel through the dark, empty cavities of your wall, and an unrepaired hole gives them direct access to your living room or kitchen. Furthermore, small cracks around the initial impact zone will spiderweb and grow larger over time due to normal house settling and vibrations from opening and closing doors. Fixing it promptly protects your home, maintains your property value, and simply keeps your space feeling clean and well cared for.
|
Risk of Ignoring Damage |
Potential Consequence |
Long-Term Cost Impact |
|
Pest Intrusion |
Mice and insects enter living areas easily |
High exterminator and cleaning fees |
|
Energy Loss |
Drafts escape through the open wall cavity |
Noticeably higher monthly utility bills |
|
Structural Weakness |
Small cracks spread into larger fractures |
Increased repair complexity and materials |
|
Sound Leaks |
Noise travels freely between adjacent rooms |
Loss of privacy and overall comfort |
Tools and Materials You Need for Drywall Repair
Before you grab a knife or start mixing up mud, you need to gather the right supplies. There is nothing worse than getting your hands covered in sticky joint compound only to realize your sandpaper is out in the garage. Your shopping list depends heavily on the exact size of the repair, but having a well-stocked kit saves you from making multiple mid-project runs to the hardware store. Quality tools actually make the job significantly easier, especially if you plan on doing more DIY repairs around the house in the future.
For example, buying a flexible metal putty knife instead of a cheap plastic one allows you to press the mud perfectly flat against the wall with the right amount of leverage. You will want a sharp utility knife to carve out broken pieces, and a sanding sponge to buff away imperfections. You will also need standard all-purpose joint compound, often called mud in the trades, which is perfect for beginners because it dries slowly and gives you plenty of working time. Finally, do not forget a simple drop cloth or an old towel to protect your floors, as sanding dried drywall compound creates an incredibly fine dust that tracks everywhere.
|
Essential Tool or Material |
Purpose in the Repair Process |
Estimated Retail Cost |
|
Utility Knife with Fresh Blades |
Cutting clean edges and scoring the drywall |
$5 – $10 |
|
Putty Knives (4-inch & 6-inch) |
Spreading and feathering the joint compound |
$10 – $15 |
|
All-Purpose Joint Compound |
Filling gaps, covering tape, and smoothing the wall |
$8 – $12 |
|
Sanding Sponge (Fine Grit) |
Smoothing dried compound before applying paint |
$4 – $6 |
|
Drywall Mesh Tape or Patch |
Spanning open gaps so wet mud does not fall inside |
$5 – $10 |
Step 1: Assess the Size of the Hole
The approach you take to fix your wall depends entirely on the size of the hole you are dealing with. Treating a tiny thumbtack puncture the same way you treat a massive hole from a plumbing repair is a huge waste of time and energy. Different damage requires different structural support before you even think about applying the joint compound. Small holes, like those from nail pops or removed picture frames, are generally under half an inch wide and only require a quick dab of spackle to fill the dent.
Medium holes, typically ranging from one to four inches across like a doorknob punch, are too wide for unsupported mud. If you try to just pack joint compound into a medium hole, it will fall straight through into the wall cavity, meaning you must use a rigid mesh patch to bridge the gap. Large holes, anything over five inches, demand a complete replacement piece of drywall. A flimsy mesh patch will flex and crack under the weight of the mud on a large hole, so you actually have to cut a square piece of scrap drywall, insert it into the wall, and tape the seams for maximum strength.
|
Hole Size Category |
Typical Damage Source |
Primary Repair Strategy |
|
Small Holes (Under 1/2 inch) |
Nails, tacks, and shifted wall anchors |
Simple lightweight spackle fill |
|
Medium Holes (1 to 4 inches) |
Doorknobs, toys, and accidental bumps |
Self-adhesive metal/fiberglass mesh patch |
|
Large Holes (5 inches or larger) |
Plumbing access, heavy impacts |
Replacement drywall piece (California patch) |
|
Hairline Surface Cracks |
House settling and temperature shifts |
Paper drywall tape and joint compound |
Step 2: Prep the Area for Patching
Proper preparation is the absolute secret to a patch that blends in flawlessly with your existing wall finish. If you try to spread joint compound over a jagged, messy hole with loose paper hanging off it, your patch will look incredibly lumpy and obvious to everyone who walks in the room. Taking five minutes to clean up the damaged area makes the rest of the application step so much easier. You want to create a clean, solid, and slightly recessed foundation for your patch to grab onto.
Start by taking your sharp utility knife and carefully carving away any loose, torn, or jagged paper flaps around the perimeter of the hole. If the white chalky gypsum core of the drywall is crushed inward, gently scrape those loose bits out so they do not mix into your wet mud later. Next, take the hard plastic handle of your putty knife and gently run it around the very edge of the hole, pressing inward to “dimple” the edge. This creates a very shallow recess for the joint compound to sit in, allowing the final layer of mud to lay perfectly flush with the wall instead of sticking out like a visible bump. Finally, wipe the whole area with a dry cloth to remove dust so the adhesive sticks.
|
Preparation Step |
Action Required |
Why It Matters for the Final Finish |
|
Remove loose debris |
Pick out crumbled, chalky gypsum pieces |
Prevents hard lumps from ruining your mud layer |
|
Cut away torn paper |
Slice off frayed drywall paper around the edges |
Stops loose paper from absorbing moisture and bubbling up |
|
Dimple the hole edges |
Press the knife handle firmly into the rim |
Creates a shallow depression for the mud to sit perfectly flush |
|
Wipe down wall dust |
Use a dry or barely damp microfiber cloth |
Ensures the patch adhesive grips the painted wall securely |
The Best Method for How to Patch a Hole in Drywall
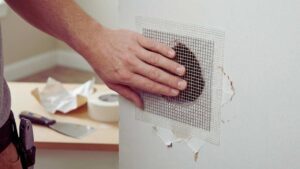
Now it is time to actually bridge the empty space and create a solid surface. Figuring out exactly how to patch a hole in drywall effectively comes down to choosing the right backing support for your specific situation. If the backing is weak or non-existent, your patch will eventually crack, cave in, and fall out the next time someone casually bumps against the wall. For medium holes, a rigid metal and fiberglass mesh patch is your best friend. You simply peel the paper backing off, stick it directly over the hole ensuring it overlaps the solid wall by an inch on all sides, and press it down hard. The metal grid provides stiffness while the fiberglass webbing catches the wet mud.
For larger holes that do not reach a wall stud, the easiest and most reliable technique is called the California patch. Measure your wall hole, cut a square piece of new drywall two inches larger than the hole, and score the back of it to match the hole’s exact size. Snap the edges backward and peel away the plaster core, leaving only the front paper intact to act as a built-in tape border. You then butter the edges of the wall with mud, slip the drywall square into the hole, and use your knife to press that paper border flat against the wall.
|
Patch Backing Method |
Best Used For |
Key Advantage and Structural Benefit |
|
Aluminum Mesh Patch |
Doorknob holes (1 to 4 inches) |
Extremely fast application and requires absolutely no cutting |
|
California Patch |
Medium-large holes (4 to 6 inches) |
Uses its own face paper as built-in joint tape for a seamless edge |
|
Stud-Backed Patch |
Very large holes (6+ inches) |
Provides maximum structural strength by anchoring to house framing |
|
Spackle Only |
Tiny pinholes and nail dents |
Quickest drying time and zero shrinkage for tiny repairs |
Step 4: Apply the Joint Compound
Applying the joint compound is the part that takes a tiny bit of practice, but remember that this material is very forgiving. If you mess up and create an ugly ridge, you just wait for it to dry and sand it right away. The biggest secret to successful mudding is applying several very thin coats rather than trying to glob on one massive, heavy layer to save time. Thick layers of mud take days to dry completely, shrink terribly as the water evaporates, and almost always crack right down the middle.
For your first coat, scoop a small dollop of joint compound onto your putty knife and firmly drag it across the patch to force the mud through the mesh or over the tape. Keep your blade angled and press hard to keep the layer thin; it is totally fine if the mesh texture still shows through. Let it dry until it turns stark white, lightly sand away any sharp ridges, and then apply a second, wider coat. This second coat should extend an inch or two past the first one to begin “feathering” the patch into the surrounding wall. Repeat this process for a third, ultra-thin skim coat, applying more pressure to the outside edge of your knife to blend the mud seamlessly into the flat drywall.
|
Mudding Coat Number |
Goal of the Application Coat |
Estimated Drying Time Needed |
|
First Coat (Bedding) |
Fill the mesh grid or secure the paper tape |
12 to 24 hours (until stark white) |
|
Second Coat (Fill) |
Cover the tape entirely and extend the outer edges |
8 to 12 hours depending on humidity |
|
Third Coat (Skimming) |
Feather the outer edges completely flat to the wall |
4 to 8 hours for a thin application |
|
Sanding Phase |
Remove knife ridges between each dried coat |
N/A (Takes only a few minutes) |
Step 5: Texture and Paint to Match
You have successfully filled the void and smoothed the wall perfectly, but your job is not quite done yet. Unless you live in a brand-new custom home with flawless flat walls, your drywall probably has some sort of texture sprayed onto it, and matching that specific bumpiness is the final hurdle to making the repair truly invisible. If your walls feature a slight orange peel or knockdown texture, you need to replicate that look directly over your smooth patch using a canned wall texture spray from the hardware store.
Shake the can vigorously, test the spray pattern on a scrap piece of cardboard to get the splatter size right, and then apply it in fast, sweeping circles over your patch. Once the texture is fully dry, you absolutely must apply a coat of drywall primer (PVA primer) before painting. Joint compound acts like a dry sponge, and if you roll regular wall paint directly onto bare mud, it will suck all the moisture out of the paint immediately. This leaves a dull, flat, off-color spot on your wall that painters call “flashing.” Brush on your primer, let it dry, and then use a small paint roller to apply your matching wall color, feathering it out into the older paint for a flawless finish.
|
Final Finishing Step |
Tool or Material Required |
Critical Purpose in the Process |
|
Blending Texture |
Canned wall texture spray |
Matches the existing bumpiness of the surrounding wall surface |
|
Sealing the Mud |
Drywall primer (PVA type) |
Seals the highly porous mud so the topcoat paint does not soak in |
|
Applying Topcoat |
Paint roller (3/8 inch nap) |
Blends the exact color seamlessly while adding a matching roller stipple |
|
Light Sanding |
Very fine grit sanding sponge |
Softens heavy texture splatters before painting if sprayed too thick |
Common Beginner Mistakes to Avoid
Even with a detailed, step-by-step guide on how to patch a hole in drywall, it is very easy to fall into a few common traps when you are in the middle of the project. I have seen homeowners make these exact same errors countless times, usually because they want to finish the job as fast as possible. Being aware of these pitfalls before you even open your tub of joint compound will save you an immense amount of frustration and wasted materials. The most frequent mistake by far is rushing the drying times. Joint compound holds a massive amount of water, and if you apply a second coat before the first one is one hundred percent dry, that trapped moisture will eventually force its way out and cause the patch to crack or bubble.
If the dried mud still feels cold to the touch, it is still wet inside. Another major issue is over-sanding the wall in a desperate attempt to make it perfectly flat. If you scrub too hard with your sanding sponge, you will chew right through the dried mud and expose the fiberglass mesh or paper tape beneath, forcing you to start the mudding process all over again. Finally, keep your mud supply perfectly clean; never scrape dried, crusty bits of leftover mud from your knife back into the main tub, or you will end up dragging harsh streaks across your wall on the next coat.
|
Common Beginner Mistake |
Why It Completely Ruins the Job |
How to easily Prevent It |
|
Rushing the drying times |
Causes massive stress cracks and surface bubbling |
Wait patiently until the mud is completely white and room temperature |
|
Over-sanding the mud |
Exposes the underlying fiberglass mesh or paper tape |
Sand very lightly; let the successive mud coats do the actual smoothing |
|
Reusing dirty mud scraps |
Leaves ugly streaks and deep gouges on the wall |
Wipe your knife clean; throw away dried scraps immediately |
|
Skipping the primer step |
Causes paint “flashing” and highly uneven sheen |
Always use a dedicated drywall primer over the bare, sanded mud |
Final Thoughts
Mastering how to patch a hole in drywall is undeniably one of the most valuable and cost-effective skills you can pick up as a homeowner or a renter aiming to secure their full security deposit. It certainly looks intimidating when you are staring at a jagged, broken hole with exposed framing behind it, but the entire process is actually incredibly forgiving and simple once you break it down. The beauty of working with joint compound is that mistakes are never permanent. If you apply the mud a little too thick, you can easily sand it down once it dries.
If your spray texture looks terrible and does not match the wall, you can scrape it right off while it is wet and try again. By taking your time to properly clean out the damage, choosing the right structural backing, applying very thin and patient coats of mud, and absolutely never skipping the primer coat, you can achieve a flawless, invisible finish. The next time life throws a doorknob, a heavy couch, or a rambunctious kid through your living room wall, you will know exactly how to handle the situation without breaking a sweat or paying a contractor hundreds of dollars.
Uncommon FAQs About Drywall Repair
How do I fix a hole where the drywall is soft and water-damaged?
You cannot just patch over wet or crumbling drywall. You have to locate the source of the moisture first, fix the leak, and then cut the drywall back until you reach solid, dry, rigid gypsum before applying any patch.
Can I use a hairdryer to make the joint compound dry faster?
You can use a hairdryer on a low, cool setting to keep air moving, but applying high direct heat will cause the top layer of the mud to dry too fast while the inside stays wet. This guarantees the patch will crack within a day.
What is the difference between setting-type compound and all-purpose mud?
All-purpose mud comes pre-mixed in a bucket and dries through evaporation over many hours. Setting-type compound comes as a dry powder in a bag. You mix it with water, and it hardens via a chemical reaction in a specific amount of time, usually twenty to ninety minutes. Beginners should stick to all-purpose mud.
Why does my painted patch look glossy compared to the rest of the wall?
This usually happens if you used a paintbrush to apply the paint over the patch, but the rest of the wall was painted with a roller. Rollers leave a slight stipple texture in the paint. Always use a small roller for your final coat of paint to match the existing wall finish.


