
Swapping out an old plumbing fixture usually feels like a massive, headache-inducing chore, but learning how to replace a kitchen faucet is actually incredibly rewarding and straightforward. You definitely do not have to call a professional plumber and pay their massive hourly rates for a job that only requires a basic set of household tools.
Grabbing your wrench and tackling this project on a Saturday morning saves you a solid chunk of money and instantly updates your living space. This simple home upgrade can dramatically boost your kitchen’s style, improve your daily water usage efficiency, and fix those annoying drips that keep you up at night.
I am going to walk you through every single phase of the job so you know exactly what to expect before you ever turn off the water. You will quickly find that the hardest part is simply contorting your body to fit comfortably inside the cabinet doors. By the time you finish reading, you will be fully prepared to handle the plumbing hardware, manage unexpected leaks, and secure everything like a seasoned pro.
|
Project Factor |
Detail |
|
Average Unit Cost |
$100 to $300+ depending on the brand and finish |
|
Plumber Labor Savings |
$150 to $400 saved by doing it yourself |
|
Time Required |
1 to 3 hours for a beginner to intermediate DIYer |
|
Skill Level Needed |
Beginner to Intermediate (No soldering required) |
Preparation: What You Need Before You Crawl Under the Sink?
Nothing ruins the momentum of a good DIY project quite like realizing you lack a specific wrench while water drips onto your forehead. Gathering your supplies before you shut the water off keeps the whole process smooth, organized, and stress-free. You need a completely clean workspace under the counter and a clear understanding of the individual parts involved.
Getting organized prevents frantic trips to the local hardware store halfway through the installation when you are already covered in grime. Take ten minutes to empty out your cabinets, remove the trash can, and lay your tools neatly on a dry towel. Working in a cramped, dark space is hard enough without knocking over half-empty bottles of glass cleaner and dishwasher detergent. Setting up a dedicated light source and having a bucket ready will save you from scrambling when a pipe inevitably drips.
Essential Tools for Faucet Replacement
You probably have most of the gear you need sitting in a toolbox in your garage right now. You will need an adjustable crescent wrench to loosen and tighten the supply line nuts without stripping the soft brass metal. A basin wrench is the absolute secret weapon for this project, allowing you to reach high up behind the sink bowl where standard tools simply cannot fit due to the tight clearance.
Keep a sturdy pair of channel-lock pliers handy to grip larger plastic nuts or stubbornly stuck components that refuse to turn. A flathead screwdriver helps gently pry away old caulk or plumber’s putty from the sink deck. Finally, a good LED headlamp is infinitely better than a flashlight because it keeps both of your hands entirely free while you work in the dark cabinet.
Materials and Supplies Checklist
Your new box will usually include the main unit, an optional decorative deck plate, and rubber gaskets for sealing the base to the sink. You should definitely pick up a fresh roll of white plumber tape (Teflon tape) to wrap around your threaded pipe connections, ensuring a tight seal against microscopic leaks.
Grab a small tub of plumber’s putty or a tube of clear silicone sealant only if your specific model explicitly requires it for the base plate installation. A small plastic bucket or a few shallow Tupperware containers will catch the residual trap water left in the old lines when you disconnect them. Having an old rag or roll of heavy-duty shop towels nearby is always a smart move to quickly wipe up random splashes or clean the sink surface.
|
Item Category |
Specific Tools & Materials Needed |
|
Hand Tools |
Adjustable wrench, basin wrench, channel-lock pliers, flathead screwdriver |
|
Plumbing Materials |
Plumber’s tape, plumber’s putty/silicone, new supply line extensions (optional) |
|
Workspace Gear |
LED headlamp, small catch bucket, thick towels, safety glasses |
|
Cleaning Supplies |
White vinegar, soft scrub brush, plastic scraper, microfiber cloths |
Step 1: Evaluating Your Current Setup and Choosing a New Faucet
Walking down the plumbing aisle at the hardware store can be overwhelming with hundreds of shiny options staring back at you. Before you buy anything based on looks alone, you must understand your current sink setup to ensure your new purchase actually fits the existing holes. Getting the wrong configuration means packing everything up for a return trip to the store or, worse, having to drill new holes in your expensive granite countertop.
You want to match your existing hole layout while simultaneously upgrading to a style that fits your daily cooking and cleaning habits. Take a quick photo of your sink deck and measure the distance between the holes before you go shopping. If you have low overhead cabinets, you also need to measure the vertical clearance so your new high-arc spout actually fits.
Understanding Sink Hole Configurations
Look closely at the base of your current fixture or peek underneath the counter to count the exact number of drilled holes. A single-hole setup is incredibly popular for sleek, modern kitchens and uses one central opening for both hot and cold water lines. If you have three holes spaced out (typically an 8-inch spread), you can easily use a metal deck plate to cover the outer two holes while installing a single-hole model right in the center.
A four-hole sink usually designates the far-right opening for a separate side sprayer or a liquid soap dispenser. Knowing exactly what you are working with allows you to buy the correct cover plates or utilize the extra holes for functional accessories like a filtered water tap.
Compatibility with Modern Features
Modern plumbing technology offers some fantastic, high-tech upgrades like touchless sensors, voice activation, and magnetic docking sprayers. If you decide to buy a smart or touchless unit, remember that it requires a dedicated power source beneath the counter, either from a battery pack or a standard wall outlet.
Pull-down models feature a long braided hose that retracts automatically, but you must ensure there is enough empty vertical space under your sink for the retraction weight to hang freely without snagging on pipes. Always measure your cabinet height to confirm a tall commercial-style spring spout will comfortably fit under your upper cabinets without looking cramped.
|
Feature to Check |
Why It Matters for Your Purchase |
|
Hole Count |
Determines if you need a deck plate (escutcheon) to cover empty gaps |
|
Spout Height |
Ensures the fixture clears any low-hanging upper wall cabinets |
|
Under-Sink Space |
Pull-down hoses need vertical room for the lead weight to travel smoothly |
|
Power Supply |
Touchless or smart models require an under-sink AC outlet or battery box |
Step 2: Clearing the Workspace and Shutting Off the Water
You absolutely cannot figure out how to replace a kitchen faucet while fighting your way through a crowded jungle of old dish soap bottles and trash bags. Completely empty the area under your sink to give your shoulders and arms the physical room they need to move around comfortably. Turning off the water supply is the single most critical safety step of the entire process to prevent accidentally flooding your home.
You need absolute, 100% confidence that the water flow is completely stopped before you try to loosen a single threaded pipe. Take your time to locate the valves, test them properly, and ensure no water is actively dripping from the spout upstairs. Rushing this step is how minor DIY projects turn into massive insurance claims.
Locating Shut-off Valves
Crawl underneath the counter and look straight toward the back wall for two separate metal or plastic pipes coming out of the drywall or the cabinet floor. These pipes will have small handles attached to them, usually shaped like little metal footballs or round plastic knobs, which control the local water flow.
The valve situated on the left side is almost universally the hot water supply, while the right side handles the cold water. Turn both handles to the right (clockwise) until they stop moving completely to shut off the flow. Once they are tight, go up top and turn the sink handle on to let any trapped pressure and water drain out completely.
Dealing with Stubborn or Corroded Valves
Sometimes older homes have shut-off valves that have not been touched in a decade and stubbornly refuse to turn. Never force a stuck plastic valve with heavy metal pliers, as you might snap the delicate stem inside and cause an immediate, high-pressure flood.
Try wrapping a thick dry cloth around the handle for a better, softer grip and applying slow, steady pressure to break the seal. If the valves are corroded shut and absolutely will not budge, you must walk outside to the street or down to your basement to shut off the main water valve for your entire house.
|
Shut-Off Action |
How to Execute Properly |
|
Clear the cabinet |
Remove every single item from the base cabinet to create floor space |
|
Locate the valves |
Find the two knobs on the back wall (Hot is usually left, Cold is right) |
|
Turn off the water |
Twist both valve handles firmly clockwise until they stop turning |
|
Bleed the pressure |
Open the old faucet handles fully to drain residual water in the pipes |
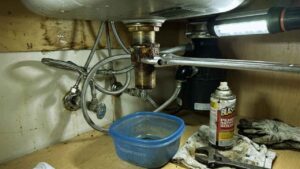
Step 3: Removing the Old Faucet Without the Headache
Getting the old, crusty unit out of the sink is notoriously the most frustrating part of the whole project due to cramped spaces and ancient hardware. Water inevitably splashes down the back of the sink over the years, causing steel mounting nuts to rust tightly onto the threaded brass shanks. Staying patient and using the right mechanical leverage will save you from losing your temper or accidentally scratching your sink bowl.
Wear safety glasses while doing this because dry dirt, rust flakes, and old putty will definitely fall directly into your eyes while you look up. Breaking the old seal takes a bit of elbow grease, but having the right tools makes a massive difference. If you take your time, the old hardware will eventually give way.
Disconnecting Supply Lines
Take your adjustable crescent wrench and carefully loosen the metal nuts connecting the flexible supply lines to the shut-off valves on the wall. Place your small plastic bucket right underneath the connection point because about a cup of water trapped inside the hose will immediately drain out when the seal breaks.
If the entire valve body tries to spin while you turn the nut, use a second wrench to hold the valve perfectly still so you do not snap the copper pipe inside the wall. Once the lines are disconnected from the wall, snake them out of the way so you have a clear path to the main mounting hardware holding the fixture to the sink deck.
Using a Basin Wrench Correctly
The basin wrench looks incredibly weird; it features a long metal shaft with a pivoting, spring-loaded jaw at the very top. Reach this tool up directly behind the deep sink bowl and snap the toothed jaws around the large mounting nut holding the old unit in place.
Flip the jaw head so that turning the long handle counter-clockwise grips the nut tightly and forces it to loosen. It might take a few frustrating tries to get the jaw seated properly in the dark, but once it bites onto the metal, the long handle provides the exact leverage you need to crack it loose.
Tips for Removing Rusted Mounting Nuts
If you are cranking aggressively on the wrench and the nut feels completely welded to the bolt, stop immediately before you strip the metal or break the tool. Spray a generous amount of liquid penetrating rust solvent onto the threads, tap it lightly with your wrench, and step away for twenty minutes.
The thin oil will actively seep into the microscopic gaps in the rust, making it significantly easier to twist off when you return. In extremely rare cases of heavy corrosion, you might actually have to carefully cut the mounting nut off with a compact oscillating multi-tool or a mini hacksaw blade.
|
Removal Task |
Best Practice / Tool to Use |
|
Catching line water |
Place a small bucket or tupperware directly under the valve connection |
|
Removing tight nuts |
Use a basin wrench to reach up behind the deep sink bowls |
|
Treating heavy rust |
Apply penetrating oil (like PB Blaster) and let sit for 15-20 minutes |
|
Detaching the deck plate |
Gently pry underneath the edges with a plastic putty knife to break the caulk |
Step 4: Cleaning and Prepping the Sink Surface
Installing a brand new, expensive fixture over a disgusting ring of old grime is a terrible idea that inevitably leads to permanent base leaks. When you finally pull the old hardware away, you will uncover years of hardened mineral deposits, stubborn hard water stains, and cracked, yellowing plumber’s putty. You have a very rare opportunity to scrub this specific, hard-to-reach area completely clean while there is nothing blocking your way.
A perfectly smooth, flawless surface is the only way the new rubber base gasket will form a reliable, watertight seal. Grab a non-scratch scouring pad, an old toothbrush, and your favorite liquid surface cleaner to get the deck shining. Taking five minutes to prep the surface guarantees your new installation looks professional.
|
Surface Prep Step |
Technique |
|
Remove old putty |
Scrape gently with a plastic putty knife (avoid metal on stainless steel) |
|
Dissolve hard water |
Soak a rag in pure white vinegar and let it sit on the mineral ring |
|
Scrub tight edges |
Use an old toothbrush with mild dish soap to lift the remaining grime |
|
Dry the area |
Wipe the deck with a microfiber cloth until absolutely bone dry |
Properly Scraping the Deck
Always use a plastic scraper rather than a sharp metal one to avoid permanently scratching a stainless steel, porcelain, or composite sink surface. Push firmly against the deck to lift away the hardened, crusty chunks of old plumber’s putty or silicone caulk left behind by the previous installer.
Spray a mixture of warm water and white vinegar heavily over the remaining hard water rings to break down the stubborn calcium deposits. Wipe the entire area completely dry with a paper towel so absolutely no moisture remains before you start the new installation process.
Step 5: Installing Your New Faucet
This is the highly anticipated turning point where your kitchen actually starts looking brand new again. Most modern manufacturers now design their products with top-mount technology, making the installation process far easier and much faster than older traditional models. You simply drop the braided lines down through the hole, line up the base, and secure everything from below using a specialized bracket.
Always follow the specific paper instructions included in your box, as every major brand has slight, proprietary variations in their mounting hardware. Work slowly, ensure the fixture is facing the right direction, and avoid using heavy wrenches until you are totally satisfied with the placement.
Positioning the Gasket and Feeding the Lines
Slide the provided rubber or plastic base gasket over the braided hoses and push it firmly up against the bottom of the new faucet base. Group the hot water line, cold water line, and the thick pull-down hose tightly together in your hand.
Carefully feed this entire bundle straight down through the center hole of your sink or the installed deck plate. Make sure the unit is sitting flat against the counter and the handle is facing exactly where you want it before you crawl back underneath the sink.
Securing the Faucet Under the Sink
Slide the metal mounting washer and the brass or plastic retaining nut up the dangling bundle of hoses. Thread the large nut onto the main threaded shank sticking down through the sink hole and hand-tighten it as much as your fingers possibly can.
Climb out from under the cabinet and physically check the alignment up top to ensure the spout is perfectly straight and centered. Crawl back under one last time and give the retaining nut a final, firm tightening with your basin wrench, but strictly avoid over-tightening which can crack a delicate porcelain sink.
Connecting the Water Supply Lines
Match the new braided hot water line with the red tag to the left shut-off valve, and match the cold line with the blue tag to the right valve. Hand-thread the metal nuts directly onto the threaded valve stems to ensure they go on perfectly straight and do not cross-thread or bind.
Wrap the wall valve threads tightly with a single layer of plumber’s tape clockwise if your new lines do not have built-in rubber cone washers. Use two wrenches to tighten the final connections snugly, taking special care to make sure the flexible hoses do not severely kink or twist as you tighten the nut.
|
Installation Phase |
Key Action for Success |
|
Gasket Placement |
Ensure the rubber o-ring or plastic base sits entirely flat on the sink deck |
|
Feeding the Hoses |
Drop all lines straight down the center hole without tangling them |
|
Positioning |
Double-check that the handle faces your preferred direction before tightening |
|
Valve Connection |
Connect hot to left, cold to right; use two wrenches to prevent pipe twisting |
Step 6: Attaching the Weight and Final Connections
If you purchased a modern pull-down or pull-out spray model, you have one extra critical step before you can turn the water back on. The removable sprayer head connects to a long nylon or braided metal hose that loops deep under the sink and connects back into the main water pipe block.
This retraction system relies entirely on a heavy lead weight to pull the sprayer head smoothly back into its docking station. Getting this heavy weight positioned perfectly ensures your sprayer retracts effortlessly every single time you do the dishes. If you place it too high or too low, the hose will snag on your plumbing or fail to pull the head all the way up.
|
Sprayer Setup Task |
Detailed Instruction |
|
Connect the main hose |
Push the quick-connect fitting up into the receiving pipe until it clicks loudly |
|
Find the indicator mark |
Look for the white tape line or sticker on the lowest point of the spray hose |
|
Attach the lead weight |
Clamp the two halves of the heavy weight securely directly over the tape mark |
|
Test the movement |
Pull the sprayer out from above the sink and verify it retracts smoothly |
Installing the Quick Connect and Weight
Take the loose end of the pull-down hose hanging under the sink and snap it directly into the receiving pipe located on the bottom of the faucet body; most modern units use a simple, secure click-in clip that requires no tools. Find the physical indicator mark—usually a piece of white tape or a painted line—on the lowest loop of the hanging hose.
Clamp the heavy metal weight directly onto this exact mark using the provided screws or the plastic snap-lock mechanism. Pull the sprayer out a few feet from above the sink and let it go, watching carefully below to ensure the moving weight does not violently hit the shut-off valves, drain pipes, or back wall as it travels up and down.
Step 7: Testing for Leaks and Flushing the System
You are technically almost done, but you absolutely cannot skip the crucial testing phase. Turning the water valves on full blast right away can force trapped dirt, pipe scale, and manufacturing debris straight up into your delicate, microscopic aerator screen.
You need to purge the entire system gently to keep your water pressure high and your water clean. Taking five minutes to hunt for tiny leaks right now is infinitely better than finding a ruined, moldy, water-logged cabinet floor three months from now. Proceed slowly with the water flow and inspect every single connection point with bright light.
Flushing the Debris
Carefully unscrew the small round aerator assembly from the very tip of your new spout and set it safely aside on the counter. Slowly turn the cold water valve counter-clockwise under the sink to open it, then slowly turn on the hot water valve.
Turn the main sink handle on and let the mixed water run freely into the drain for at least two full minutes to push out any hidden air bubbles and loose pipe scale. Once the water runs perfectly clear, turn the sink handle off, screw the aerator firmly back onto the spout tip, and test your normal water pressure.
The Tissue Paper Leak Test
While the water is running at full blast, take a piece of totally dry toilet paper or facial tissue and crawl back under the sink with your headlamp on. Gently dab the dry tissue entirely around the shut-off valve connections, the hose joints, and the main mounting shank directly under the sink deck.
Tissue paper absorbs moisture instantly and turns dark, making it the absolute perfect diagnostic tool for spotting microscopic, slow-forming leaks that your eyes might miss. If the paper comes away even slightly wet, simply tighten that specific, offending nut one more quarter-turn with your wrench and test the area again until bone dry.
|
Testing Process |
What to Look For |
|
Remove the aerator |
Unscrew the tip to prevent debris from clogging the fine mesh screen |
|
Open valves slowly |
Turn the under-sink knobs counter-clockwise gently to avoid pressure spikes |
|
Flush the lines |
Run both hot and cold water for two full minutes to clear out factory dust |
|
Check for drips |
Dab all under-sink connections with dry tissue paper to expose hidden leaks |
Common Challenges and Pro Troubleshooting Tips
Even the most carefully planned, thoroughly researched DIY projects inevitably run into a few small hiccups along the way. Understanding exactly how to solve minor plumbing quirks prevents blind panic and saves you from making a frustrating, expensive call to a local handyman.
The most frequent issues usually involve hose lengths coming up short or minor, stubborn drips forming at the metal connection points. You can easily handle all of these common problems yourself with a few cheap hardware store fixes and a little patience. Knowing how to troubleshoot on the fly is what separates a successful DIYer from someone who gives up halfway.
|
Common Problem |
Typical Cause |
Easy DIY Fix |
|
Hoses are too short |
Deep sink bowls or extremely low wall valves |
Buy threaded braided supply line extensions |
|
Weak water pressure |
Debris clogged in the tiny aerator screen |
Remove aerator, rinse out debris, re-install |
|
Base of unit wiggles |
Under-sink mounting nut is simply too loose |
Re-tighten the under-sink bracket securely |
|
Drip at the wall valve |
Damaged or crushed internal rubber washer |
Replace the supply line washer or add tape |
What to Do if the Supply Lines are Too Short?
Sometimes you buy a beautiful, expensive unit only to realize the permanently attached factory hoses magically stop six inches above your wall valves. Never, ever try to aggressively stretch the braided lines to make them fit, as this puts extreme mechanical stress on the crimped joints and will eventually cause a massive, flooding blowout.
Drive straight to the hardware store plumbing aisle and buy two short “supply line extensions” to bridge the gap. These simple hoses directly thread onto your existing lines to give you that extra reach safely and securely without tension.
Fixing Minor Leaks at the Connections
If a threaded connection continues to weep water after you tighten it firmly, stop cranking the wrench immediately. Over-tightening can completely crush the small, delicate rubber o-ring located inside the nut, completely ruining the watertight seal.
Disconnect the leaking line entirely, look inside the metal nut with a flashlight, and verify the rubber washer is still perfectly flat and intact. Apply a fresh layer of plumber’s tape tightly to the valve threads and reconnect the hose with moderate, even pressure instead of brute force.
Maintenance Tips to Make Your Faucet Last a Decade
A high-quality, name-brand fixture should easily give you ten to fifteen years of reliable daily service if you treat it correctly from day one. Hard municipal water is the absolute biggest enemy of modern plumbing hardware, causing stiff handles, squeaky joints, and crusty white buildup around the silicone spray nozzles.
A tiny bit of simple preventative care keeps the exterior finish perfectly shiny and the internal ceramic disc cartridges moving as smoothly as butter. Skip the harsh, abrasive bleach sprays and stick to gentle, consistent cleaning habits to protect your investment. Your hardware will look factory-new for years if you follow these basic rules.
|
Maintenance Task |
Recommended Frequency |
Primary Benefit |
|
Wipe with microfiber |
Daily after cooking/cleaning |
Prevents hard water spots from permanently baking on |
|
Clean the aerator |
Every 6 months |
Restores normal, powerful water pressure |
|
Rub silicone nozzles |
Monthly |
Clears calcium blockages from the spray holes |
|
Inspect cabinet floor |
Every 3 months |
Catches extremely slow leaks before wood mold grows |
Caring for the Finish and Mechanics
Keep a soft, dry microfiber cloth draped casually over your sink divider and quickly wipe the metal spout completely dry after doing the evening dishes. If you notice the main water stream mysteriously splitting into multiple directions or suddenly losing power, unscrew the aerator and drop it in a small glass of white vinegar overnight to chemically dissolve the hidden calcium.
Do not ever use abrasive green scrubbing sponges or harsh chemical powders on brushed nickel, matte black, or oil-rubbed bronze finishes, as they will permanently scratch and ruin the protective clear coat. Finally, look under the sink with a flashlight every few months just to ensure the lines remain completely dry.
Final Thoughts
Tackling this specific plumbing project proves that basic home maintenance is entirely manageable for the average homeowner willing to learn. Once you actually learn how to replace a kitchen faucet, you gain the genuine confidence to handle bathroom sinks, showerheads, and various other minor household upgrades without fear.
You have successfully navigated incredibly tight spaces, dealt with stubbornly rusted old parts, and properly installed a modern fixture that you will literally touch dozens of times a single day. Keep your basin wrench stored safely in your toolbox, because your neighbors and friends will definitely want to borrow it once they see your perfectly upgraded kitchen. Stand back, turn on the water, and enjoy the leak-free results of your hard work.
Frequently Asked Questions (FAQs) About Replace Kitchen Faucet
What size basin wrench do I actually need?
A standard residential basin wrench with a 10-inch to 12-inch handle and adjustable, spring-loaded jaws that open up to 1.25 inches will fit almost every standard residential sink nut. If you have extremely deep sink bowls, telescoping versions that extend up to 17 inches are incredibly helpful for reaching high up into the narrow gap.
Will changing my fixture negatively affect my garbage disposal?
No, the pressurized water supply lines and the gravity-fed drain plumbing are completely separate, independent systems under your sink. However, you will likely physically bump into the disposal unit multiple times while working under the cramped sink, so ensure it is completely unplugged from the wall outlet while you are working in that tight space for your own safety.
Do I absolutely need to turn off my main hot water heater?
You do not need to turn off the actual hot water heater tank in your garage or basement as long as the specific hot water shut-off valve located underneath the sink is functioning properly. If the under-sink valve is broken or refuses to shut off the flow, then you must shut off the main water supply to the entire house, but the heater itself can usually stay running.
Why does my tall new spout feel wobbly or loose when I swivel it side to side?
Many modern high-arc and commercial-style models have a tiny, hidden set screw located at the very back of the base that physically locks the swiveling spout neck into the main stationary body. Check your included instruction manual closely and use a small Allen wrench to tighten this specific hidden screw until the spout rotates with smooth resistance.
Can I just use WD-40 on stuck plumbing threads instead of buying special oil?
Standard blue-can WD-40 is primarily a water displacer and light lubricant, not a dedicated, heavy-duty rust penetrant. While it can certainly help in a pinch, a true penetrating oil specifically designed for rusted metal—like PB Blaster or Liquid Wrench—works much faster and penetrates far deeper on severely rusted, corroded under-sink bolts.


