
Walking into a room with harsh, outdated lighting immediately brings down the mood of the entire space. Builders often install generic, low-cost fixtures that do the bare minimum to illuminate a room, leaving it feeling sterile or cramped. Upgrading to a fixture that matches your personal taste adds undeniable character and instantly boosts the visual value of your property.
Furthermore, newer fixtures are usually built to optimize the output of modern LED bulbs. This means you get a much brighter room while actually saving money on your monthly energy bills. A savvy homeowner knows that lighting changes the perceived size and warmth of a room without requiring a massive renovation budget. You do not have to spend thousands on a full remodel when a simple modern pendant or chandelier does the trick. You just need to learn how to replace a light fixture safely to unlock that potential and transform your living space.
|
Lighting Upgrade Benefit |
Impact on Home Environment |
Long-Term Value |
|
Visual Appeal |
Instantly modernizes outdated rooms |
High aesthetic and resale value |
|
Energy Efficiency |
Maximizes LED bulb performance |
Lowers monthly power bills |
|
Space Perception |
Makes cramped spaces feel larger |
Improves overall home layout |
|
Ambiance Control |
Creates a warmer, welcoming feel |
Enhances daily comfort |
What to Expect from This Guide?
Taking on an electrical project feels intimidating if you have never done it before, but standard home wiring is actually very logical. We are going to break down this entire project into simple, manageable steps that anyone can follow. You do not need a deep understanding of electrical theory to do this safely in your own home. You just need to know how to cut the power, match the right colors together, and secure the hardware firmly to the ceiling.
We will look at the common pitfalls that frustrate first-timers and explain exactly how to avoid them so you do not get stuck halfway through. I have found that preparing your tools and understanding the safety rules ahead of time eliminates almost all the stress. By the end of this tutorial, you will have the confidence to tackle basic lighting upgrades in any room.
|
Guide Expectation |
What You Will Learn |
Why It Matters |
|
Safety First |
How to test and verify power is off |
Prevents electrical shock |
|
Tool Prep |
Gathering the exact items needed |
Stops mid-project store runs |
|
Wiring Basics |
Matching standard colored wires |
Ensures the light actually turns on |
|
Troubleshooting |
Fixing common post-install issues |
Saves money on emergency calls |
Understanding When It Is Safe to DIY and When to Call a Pro
The Scope of a Basic Fixture Swap
A safe DIY project involves a simple like-for-like swap where the existing infrastructure remains mostly untouched. This means you are taking down one fixture and putting another one up in the exact same spot using the wires that are already present. If your home was built or rewired in the last few decades, the wires are likely color-coded correctly and wrapped in modern plastic insulation.
They will also have a dedicated ground wire, which is the most critical safety feature of modern electrical systems. Under these standard conditions, doing the job yourself makes perfect sense and carries very little risk. You are simply untwisting a few caps and retwisting them onto the new product. Knowing your limits is the smartest way to replace a light fixture safely and keep your home secure.
|
Project Scope |
Definition |
DIY Suitability |
|
Direct Swap |
Replacing a fixture using existing wires |
High |
|
Box Upgrade |
Changing a standard box to a heavy brace |
Medium |
|
Running New Wire |
Pulling fresh cables from the panel |
Low (Call a Pro) |
|
Moving Locations |
Cutting new holes across the ceiling |
Low (Call a Pro) |
Red Flags That Require a Licensed Electrician
Sometimes you open up a ceiling box and find a confusing, dangerous mess left behind by a previous homeowner. If your home was built in the late 1960s or 1970s, it might have aluminum wiring instead of copper, which requires special handling. Aluminum wiring is silver in color, expands differently than copper, and easily causes house fires if not connected with specialized hardware.
You might also pull down an old fixture and realize there is no metal or plastic junction box holding the wires at all. Frayed, crumbling cloth insulation on the wires is another massive warning sign that the wiring is too brittle to handle. If you run into any of these severe issues, stop what you are doing, cap the wires, and call a professional immediately.
|
Red Flag Issue |
Visual Indicator |
Required Action |
|
Aluminum Wiring |
Silver-colored metal instead of copper |
Hire an electrician for special connectors |
|
Missing Junction Box |
Wires poking directly through drywall |
Install an approved ceiling box |
|
Brittle Insulation |
Cloth covering crumbles when touched |
Stop work and request a rewire |
|
Overcrowded Box |
Too many wires crammed into one space |
Have a pro upgrade the box size |
Essential Tools and Materials You Will Need
Must-Have Safety Gear
Your absolute most important tool is a non-contact voltage tester, which you can find at any local hardware store. This handy device looks like a thick pen and beeps or flashes a bright light when placed near a live electrical wire. It detects the magnetic field generated by alternating current, meaning you do not even have to touch bare metal to know if a wire is hot.
You also need a pair of basic safety glasses to protect your eyes from falling dust, paint chips, and drywall debris. A sturdy, balanced step ladder is absolutely essential so you are not straining your neck or standing on wobbly chairs. Trying to balance heavy objects while reaching too high is a fast track to dropping your brand new light.
|
Safety Item |
Primary Function |
Where to Find It |
|
Voltage Tester |
Detects live electrical currents |
Hardware store electrical aisle |
|
Safety Glasses |
Blocks falling ceiling debris |
Home improvement centers |
|
Step Ladder |
Provides a stable, safe reaching height |
Hardware or home goods stores |
|
Work Gloves |
Protects hands from sharp metal edges |
Any local home store |
Basic Hand Tools for the Job
You need a standard Phillips-head screwdriver and a flathead screwdriver to handle the various screws on the mounting brackets. A quality pair of wire strippers is crucial for cutting wires to the correct length without damaging the copper underneath.
If you use a knife instead of proper strippers, you will likely nick the wire, creating a weak spot that snaps easily when bent. Needle-nose pliers are incredibly helpful for bending stiff wires into shape and holding small nuts in tight spaces. Keep a trash bag nearby to throw away the old wire clippings and stripped plastic so you do not step on them later.
|
Hand Tool |
Specific Use Case |
Importance |
|
Phillips Screwdriver |
Removing canopy and bracket screws |
Essential |
|
Flathead Screwdriver |
Prying off stubborn fixture covers |
Essential |
|
Wire Strippers |
Removing plastic casing from wire ends |
Crucial for safety |
|
Needle-Nose Pliers |
Bending and gripping small components |
Highly Recommended |
Hardware and Connectors
Your new fixture likely comes with a mounting bracket, a few machine screws, and a handful of wire nuts. Wire nuts are the small, cone-shaped plastic caps used to twist the bare wire ends together securely. Often, the wire nuts included in the box by the manufacturer are cheap and slip off the wires easily.
It is always a smart idea to buy a small pack of high-quality wire nuts from the hardware store to ensure a tight grip. A secure connection is the backbone of any safe electrical project, preventing stray sparks from escaping the junction box.
|
Hardware Component |
Function |
Quality Check |
|
Mounting Bracket |
Secures the new fixture to the ceiling box |
Must fit the box perfectly |
|
Wire Nuts |
Caps and twists wire connections together |
Buy premium ones if included are cheap |
|
Machine Screws |
Attaches the bracket to the junction box |
Ensure threads match the box holes |
|
Decorative Cap Nuts |
Holds the fixture flush to the ceiling |
Must hand-tighten easily |
Step 1: Turning Off the Power
Locating Your Breaker Box
Working with live electricity causes severe injury, so you must guarantee the power is completely disconnected before removing a single screw. Go to your main electrical panel, which is usually located in the basement, the garage, or a utility room.
Open the heavy metal door and look for the circuit breaker switch that corresponds to the room where you are working. Flip that specific breaker hard to the off position, ensuring it clicks solidly into place. If your panel lacks clear labels, turn on the old light fixture, stand in the hallway, and flip breakers one by one until the light shuts off.
|
Breaker Step |
Action Required |
Result |
|
Locate Panel |
Find main electrical box |
Access to home power controls |
|
Identify Circuit |
Read labels or test switches |
Isolates the correct room |
|
Flip Switch |
Push breaker firmly to OFF |
Cuts primary current to the light |
|
Verify |
Check if the bulb went dark |
Initial confirmation of power loss |
Why Turning Off the Wall Switch Is Not Enough?
A remarkably common and dangerous mistake is assuming that simply turning off the wall switch makes the ceiling wires completely safe. In many home wiring configurations, the raw power comes directly into the ceiling box first, and the wall switch merely interrupts the flow to the actual bulb.
This specific setup means there are still live, hot wires packed tightly inside the ceiling box even when the wall switch is pushed down. You could accidentally bump one of these hot wires with your screwdriver while removing the old bracket and receive a massive shock. Always take the extra three minutes to walk down to the basement and cut the power at the main breaker panel.
|
Power Control Method |
Does It Stop Power at Bulb? |
Are Ceiling Wires Safe to Touch? |
|
Wall Switch OFF |
Yes |
No, hot wires may still be live |
|
Main Breaker OFF |
Yes |
Yes, entire circuit is dead |
|
Main Breaker ON |
No |
Absolutely Not |
Using a Non-Contact Voltage Tester
Once the main breaker is off, bring your ladder into the room, approach the old fixture, and remove the outer decorative cover. Take out your non-contact voltage tester, turn it on, and touch its plastic tip to every single wire you can see inside the box.
Probe around the wire nuts, the black wires, and the white wires just to be absolutely certain. If the tester stays quiet and unlit, the power is truly off and you are clear to proceed. Safety first, always test before you touch.
|
Testing Step |
Action |
What to Look For |
|
Turn on Tester |
Press power button |
Wait for the initial ready light/beep |
|
Probe Wires |
Touch tip to wire insulation |
Ensure tester touches all wire sides |
|
Read Results |
Watch for red light or loud beep |
Silence and no light means safe |
|
Double Check |
Test against a known live outlet |
Confirms the tester battery is working |
Step 2: Removing the Old Light Fixture
Detaching Fragile Components First
Start the removal process by taking out the light bulbs and setting them safely on a table away from your ladder. Next, carefully unscrew any glass shades, crystal drops, or plastic covers that hang from the main body of the light. You want to strip the old fixture down to its bare metal frame so it is as light and manageable as possible.
Trying to unmount a heavy fixture with the glass still attached usually results in dropped pieces and shattered glass all over your floor. Getting the fragile items out of the way gives you a clear line of sight to the screws holding the base to the ceiling.
|
Component to Remove |
Handling Method |
Storage Tip |
|
Light Bulbs |
Wait to cool, unscrew gently |
Place in a padded box or soft towel |
|
Glass Shades |
Loosen holding screws slowly |
Keep away from foot traffic areas |
|
Decorative Crystals |
Unhook from metal loops |
Store in a bowl so they do not roll |
|
Plastic Covers |
Pry off gently with flathead |
Wipe down before storing or tossing |
Unscrewing the Canopy and Mounting Bracket
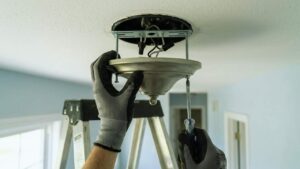
The canopy is the wide decorative metal plate that sits flush against the ceiling, hiding the ugly wiring and the electrical junction box. There are usually two long screws holding it in place, either going straight up into the mounting bracket or sitting on the sides.
Unscrew these slowly while keeping one firm hand pressed against the bottom of the fixture so it does not suddenly drop. If it falls unexpectedly, the sheer weight will rip the connected wires right out of the ceiling, potentially damaging the house wiring. Let the fixture hang gently from its own wires once the screws are completely out.
|
Canopy Removal Action |
Tool Needed |
Safety Precaution |
|
Locate Screws |
Visual inspection |
Ensure ladder is positioned correctly |
|
Loosen Screws |
Phillips screwdriver |
Keep one hand supporting the base |
|
Lower Canopy |
Hands |
Pull down slowly to reveal wires |
|
Inspect Bracket |
Visual inspection |
Check for hidden rust or loose bolts |
Disconnecting the Old Wires Carefully
With the fixture suspended slightly, you will see a cluster of wires twisted together tightly under plastic wire nuts. Untwist these wire nuts counterclockwise and pull the old fixture wires away from the solid house wires.
Do this gently and patiently, as you never want to pull hard and accidentally damage the house wires inside the ceiling box. Once the hot, neutral, and ground wires are separated, you can step down from the ladder and set the old fixture aside completely. Now you have a clean slate to begin the installation of your modern lighting upgrade.
|
Disconnection Step |
Technique |
Goal |
|
Untwist Wire Nuts |
Turn counterclockwise |
Free the internal wire connections |
|
Separate Wires |
Pull apart gently |
Detach fixture from house current |
|
Free Ground Wire |
Unscrew from green screw if needed |
Fully release the old hardware |
|
Remove Fixture |
Step down ladder carefully |
Clear the work area for the new item |
Step 3: Inspecting the Electrical Box and Wires
Checking the Junction Box Weight Rating
Before installing your new piece, you have to verify that the existing ceiling box can actually handle the physical weight. Standard plastic or metal junction boxes nailed to a joist are typically rated to hold a maximum of 50 pounds of hanging weight. If you are replacing a lightweight dome with a massive, heavy chandelier, the current box will eventually crack and drop the light on the floor.
Ceiling fans and heavy chandeliers require special heavy-duty brace boxes that expand and bite directly into the wooden ceiling joists. Give the current box a firm wiggle, and if it feels loose at all, you need to replace it before moving forward.
|
Fixture Type |
Estimated Weight |
Box Requirement |
|
Flush Mount Dome |
2 to 5 lbs |
Standard junction box |
|
Small Pendant |
5 to 15 lbs |
Standard junction box |
|
Standard Chandelier |
20 to 45 lbs |
Standard box (check securement) |
|
Heavy Chandelier/Fan |
50+ lbs |
Heavy-duty steel brace box required |
Evaluating the Condition of the Existing Wires
Look closely at the house wires currently dropping out of the ceiling box and inspect the colored plastic insulation. The plastic should look clean, pliable, and intact right up to the exposed copper tips where the old connection was made.
If the exposed copper tips look charred black, heavily corroded, or mangled from the previous installer twisting them too hard, use your cutters. Snip off the damaged ends completely so you can start fresh with clean, highly conductive copper. Clean wires ensure the electricity flows smoothly without generating excess heat inside the wire nut.
|
Wire Condition |
Visual Check |
Required Action |
|
Healthy Wire |
Bright copper, pliable plastic |
Proceed with installation |
|
Mangled Copper |
Bent, twisted, or broken tips |
Snip off the damaged tip |
|
Charred Ends |
Black marks or melted plastic |
Cut back past the damage |
|
Corroded Ends |
Greenish buildup on copper |
Clean or cut to fresh metal |
Preparing the Wire Ends
To make a rock-solid electrical connection, you need exactly half an inch of clean, bare copper exposed at the end of each wire. If you had to snip off damaged ends in the previous step, use your wire strippers to remove fresh insulation. Be very careful to use the correct gauge hole on the stripper tool so you cleanly slice the plastic without nicking the copper underneath.
Nicks and deep scratches create severe weak points where the copper wire will easily snap when you twist the nut on later. Take your time here, because perfectly stripped wires make the actual connection process incredibly easy.
|
Prep Action |
Tool Required |
Perfect Outcome |
|
Measure Strip Length |
Visual estimate |
About 0.5 inches of exposed wire |
|
Select Gauge Hole |
Wire strippers |
Matches the wire thickness exactly |
|
Strip Plastic |
Wire strippers |
Clean cut with zero copper damage |
|
Check Copper |
Visual inspection |
Straight, bright, and un-nicked metal |
Step 4: Prepping the New Light Fixture
Assembling the Fixture Parts
Getting your new fixture ready down on the ground or a workbench is much easier than trying to thread tiny parts while on a ladder. Read through the manufacturer instructions entirely before you start taking things out of the protective plastic bags. Some fixtures require you to thread the main wires up through long metal downrods, attach side arms, or screw in structural central components.
Do as much of this preliminary assembly as possible on a flat surface to avoid dropping tiny set screws into your carpet. Leave the fragile glass shades in the box for now, as you do not want to shatter them while maneuvering the fixture toward the ceiling.
|
Assembly Phase |
Location |
Best Practice |
|
Reading Instructions |
Clean workspace |
Identify all parts before starting |
|
Threading Downrods |
Flat table |
Pull wires through slowly to avoid snags |
|
Attaching Arms |
Workbench |
Tighten all joints securely |
|
Glass Prep |
Leave in box |
Wait until final step to install |
Attaching the New Mounting Bracket
Almost every modern fixture comes with a brand new metal mounting bracket designed specifically for its canopy shape. This bracket attaches directly to the ceiling electrical box and provides a threaded base for the fixture to mount onto securely. Take the old, rusty bracket off the ceiling box using your Phillips screwdriver and discard it.
Screw the new, shiny bracket into the threaded tabs on the box, making sure the screws are completely tight and the bracket is sitting flush. If the bracket is wobbly, your final light fixture will hang crooked and look terrible.
|
Bracket Step |
Action |
Importance |
|
Remove Old Bracket |
Unscrew and discard |
Prevents compatibility issues |
|
Align New Bracket |
Match holes to junction box |
Ensures the fixture centers properly |
|
Secure Screws |
Tighten with screwdriver |
Prevents a wobbly, unsafe mount |
|
Check Flushness |
Press against drywall |
Ensures a seamless final look |
Sizing and Cutting the Fixture Wires
If your new fixture is a dining room chandelier hanging on a metal chain, it will have several feet of wire attached out of the box. Hold the fixture up, decide exactly how low you want it to hang over your table, and cut the metal chain to that precise length.
Weave the electrical wire up through every other link in the chain so it looks neat and stays tucked away. Leave about eight to ten inches of wire sticking out past the top link, and use your cutters to snip off all the excess cord. Finally, use your wire strippers to expose half an inch of bare copper on these fresh ends.
|
Wire Sizing Step |
Technique |
Benefit |
|
Determine Height |
Measure from floor or table |
Achieves perfect room aesthetics |
|
Cut Chain |
Use heavy pliers or bolt cutters |
Removes unnecessary hanging length |
|
Weave Wire |
Thread through alternating links |
Hides the wire naturally |
|
Trim Excess Wire |
Cut 10 inches past the top |
Prevents overcrowding the ceiling box |
Step 5: Connecting the Wires Safely
Understanding Standard Wire Colors
Wiring is the specific step that makes most people nervous, but standard home wiring relies on a very simple color-matching system. In modern North American homes, the black wire is known as the hot wire, carrying the aggressive electrical current from the breaker panel to the light.
The white wire is the neutral wire, providing a smooth return path for the unused current back to the main panel. The green wire, or sometimes a bare, uninsulated copper wire, serves as the critical ground wire for the whole system. Knowing these basic colors is the ultimate key to understanding how to replace a light fixture safely without causing a short circuit.
|
Wire Color |
Electrical Function |
Typical Connection Point |
|
Black |
Hot (Carries main current) |
Connects to fixture black wire |
|
White |
Neutral (Returns unused current) |
Connects to fixture white wire |
|
Green |
Ground (Safety escape path) |
Connects to fixture green wire |
|
Bare Copper |
Ground (Safety escape path) |
Connects to green screw or green wire |
Making Secure Connections with Wire Nuts
You will need a helper or a temporary wire hook to support the physical weight of the fixture while your hands make the connections. Start by taking the bare copper or green wire from the ceiling and twisting it together with the ground wire from the new fixture.
Next, hold the bare end of the white house wire and the white fixture wire directly parallel to each other. Place a wire nut over both exposed ends and twist it hard clockwise until it bites into the copper and tightens securely. Finally, repeat that exact same process to connect the black house wire to the black fixture wire, ensuring no bare copper is visible beneath the plastic caps.
|
Connection Order |
Wires to Join |
Nut Twisting Action |
|
First |
Ground to Ground |
Clockwise until tight |
|
Second |
White to White (Neutral) |
Clockwise until tight |
|
Third |
Black to Black (Hot) |
Clockwise until tight |
|
Final Check |
Pull lightly on all wires |
Verifies secure physical grip |
Grounding the Fixture Properly
I cannot stress enough that you must never skip the grounding step during an installation. If a hot black wire accidentally slips out of its nut and touches the metal canopy of your fixture, the ground wire instantly channels that rogue current safely away.
This rapid diversion of power causes your breaker panel to trip immediately, shutting down the danger. Without a proper ground connection, that metal fixture becomes electrified, and touching it while changing a bulb results in a severe, potentially fatal shock. Always secure that green or bare copper wire to keep your household completely safe.
|
Grounding Scenario |
With Ground Wire |
Without Ground Wire |
|
Normal Operation |
Safe, current flows properly |
Safe, but lacks backup protection |
|
Hot Wire Touches Metal |
Breaker trips immediately |
Metal fixture becomes electrified |
|
Touching the Fixture |
Safe, power is dead |
High risk of severe shock |
|
Power Surge |
Safely diverted to earth |
Potential fixture burnout |
Step 6: Mounting the New Fixture
Tucking the Wires into the Box
The thick wires and bulky wire nuts take up a surprising amount of vertical space inside that small ceiling hole. You need to push them up into the plastic or metal ceiling box very carefully to avoid loosening your fresh connections.
Do not just blindly jam them in with your fist; fold them neatly in a zig-zag pattern like an accordion. A professional practice is to push the black wires to the left side of the box and the white wires to the right side. This separation keeps everything hyper-organized and physically prevents the wire nuts from rubbing against each other unnecessarily over time.
|
Tucking Strategy |
Action |
Purpose |
|
Folding |
Bend wires in an accordion shape |
Saves space inside the box |
|
Separation |
Keep hot and neutral sides apart |
Minimizes short circuit risks |
|
Gentle Pressure |
Push upwards slowly |
Avoids breaking the wire nuts loose |
|
Visual Check |
Ensure no wires pinch the edge |
Prepares area for canopy flushness |
Securing the Canopy to the Bracket
Lift the entire fixture canopy upward so it completely covers the electrical box, the mounting bracket, and all the messy wires. Depending on the manufacturer design, you will usually align small holes in the canopy with threaded posts dropping downward from the bracket.
Push the canopy flat against the drywall and twist the decorative cap nuts onto those threaded posts until they grab. Tighten this hardware firmly until the canopy sits completely flush against the ceiling, with no ugly dark gaps showing around the rim.
|
Mounting Step |
Method |
Desired Result |
|
Lift Canopy |
Push flat against drywall |
Hides all internal components |
|
Align Holes |
Guide over threaded posts |
Centers the fixture properly |
|
Thread Nuts |
Twist decorative caps clockwise |
Secures the weight of the light |
|
Final Tighten |
Hand-tighten until snug |
Eliminates wobbly hanging issues |
Adding Bulbs and Final Decorative Pieces
Now that the heavy lifting is done and the fixture is firmly secured to the house, you can breathe a sigh of relief. This is the fun part where you finally get to add the delicate parts that make the light look beautiful. Screw in the recommended light bulbs, checking the socket sticker to ensure you do not exceed the maximum allowed wattage rating.
Attach the glass shades, crystal drops, or fabric covers according to the included instructions. Wiping the glass down with a microfiber cloth right now removes your fingerprints and leaves the fixture sparkling clean for the grand reveal.
|
Finishing Touch |
Action |
Benefit |
|
Install Bulbs |
Screw into sockets |
Prepares light for final testing |
|
Attach Glass |
Secure shades with thumb screws |
Completes the aesthetic look |
|
Add Crystals |
Hang decorative drops carefully |
Finalizes chandelier design |
|
Wipe Down |
Clean metal and glass surfaces |
Removes oily fingerprints |
Step 7: Testing Your Work
Restoring Power at the Breaker
Clean up your step ladder, throw away the wire clippings, and step back away from the newly installed fixture. Walk back down to your basement or garage and locate your main electrical panel again. Grab the breaker switch you flipped off an hour ago and push it firmly back into the on position.
You should hear a solid, satisfying click as the current is restored to that specific room. If the breaker instantly makes a loud pop and snaps aggressively back to the off position, do not try to force it back on.
|
Breaker Status |
Visual/Audio Cue |
Next Step |
|
Switch Stays ON |
Solid click, stays in place |
Proceed to test wall switch |
|
Switch Snaps OFF |
Loud pop, handle moves back |
Stop and check for a short circuit |
|
Switch Feels Spongy |
Handle won’t click |
Push to full OFF, then full ON |
|
Smell of Smoke |
Acrid burning smell |
Leave OFF and call professional |
Flipping the Switch and Checking for Issues
If the breaker stays securely in the on position, walk back upstairs to the room and flip the actual wall switch. Your new fixture should illuminate instantly, flooding the room with bright, beautiful light. Leave the light turned on for about five to ten minutes while you observe it closely.
Check to see if there is any rapid flickering, listen closely for strange buzzing noises, and sniff the air for the smell of burning plastic. If everything operates silently and smoothly, you have successfully completed the job and learned how to replace a light fixture safely.
|
Testing Observation |
Normal Result |
Warning Sign |
|
Illumination |
Turns on instantly |
Delayed start or complete darkness |
|
Sound |
Completely silent |
Loud buzzing or crackling noise |
|
Light Quality |
Steady and bright |
Rapid flickering or strobing |
|
Scent |
Clean room air |
Sharp smell of melting plastic |
Troubleshooting Common Issues After Installation
The Light Does Not Turn On
If you confidently flip the switch and absolutely nothing happens, do not panic and assume you ruined the wiring. The most common culprit is simply a dead bulb straight out of the box, or a bulb that is not screwed down tightly enough to hit the metal contact.
If you test the bulbs in another lamp and they work fine, a wire nut likely vibrated loose while you were shoving the wires into the ceiling box. You will need to walk down, turn off the breaker again, lower the canopy, and double-check that all three connections are tightly bound. Ensure the stripped bare wire ends are actually making solid metal-to-metal contact inside those plastic caps.
|
Problem |
Probable Cause |
Easy Fix |
|
No Light |
Bulb isn’t screwed in far enough |
Tighten bulb firmly into socket |
|
No Light |
Bulb is defective |
Test bulb in a known working lamp |
|
No Light |
Wire nut fell off inside box |
Turn off power and re-secure nuts |
|
No Light |
Wall switch is broken |
Test switch continuity or replace it |
The Light Flickers
Flickering lighting is highly annoying and usually happens if the wire connections are just slightly loose inside the junction box. This looseness causes the electrical current to jump across a tiny microscopic gap, creating a rapid strobe effect. However, it also frequently occurs if you are using modern LED bulbs hooked up to an older dimmer switch that was designed for hot incandescent bulbs.
Those older, legacy dimmers simply do not communicate well with the complex electronic drivers hidden inside LED bases. Upgrading the old wall switch to a modern, LED-compatible dimmer switch almost always solves this specific problem permanently.
|
Flickering Cause |
Diagnosis Method |
Solution |
|
Loose Wiring |
Check wire nuts for snug fit |
Re-twist nuts tightly over copper |
|
Incompatible Dimmer |
Check if dimmer is old style |
Replace with LED-rated dimmer switch |
|
Cheap LED Bulbs |
Swap with high-quality brand |
Invest in better driver technology |
|
Power Grid Fluctuation |
Happens only when AC turns on |
Normal, or requires dedicated circuit |
The Breaker Trips Immediately
If you flip the breaker back on at the panel and it violently snaps right back off, your circuit is experiencing a dead short. This means raw electricity is flowing rapidly exactly where it shouldn’t be going, and the safety mechanism is saving your house from a fire. The absolute most likely reason is that a hot black wire escaped its nut and is currently touching a neutral white wire, the bare ground wire, or the metal box itself.
Walk away from the panel, ensure the breaker is fully off, take the fixture completely down, and intensely inspect your handiwork. Make sure absolutely no bare copper from the black wire is exposed outside the bottom edge of the wire nut.
|
Breaker Issue |
Root Cause |
Immediate Action |
|
Instant Trip |
Black wire touching white wire |
Keep power off, fix crossed wires |
|
Instant Trip |
Black wire touching ground |
Keep power off, insulate bare spots |
|
Instant Trip |
Pinched wire under canopy |
Keep power off, re-route wire path |
|
Trips After 5 Mins |
Overloaded circuit capacity |
Reduce bulb wattage or move items |
Final Thoughts
Updating your interior lighting is an incredibly rewarding weekend project that instantly elevates the look and feel of your entire home. By taking the necessary time to turn off the main power, test the exposed wires, and match the color codes correctly, you can successfully replace a light fixture safely without paying expensive professional labor fees.
Always prioritize extreme caution over speed, and never cut corners when twisting those wire nuts tight. Make absolutely sure your ceiling junction box can handle the physical weight of your new hardware before you mount it. With a little patience, the right tools, and a methodical approach, you can completely transform any room in your house and enjoy your bright new lighting for years to come.
Frequently Asked Questions (FAQs) About Replace Light Fixture
Do I really need to turn off the main breaker, or can I just use the wall switch?
You absolutely must turn off the main breaker every single time. Wall switches only interrupt the single hot wire going to the light bulb itself. Depending on how the room was originally wired by the builder, live, aggressive power may still be passing directly through that ceiling box to feed other outlets down the hall. Using a non-contact voltage tester on the wires after the breaker is flipped is the only acceptable way to guarantee your safety.
What should I do if my ceiling wires do not have standard black and white colors?
In older, historic homes, wire colors may have faded to a dusty gray, or previous owners might have used non-standard wiring scraps to finish a job. If you cannot clearly identify the hot and neutral wires by looking at the colored plastic, you will need a digital multimeter to determine which wire actually carries the current. If you feel uncomfortable using advanced testing tools, it is vastly safer to just cap everything off and contact a licensed electrician.
Can I install a heavy chandelier where a small dome light used to be?
You cannot do this safely without physically checking the electrical box inside the ceiling first. Standard plastic junction boxes are typically rated by the manufacturer to hold a maximum of only 50 pounds of static weight. If your new dining room chandelier is heavier than that limit, you must replace the standard box with a heavy-duty steel brace box that mounts directly into the solid wood ceiling joists for proper support.
Is it normal for sparks to fly when connecting the wires?
No, seeing sparks is never a normal part of a DIY installation. If you see bright sparks, hear a loud pop, or smell acrid smoke, walk away and turn off the power at the main breaker panel immediately. Sparks indicate a dangerous short circuit, which is usually caused by a loose connection or the hot black wire accidentally making contact with a grounded metal surface.
How do I connect the wires if my new light fixture cord is completely clear?
Modern pendant lights often use clear cords that feature two identical-looking wires encased side-by-side in transparent plastic. If you look very closely at the plastic casing under a bright light, you will see a difference. One side will be perfectly smooth, and the other side will feature a subtle raised ridge, a rough stripe, or tiny printed writing. The completely smooth side is always the hot wire and connects to your black house wire, while the ridged or marked side is the neutral wire and connects to your white house wire.


