
Hard water stains can make a spotless sink look neglected. You clean the basin. You wipe the counter. Then the faucet still has white crust around the base, cloudy marks on the handle, or a rough ring near the spout. It’s annoying, but it’s not hard to fix when you understand what you’re cleaning.
Hard water stains are mineral deposits. They usually come from calcium and magnesium in water. When water droplets dry on the faucet, the water evaporates, but the minerals stay behind. Over time, those minerals form chalky spots, limescale, and crusty buildup.
The safest way to remove hard water stains faucet surfaces collect is not to scrub harder. That can scratch the finish. The better method is to soften the buildup, wipe gently, rinse well, and dry the faucet right away.
What Causes Hard Water Stains on Faucets?
Hard water stains form when mineral-rich water dries on a surface. Faucets are easy targets because they get splashed many times a day. The spout, base, handles, and aerator all hold tiny droplets after each use. The main minerals behind these stains are calcium and magnesium. In some homes, iron can also leave orange or brown marks. That is why hard water stains do not always look the same. Some are white and chalky. Some look cloudy. Some feel rough. Others look rusty.
Water hardness is commonly measured in milligrams per liter as calcium carbonate. Water from 121 to 180 mg/L is considered hard. Water above 180 mg/L is considered very hard. If your faucets, shower doors, kettle, and glassware all show mineral spots, your water may be in the hard or very hard range.
These stains are not the same as dirt. Dish soap can remove grime, fingerprints, toothpaste splatter, and grease. But mineral scale needs a different approach. A mild acid, such as diluted white vinegar, can help loosen calcium and limescale so you can wipe it away with less effort. The key is patience. If you attack dry mineral crust with steel wool or a rough pad, you may remove the stain and damage the finish at the same time. That is not a good trade.
|
Key point |
What it means for your faucet |
|
Main cause |
Calcium and magnesium minerals in hard water |
|
Common look |
White crust, cloudy film, rough scale, or chalky rings |
|
Possible color changes |
Orange or brown stains may point to iron |
|
Worst areas |
Faucet base, spout tip, handles, seams, and aerator |
|
Why stains return |
Water dries on the faucet and leaves minerals behind |
|
Best cleaning logic |
Soften the deposit first, then wipe gently |
|
Best daily habit |
Dry the faucet after use with a soft cloth |
Why the faucet base stains first?
The faucet base usually gets the worst buildup because water collects around the mounting ring. It sits there longer than water on the top of the faucet. As it dries, minerals stay behind.
Over time, a thin cloudy ring turns into a rough white crust. This is why many people notice buildup around the bottom of the faucet before they see it anywhere else.
Why the spout tip gets crusty?
The spout tip holds water droplets after the faucet turns off. Those droplets dry around the aerator, which is the small screen at the end of many faucets.
If minerals build up there, the water may spray sideways, flow unevenly, or lose pressure.
Hard water stains vs. soap scum
Hard water stains come from minerals. Soap scum forms when soap mixes with minerals, oils, and residue.
In bathrooms, both often appear together. That is why a faucet may still feel rough after a normal wipe-down. You may be dealing with both mineral scale and soap film.
Remove Hard Water Stains Faucet: The Safest First Method
For most chrome faucets and many standard stainless steel faucets, the safest first method is a 50/50 mix of white vinegar and water. This method is simple, cheap, and widely recommended for mineral deposits when the finish can handle it. White vinegar works because it is mildly acidic. It helps break down calcium and limescale deposits. But vinegar is still acid, so you should not leave it sitting on faucet finishes for hours. Short contact is safer.
Start by washing the faucet with mild dish soap and warm water. This removes surface grime so the vinegar can reach the mineral buildup. Then apply the vinegar mix with a microfiber cloth instead of spraying it everywhere. This keeps the cleaner controlled and protects nearby surfaces.
After a few minutes, wipe gently. Use a soft toothbrush around seams. Rinse with clean water. Then dry the faucet fully. That final dry wipe is not optional. If water sits on the faucet again, new spots start forming.
|
Step |
What to do |
Why it matters |
|
1 |
Wash with mild dish soap and warm water |
Removes grime before treating minerals |
|
2 |
Mix equal parts white vinegar and warm water |
Creates a gentle mineral-loosening cleaner |
|
3 |
Soak a microfiber cloth in the mix |
Gives controlled contact without flooding the area |
|
4 |
Wrap or press the cloth on the stain for 5 to 10 minutes |
Softens buildup without long acid exposure |
|
5 |
Wipe gently with the cloth |
Removes loosened scale |
|
6 |
Use a soft toothbrush for seams |
Reaches tight areas around handles and the base |
|
7 |
Rinse with clean water |
Removes vinegar residue |
|
8 |
Dry with a clean microfiber cloth |
Stops new water spots from forming |
What you need?
You do not need a fancy cleaning kit. Most of the tools are already in the kitchen or laundry room. Use white distilled vinegar, warm water, mild dish soap, microfiber cloths, a soft toothbrush, cotton swabs, and a small bowl. For faucet heads, keep a small plastic bag and rubber band nearby.
If your skin is sensitive, wear gloves. Vinegar is mild compared with many cleaners, but it can still irritate skin.
Step-by-step cleaning process
First, wipe the faucet with dish soap and warm water. Focus on the base, handles, spout, and underside. Next, mix equal parts white vinegar and warm water in a bowl. Dip a microfiber cloth into the solution. Wring it out so it is damp, not dripping.
Wrap the cloth around the stained area. Press it around the base ring, handle seam, or spout tip. Let it sit for 5 to 10 minutes. Remove the cloth and wipe the area gently. If buildup remains in seams, use a soft toothbrush or cotton swab.
Rinse the faucet well with clean water. Dry it fully with a fresh microfiber cloth.
Repeat short treatments instead of long soaking
Old stains may not disappear after one round. That is normal.
Repeat the short vinegar wrap if needed. Do not soak the faucet overnight. One long soak can damage some finishes, while two careful short treatments are much safer.
Clean by Faucet Finish Before You Clean by Stain
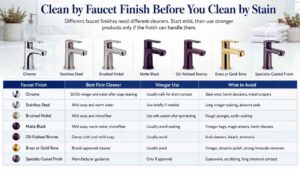
A faucet stain may look the same on every faucet, but the finish underneath can be very different. Chrome, stainless steel, brushed nickel, matte black, bronze, brass, and gold-tone finishes do not all tolerate the same cleaners.
This is where many people go wrong. They see a hard water stain and reach for vinegar, a descaler, or a scrub pad. That may work on chrome, but it can dull or damage specialty finishes. If you know your faucet brand, check its care guide. If you do not know the brand, start with the mildest method: warm water, dish soap, and a soft cloth.
Use acid-based cleaners only when the finish can handle them. Even then, keep contact short and rinse fully.
|
Faucet finish |
Best first cleaner |
Vinegar use |
What to avoid |
|
Chrome |
50/50 vinegar and water after soap cleaning |
Usually safe for short contact |
Steel wool, harsh descalers, metal scrapers |
|
Stainless steel |
Mild soap and warm water |
Use briefly if needed |
Long vinegar soaking, abrasive pads |
|
Brushed nickel |
Mild soap and microfiber |
Use with caution after spot testing |
Rough sponges, acidic soaking |
|
Matte black |
Mild soap, warm water, microfiber |
Usually avoid soaking |
Vinegar bags, magic erasers, harsh cleaners |
|
Oil-rubbed bronze |
Damp cloth and mild soap |
Usually avoid |
Acid cleaners, bleach, ammonia |
|
Brass or gold-tone |
Brand-approved cleaner |
Usually avoid |
Vinegar, abrasive polish, strong limescale removers |
|
Specialty-coated finish |
Manufacturer guidance |
Only if approved |
Guesswork, scrubbing, long chemical contact |
Chrome faucets
Chrome is usually the easiest finish to clean. A short 50/50 vinegar treatment often works well for white spots and light scale.
Still, do not scrub chrome with rough pads. Fine scratches can trap minerals later and make the faucet look dull.
Stainless steel faucets
Stainless steel can handle gentle cleaning, but it can streak or mark if you use the wrong cleaner for too long.
Start with dish soap and warm water. If mineral spots remain, use diluted vinegar briefly. Rinse well and dry right away.
Brushed nickel faucets
Brushed nickel needs a lighter touch. It can look streaky if you rub too hard or use strong cleaners.
Clean it with mild soap and microfiber first. If you try vinegar, test a hidden spot and keep the contact short.
Matte black faucets
Matte black faucets are stylish, but they show water spots quickly. They can also react badly to acidic cleaners and abrasive tools.
Use mild dish soap, warm water, and a soft cloth. Dry the faucet after every use if possible. Avoid vinegar soaking unless the manufacturer says it is safe.
Bronze, brass, and gold-tone faucets
These finishes need careful cleaning. Vinegar can dull or discolor them if the surface is not designed for acid contact.
Use mild soap, water, and a soft cloth. For stubborn stains, check the brand’s care instructions before trying anything stronger.
How to Remove Thick Scale Around the Faucet Base
The faucet base is where hard water stains often become ugly. You may see a white ring, rough buildup, or crust packed around the edge where the faucet meets the sink. Do not scrape that buildup dry. Dry scale can act like sandpaper. If you rub too hard, you may scratch the faucet or the sink surface.
The better approach is to soften the stain first. A controlled vinegar wrap works well on chrome and many standard stainless finishes. For delicate finishes, use warm water and mild soap first. If your faucet sits on marble, limestone, travertine, or natural stone, protect the counter. Vinegar can damage stone surfaces. Place a towel around the faucet base and keep the acid away from the counter.
Once the buildup softens, wipe it away slowly. Use cotton swabs around tight seams. Use a plastic scraper only when needed, and only with light pressure.
|
Problem area |
Best tool |
Best method |
|
White ring around the base |
Microfiber cloth |
Short vinegar wrap if finish-safe |
|
Handle seams |
Cotton swab |
Mild cleaner and slow wiping |
|
Back of faucet |
Soft toothbrush |
Clean after softening buildup |
|
Thick mineral crust |
Plastic scraper |
Use only after soaking and with light pressure |
|
Natural stone counter |
Towel barrier |
Keep vinegar away from the stone |
|
Small gaps |
Cotton swab or wooden toothpick |
Lift softened residue gently |
|
Repeating ring |
Daily drying cloth |
Stop water from pooling at the base |
Use a controlled wrap
Fold a microfiber cloth into a narrow strip. Dip it into the vinegar and water mix. Press it around the faucet base where the white ring has formed.
Let it sit for 5 to 10 minutes. Remove the cloth and wipe gently. If the scale is still rough, repeat the process. Do not switch to a metal scraper.
Clean seams with cotton swabs
Cotton swabs work well around handles and tight edges. Dip the swab in mild soap or diluted vinegar, depending on the finish. Move slowly around the seam and lift softened residue.
This step takes a little patience, but it makes the faucet look much cleaner.
Protect nearby surfaces
Vinegar is not safe for every countertop. It can etch marble, limestone, travertine, and some stone sealers.
If you have a stone counter, use less liquid, work carefully, and wipe spills immediately.
How to Clean the Faucet Head and Aerator
If your faucet sprays sideways or the water stream feels weak, the aerator may be clogged with mineral deposits. The aerator is the small screen at the faucet tip. It controls the water stream and mixes air into the flow. In hard water areas, calcium and limescale can block the screen. A clogged aerator does not only look bad. It can make the faucet feel weak, messy, and uneven. It may also trap grit after plumbing work or water supply disruptions.
Bathroom faucet flow also matters for water use. WaterSense-labeled bathroom faucets and accessories use a maximum flow rate of 1.5 gallons per minute. That is 30% or more less than the standard 2.2 gallons per minute, while still maintaining performance. If your aerator is clogged, the flow may feel much worse than it should.
You can clean many faucet heads without removing the aerator. But for heavy buildup, removing the aerator gives better results.
|
Symptom |
Likely cause |
Best fix |
|
Water sprays sideways |
Mineral deposits blocking holes |
Soak and brush the faucet head |
|
Weak stream |
Clogged aerator mesh |
Remove and clean the aerator |
|
White crust on spout tip |
Calcium or limescale buildup |
Use the vinegar bag method if finish-safe |
|
Grit after cleaning |
Loosened debris |
Run water for 30 to 60 seconds |
|
Pull-down sprayer looks patchy |
Scale in spray nozzles |
Rub rubber nozzles gently |
|
Bad flow after cleaning |
Damaged or blocked aerator |
Replace the aerator |
|
Flow problem continues |
Cartridge or supply issue |
Check plumbing or call a plumber |
Clean the faucet head without removing it
Fill a small plastic bag with equal parts white vinegar and water. Place the bag over the faucet tip so the aerator is covered. Secure it with a rubber band. Let it sit for 15 to 30 minutes if the finish can handle vinegar. Then remove the bag and scrub the spout tip gently with a soft toothbrush.
Run the faucet for a minute to flush away loosened mineral particles. Do not use this vinegar bag method on matte black, bronze, brass, gold-tone, or specialty finishes unless the brand allows it.
Remove the aerator for deeper cleaning
If the spray still looks uneven, remove the aerator. Wrap the aerator with a cloth to protect the finish. Unscrew it by hand if possible. If it is tight, use pliers over the cloth.
Soak the aerator in a 50/50 mix of warm water and white vinegar. Depending on the buildup, this may take a few minutes to about an hour. Brush gently, rinse well, and reinstall it. Take a quick photo before taking the aerator apart. Some aerators have several small pieces, and the photo helps you put them back in the correct order.
Replace the aerator when needed
Aerators are inexpensive. If the screen is bent, cracked, rusty, or still clogged after cleaning, replace it.
Take the old aerator to a hardware store so you can match the size and thread type.
DIY Cleaners vs. Commercial Descalers
For light faucet stains, simple household cleaners usually work well. You do not need to start with the strongest product on the shelf. Mild dish soap works for everyday cleaning. Diluted white vinegar works for many mineral stains on safe finishes. Baking soda can help with light residue on durable surfaces, but it must be used gently.
Commercial descalers can help with heavy calcium, lime, and rust buildup. But they also carry more risk. Some are too harsh for delicate faucet finishes, stone counters, and coated surfaces.
The smarter choice is to match the cleaner to the stain and the finish. Use the mildest product that works.
|
Cleaner |
Best for |
How to use it |
Main caution |
|
Dish soap and warm water |
Daily grime and light film |
Wipe, rinse, and dry |
Does not remove heavy scale alone |
|
50/50 vinegar and water |
Light to medium mineral buildup |
Short contact, then rinse |
Can harm sensitive finishes |
|
Baking soda paste |
Light residue on durable finishes |
Rub gently with water |
Can scratch if used with pressure |
|
Commercial descaler |
Thick calcium, lime, or rust |
Follow label exactly |
May damage coatings or stone |
|
Hydrogen peroxide cleaner |
Some bathroom stains |
Use separately and rinse |
Do not mix with vinegar |
|
Plastic scraper |
Softened crust |
Use light pressure only |
Can still scratch if forced |
|
Water softener |
Whole-home scale prevention |
Installed at water supply |
Needs cost, salt, and maintenance |
When vinegar is enough?
Use diluted vinegar for white mineral spots on chrome and many standard stainless steel faucets. Keep the contact short. Rinse fully. Dry right away.
This method works best when the stain is fresh or moderate.
When a descaler makes sense?
Use a commercial calcium, lime, or rust remover when buildup is thick, old, or clogging the faucet head. Read the label first. Make sure the product is safe for the faucet finish and nearby surfaces.
Avoid strong descalers on natural stone, delicate metals, and specialty-coated faucets unless the product label clearly says it is safe.
Why baking soda is not always harmless?
Baking soda feels gentle, but it is still mildly abrasive. If you rub hard, it can dull glossy finishes or scratch coated surfaces.
Use it only with light pressure. Avoid it on matte black, bronze, brass, gold-tone, and specialty finishes unless the manufacturer allows it.
Cleaning Mistakes That Can Damage Faucets
Most faucet damage does not happen because the stain is too hard. It happens because people use the wrong cleaner or scrub too aggressively. The biggest safety mistake is mixing cleaners. Bleach should never be mixed with vinegar, ammonia, acids, or other cleaning products. These combinations can release dangerous gases.
Another common mistake is leaving vinegar on the faucet too long. Vinegar can help loosen minerals, but it is still acidic. It should not sit on delicate finishes for hours.
Abrasive tools can also cause long-term damage. Steel wool, rough scouring pads, magic erasers, and metal scrapers may remove buildup, but they can dull or scratch the faucet. Once the finish is scratched, stains cling more easily. That means the faucet may get dirty faster in the future.
|
Mistake |
Why it is risky |
Better choice |
|
Mixing bleach and vinegar |
Can release chlorine gas |
Use one cleaner at a time |
|
Mixing bleach and ammonia |
Can release chloramine gases |
Never mix cleaning products |
|
Using steel wool |
Scratches faucet finishes |
Use microfiber |
|
Using a magic eraser on delicate finishes |
Can dull coatings |
Use mild soap and cloth |
|
Soaking with vinegar overnight |
May damage the finish |
Use short contact and repeat if needed |
|
Using toilet cleaner on faucets |
Too harsh for fixture finishes |
Use faucet-safe cleaner |
|
Scraping with a metal tool |
Can chip or scratch |
Use a plastic scraper only after softening |
|
Skipping the rinse |
Leaves cleaner residue |
Rinse and dry after cleaning |
Never mix bleach with vinegar
Bleach does not remove mineral scale well. Vinegar does. But they should never be used together.
If you used bleach earlier, rinse the area well and wait before using vinegar or any acidic cleaner.
Avoid rough tools
A soft toothbrush, microfiber cloth, cotton swab, or plastic scraper is enough for most faucet stains.
If you feel the need to use a knife or steel wool, stop and soften the buildup longer instead.
Rinse every cleaner off the faucet
Even mild cleaners should not sit on faucet finishes. Apply, wait briefly, clean, rinse, and dry.
That simple order protects the surface.
How to Prevent Hard Water Stains From Coming Back
The easiest way to deal with hard water stains is to stop water from drying on the faucet. This sounds too basic, but it works. Water spots form when water evaporates and leaves minerals behind. If you wipe the faucet dry, you remove the water before that happens.
Keep a microfiber cloth near the sink. After using the faucet, give the spout, handles, and base a quick wipe. It takes a few seconds. Weekly cleaning also helps. Dish soap and warm water remove soap film, toothpaste, grease, and grime before minerals stick to them.
If your whole home has hard water, prevention may need more than wiping. A water softener can reduce minerals before they reach faucets, showerheads, appliances, and water heaters. It is not always necessary, but it can help in homes with heavy scale.
|
Prevention habit |
How often |
Why it works |
|
Dry faucet with microfiber |
Daily or after heavy use |
Stops mineral droplets from drying |
|
Clean with dish soap |
Weekly |
Removes grime and soap film |
|
Use vinegar on safe finishes |
Monthly or as needed |
Keeps scale from hardening |
|
Clean the aerator |
Every 1 to 3 months in hard water areas |
Keeps water flow steady |
|
Fix leaks |
As soon as possible |
Stops constant mineral deposits |
|
Check water hardness |
Once, then as needed |
Confirms if hard water is the main issue |
|
Consider water softening |
Long-term |
Reduces calcium and magnesium at the source |
|
Protect stone counters |
Every cleaning session |
Prevents acid damage from vinegar spills |
Keep a drying cloth near the sink
A faucet that gets dried daily rarely builds thick scale. You do not need to polish it every time. Just blot the water off the spout, handle, and base.
This one habit saves the most cleaning time.
Do a weekly light clean
Once a week, clean the faucet with mild dish soap and warm water. Wipe the base, spout, handles, and underside.
Rinse well and dry. This keeps soap scum and minerals from forming a stubborn layer.
Fix slow leaks quickly
A slow drip keeps the same area wet all day. That creates perfect conditions for mineral buildup.
Fixing the leak prevents scale and saves water.
When Hard Water Is a Whole-Home Problem
If only one faucet has stains, you may just need better drying and cleaning habits. But if every faucet, showerhead, kettle, glass, and appliance shows white marks, your water may be the real issue. Hard water can affect sinks, tubs, fixtures, washing machines, water heaters, and glassware. It can also make soap harder to lather and leave a film on surfaces.
In that case, test your water hardness before buying equipment. If you use city water, check your local water-quality report or contact your water utility. If you use a private well, consider a certified lab test.
A water softener is a long-term solution for homes with serious hard water. It reduces calcium and magnesium before the water reaches fixtures and appliances. That can reduce scale, spots, and soap film. Still, a softener is not a small purchase. It needs installation, salt or potassium, maintenance, and space. Testing helps you decide if it is worth it.
|
Sign |
What it may mean |
Best next step |
|
White crust on many faucets |
Hard water throughout the home |
Test water hardness |
|
Cloudy glasses after washing |
Minerals drying on glass |
Dry faster or consider softening |
|
Soap does not lather well |
Minerals reacting with soap |
Check hardness level |
|
Showerhead clogs often |
Scale inside spray holes |
Clean aerator and test water |
|
Kettle has white flakes |
Calcium carbonate buildup |
Descale appliance and test water |
|
Water heater efficiency drops |
Scale may be forming inside |
Ask a plumber or water professional |
|
Stains return within a day |
Water dries on surfaces often |
Improve drying routine |
|
Orange-brown stains appear |
Iron may be present |
Test for iron and hardness |
Test before buying a softener
Do not buy a water softener just because one faucet has stains. Test first.
A test tells you whether your water is soft, moderately hard, hard, or very hard. It can also show whether iron or other minerals are part of the problem.
Faucet filter vs. water softener
A faucet filter may improve taste or reduce certain contaminants, depending on the filter type. But it usually does not solve whole-home scale.
A water softener treats hardness minerals before they reach faucets, showerheads, dishwashers, washing machines, and water heaters.
A note about sodium
Traditional ion-exchange softeners often use sodium or potassium to replace calcium and magnesium.
If someone in your home is on a sodium-restricted diet, ask a water-treatment professional or healthcare provider before choosing a system.
Troubleshooting Faucet Stains by Color and Texture
Hard water stains do not always look white. The color and texture can give you clues about the cause. White chalky crust usually points to calcium or limescale. Cloudy film may be light mineral residue mixed with soap film. Orange or brown marks may come from iron. Green-blue stains may point to copper corrosion or water chemistry issues.
Do not treat every stain with the same cleaner. A white calcium ring and an orange iron stain may need different approaches.
Also, know when the problem is no longer a stain. If the faucet looks pitted, peeling, blackened, or permanently dull, the finish may be damaged. Cleaning can remove buildup, but it cannot rebuild a worn coating.
|
What you see |
Possible cause |
What to do |
|
White chalky crust |
Calcium or limescale |
Use diluted vinegar if finish-safe |
|
Cloudy film |
Light mineral residue or soap film |
Wash, rinse, and buff dry |
|
Orange-brown stains |
Iron or rust |
Use a fixture-safe rust cleaner |
|
Green-blue stains |
Copper corrosion or water chemistry |
Test water and avoid strong acids |
|
Black slime near aerator |
Biofilm or trapped debris |
Clean aerator and spout tip |
|
Rough ring at base |
Standing hard water |
Use a controlled wrap and dry daily |
|
Weak water flow |
Clogged aerator |
Remove, soak, brush, or replace |
|
Pitted finish |
Finish damage |
Cleaning may not fully restore it |
White crust
This is the most common hard water stain. Use the short vinegar method if the faucet finish allows it.
Orange or brown marks
Orange marks may come from iron in the water or rusting metal parts. A rust-specific cleaner may work better than vinegar.
Check the product label and faucet finish before using it.
Green or blue stains
Green-blue marks may suggest copper corrosion or water chemistry issues. Do not keep using stronger acids. Test the water instead.
Cloudy finish after cleaning
If the faucet still looks cloudy after cleaning, rinse it again and buff dry. If cloudiness remains, the finish may be etched or worn.
Final Thoughts
You do not need harsh chemicals to remove hard water stains faucet surfaces collect. You need the right method. Start with the finish. If the faucet is chrome or standard stainless steel, a short 50/50 vinegar and water treatment can work well. If the faucet is matte black, bronze, brass, gold-tone, brushed nickel, or specialty-coated, start with mild soap and check the care guide before using acid.
Soften the buildup before wiping. Use microfiber, cotton swabs, and a soft toothbrush. Rinse every cleaner off. Dry the faucet after cleaning. The long-term fix is even simpler: do not let water dry on the faucet. Keep a microfiber cloth near the sink. Wipe the base and spout after use. Clean the aerator before it clogs. Fix slow drips. If scale appears throughout the home, test your water hardness and consider a water softener.
Frequently Asked Questions (FAQs) About Hard Water Stains on Faucets
Can vinegar damage a faucet?
Yes. Vinegar can damage some faucet finishes if it sits too long or if the finish is sensitive to acid. Chrome usually handles diluted vinegar better than matte black, bronze, brass, gold-tone, or specialty-coated finishes.
How long should vinegar sit on a faucet?
For most chrome faucets, start with 5 to 10 minutes. For removable aerators, soaking may take longer depending on buildup. Avoid overnight vinegar soaking, especially on delicate finishes.
Can I use apple cider vinegar?
White distilled vinegar is better. It is clear, inexpensive, and less likely to leave odor or residue.
Can baking soda and vinegar remove hard water stains?
They can fizz and loosen some light residue, but the mix is not always the best cleaner for mineral scale. Diluted vinegar alone often works better because it stays acidic. Use baking soda separately as a gentle paste only on durable finishes.
Why does my faucet still look cloudy after cleaning?
It may still have mineral film, soap scum, or cleaner residue. Rinse well. Dry fully. Buff with a clean microfiber cloth. If the cloudiness stays, the finish may be etched or worn.
Is CLR safe on faucets?
It depends on the product and the faucet finish. Some calcium, lime, and rust removers are made for fixtures. Others can damage delicate finishes. Always read the label first.


