
That steady dripping noise echoing from the sink is enough to drive anyone crazy. You hear it at night when the house is quiet, and it constantly reminds you of a chore you keep putting off. Many homeowners ignore the problem or place a sponge underneath the spout to muffle the sound, hoping it will magically resolve itself.
However, ignoring the issue wastes a massive amount of water, damages your sink base, and drives up your monthly utility bills. If you are wondering how to fix a leaky faucet without spending a fortune, you are in the exact right place to learn.
You might think plumbing requires years of trade experience or expensive specialized gear to handle properly. That is simply not true for everyday household repairs. Most common household sink drips stem from a single degraded rubber washer, a cracked O-ring, or a worn-out plastic cartridge inside the handle mechanism. These internal parts degrade naturally over time due to daily friction and the harsh buildup of hard water minerals. Replacing them is a straightforward process that almost anyone can handle with a little patience and guidance.
Taking care of this simple maintenance task yourself makes you a highly resourceful and financially savvy homeowner. You do not need to sit around your house waiting all day for an expensive professional plumber to show up, and you get to keep that hefty service fee right in your own pocket. You just need a few basic hand tools from your garage, replacement parts from your local hardware store, and about 15 minutes of free time. Let us walk through the exact steps you need to take to stop that annoying drip once and for all.
The True Cost of a Dripping Faucet
Many people severely underestimate the financial and environmental impact of a dripping sink, brushing it off as a minor inconvenience. A slow leak looks completely harmless at first glance, but water flows continuously out of that spout 24 hours a day, seven days a week. Environmental experts note that a faucet dripping just one time per second wastes thousands of gallons of perfectly clean water every single year.
You are actively paying for that wasted water on your utility bill every month, throwing your hard-earned money straight down the drain. Beyond the painful water bill, a continuous drip causes permanent hard water stains in your sink basin that no amount of scrubbing can remove. Furthermore, the constant moisture can slowly degrade the caulk around your sink edges and lead to hidden, dangerous mold growth if water seeps under the counter base.
|
Cost Category |
Impact Description |
Long-Term Consequence |
|
Water Waste |
Wastes up to 3,000+ gallons per year. |
Depletes local water reservoirs unnecessarily. |
|
Financial Loss |
Adds $20 to $100+ to annual water bills. |
Drains your household maintenance budget. |
|
Fixture Damage |
Erodes metal seating and protective finishes. |
Requires premature replacement of the sink. |
|
Property Damage |
Causes mold and cabinet rot around the base. |
Leads to expensive structural home repairs. |
Identifying Your Faucet Type Before You Start
Before you buy replacement parts or grab a wrench, you must identify exactly what kind of plumbing hardware sits on your counter. Faucets look incredibly similar on the outside, but their internal control mechanisms operate in completely different ways. Finding out what type you have dictates how you will take it apart safely and what specific pieces you need to buy from the hardware store.
You can usually tell the difference based on how many handles the fixture has and exactly how the handle feels when you turn the water on and off. Learning how to fix a leaky faucet starts with knowing your equipment inside and out. Take a close look at your setup and match it to one of the common household types detailed below before you proceed.
|
Faucet Mechanism |
Handle Configuration |
How It Operates |
Identification Clue |
|
Compression |
Dual handles (Hot/Cold) |
Tightens down on a rubber washer. |
You feel rising pressure as you close it. |
|
Ball |
Single rotating handle |
Slotted ball glides over springs. |
Moves in a wide, circular dome motion. |
|
Cartridge |
Single or Dual handles |
Internal cylinder moves up and down. |
Very smooth operation with a hard stop. |
|
Ceramic Disk |
Single wide handle |
Ceramic plates slide across each other. |
Wide base cylinder with minimal handle travel. |
Compression Faucets
These are the oldest style of fixtures, typically found in older historic houses, laundry rooms, or utility sinks. They almost always feature two completely separate handles—one dedicated to hot water and the other to cold. When you twist the handle to the off position, you physically feel the firm resistance of a metal threaded screw tightening down inside the fixture.
The handle actively pushes a thick, black rubber washer down onto a metal seat to block the water flow completely. Over time, that heavy pressure crushes and tears the rubber washer, which is the leading cause of drips in this specific model. You can usually fix these for less than a dollar simply by swapping out that flattened piece of rubber.
|
Compression Parts |
Location in Fixture |
Primary Function |
|
Handle Screw |
Under the decorative cap |
Keeps the handle attached to the stem. |
|
Packing Nut |
Below the handle |
Holds the entire valve stem securely in place. |
|
Valve Stem |
Inside the brass body |
Turns to lower or raise the water barrier. |
|
Seat Washer |
Bottom of the valve stem |
Presses against the brass seat to stop water. |
Ball Faucets
Ball faucets are incredibly common in modern kitchens and older bathroom remodels. They utilize a single handle that sits securely on top of a rounded, dome-shaped metal cap. The handle moves freely in all directions, allowing you to seamlessly control both the temperature and the water pressure with one hand.
Inside the metal housing, a plastic or stainless steel ball with specific cutouts rests on top of tiny rubber seats and metal springs. Because they contain many small, constantly moving parts rubbing against each other, they tend to leak more frequently than other designs. The fix usually involves replacing the tiny rubber seats and springs hidden at the very bottom of the housing.
|
Ball Faucet Parts |
Location in Fixture |
Primary Function |
|
Dome Cap |
Base of the handle |
Secures the internal ball and cam assembly. |
|
Cam & Packing |
Top of the ball |
Provides tension and prevents top leaks. |
|
Slotted Ball |
Middle of the housing |
Mixes hot and cold water based on position. |
|
Springs & Seats |
Bottom of the housing |
Creates a watertight seal against the ball. |
Cartridge Faucets
Cartridge models feel incredibly smooth and effortless when you use them on a daily basis. The handle does not require any forceful pressure to tighten down; it simply stops moving abruptly when it hits the off position. Inside the brass housing sits a self-contained, interchangeable plastic or brass cartridge cylinder.
This cartridge utilizes several rubber O-rings around its exterior to prevent water from slipping past the mechanism. When these fixtures start dripping, it usually means the internal plastic mechanism has cracked or the exterior O-rings have dried out and flattened. The easiest and most reliable repair is simply pulling out the old cartridge and dropping a brand new one into the slot.
|
Cartridge Parts |
Location in Fixture |
Primary Function |
|
Retaining Clip |
Front of the cartridge body |
Locks the cartridge safely into the brass base. |
|
Cartridge Body |
Inside the main housing |
Regulates water flow without grinding metal. |
|
O-Rings |
Outside of the cartridge |
Seals the gap between the cartridge and the base. |
|
Alignment Tabs |
Sides of the cartridge |
Ensures the cartridge is inserted facing forward. |
Ceramic Disk Faucets
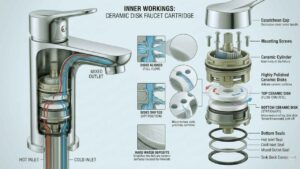
These represent the most modern, expensive, and durable design available for residential plumbing today. They usually feature a single, wide handle positioned over a thick cylindrical base. Two highly polished, incredibly hard ceramic disks sit stacked horizontally inside the interior cylinder.
As you move the handle up and down or side to side, the disks slide smoothly across each other to let water pass through precisely cut holes. They are highly reliable and almost never wear out under normal conditions, but harsh hard water minerals can eventually scratch the delicate ceramic surfaces. When they do fail, replacing the entire interior cylinder unit is the standard procedure.
|
Ceramic Disk Parts |
Location in Fixture |
Primary Function |
|
Escutcheon Cap |
Decorative cover under handle |
Hides the internal mounting hardware. |
|
Mounting Screws |
Top of the disk cylinder |
Secures the cylinder firmly to the sink deck. |
|
Ceramic Cylinder |
Main body of the fixture |
Houses the sliding ceramic plates. |
|
Bottom Seals |
Base of the cylinder |
Prevents water from leaking under the unit. |
Essential Tools and Materials for the Job
You simply cannot complete this job with your bare hands, but you also do not need to invest in a massive professional plumbing truck setup. Gathering your tools before you actually start ensures you will not be running frantically back and forth to the garage while your sink is in pieces.
You probably already own most of these basic items tucked away in a kitchen drawer or a basic home tool kit. If you need to buy replacement parts, it is always best to take the broken pieces directly to the hardware store to visually find an exact match. Having a clean, well-lit workspace and the right tools on hand makes the entire process completely stress-free and highly efficient.
|
Tool or Material |
How It Is Used |
Necessity Level |
|
Adjustable Wrench |
Gripping and turning large packing nuts securely. |
Absolute Must |
|
Screwdriver Set |
Popping off caps and removing internal mounting screws. |
Absolute Must |
|
Allen Wrench Set |
Loosening the hidden set screws on single-handle units. |
High (for single handles) |
|
Plumber’s Grease |
Lubricating new rubber seals to prevent future tearing. |
Highly Recommended |
Crucial Preparation: Stop the Water First
This specific step is completely non-negotiable and requires your full attention. You absolutely must turn off the local water supply before you try to take any plumbing fixture apart. If you ignore this crucial step and unscrew a pressurized valve, water will violently shoot out of the open pipe and flood your room in a matter of seconds.
Getting everything ready takes just a few minutes, keeps you dry, and prevents catastrophic property damage to your cabinets and flooring. Clear out all the cleaning supplies and clutter from under your sink so you have plenty of room to see the valves and work comfortably.
|
Preparation Step |
Specific Action Required |
Reason for Doing This |
|
Locate Shutoff Valves |
Find the oval knobs under the sink basin. |
Identifies where to cut off the local supply. |
|
Turn Off the Water |
Twist valves clockwise until they stop firmly. |
Halts pressurized water from entering the sink. |
|
Drain the Lines |
Turn both sink handles to the fully open position. |
Empties sitting water and relieves pipe pressure. |
|
Block the Drain |
Place a thick towel completely over the drain hole. |
Catches dropped screws and protects the finish. |
Step-by-Step Guide: How to Fix a Leaky Faucet
Now that your workspace is perfectly prepped and the water is completely off, it is time to dismantle the hardware. Follow the specific instructions below that match the exact type of fixture you identified earlier in the process. Work slowly, do not force any stuck metal parts, and pay close attention to the order in which you remove the pieces.
It greatly helps to line the removed pieces up horizontally on the counter in the exact order you took them out. This simple trick makes putting everything back together much simpler and ensures you do not have any leftover pieces.
|
Repair Phase |
General Action Needed |
Important Focus Area |
|
Disassembly |
Remove handles, decorative covers, and internal caps. |
Keep close track of tiny set screws. |
|
Extraction |
Pull out the main valve stem, ball, or cartridge. |
Note the physical orientation of the part. |
|
Part Replacement |
Swap out the bad washers, springs, or cylinders. |
Apply generous grease to new rubber items. |
|
Reassembly |
Put parts back tightly in reverse order. |
Do not overtighten the final packing nuts. |
Fixing a Compression Faucet
Start the repair by carefully prying off the decorative plastic cap on top of the handle using a small flat-head screwdriver. This action exposes a Phillips head screw underneath the cap. Take out the screw completely and pull the handle straight up to remove it from the grooved stem. You will now clearly see a brass packing nut sitting on top of the base. Use your adjustable wrench to loosen this nut completely and slide it off.
Once the nut is off, grab the top of the valve stem and twist it counterclockwise to back it out of the brass base. Look at the very bottom of this metal stem to locate the rubber washer. You will see a black rubber washer firmly held in place by a small, often corroded brass screw. Remove the screw, peel off the old flattened washer, and replace it with a brand new one of the same diameter. Put the stem back into the hole, tighten the nut with your wrench, and reattach the handle.
|
Compression Step |
Action |
Focus |
|
Step 1: Handle Removal |
Pry off cap and unscrew. |
Keep the screw safe. |
|
Step 2: Nut Removal |
Loosen packing nut with a wrench. |
Do not scratch the brass. |
|
Step 3: Stem Extraction |
Twist stem counterclockwise. |
Pull straight up gently. |
|
Step 4: Washer Swap |
Remove bottom screw and change rubber. |
Grease the new washer well. |
Fixing a Ball Faucet
Look closely for a very small hole near the bottom base of the handle. Use an Allen wrench to loosen the hidden set screw inside that hole, then slide the handle straight up and off. Use your adjustable pliers to carefully unscrew the large dome-shaped cap covering the mechanism. Take off the circular metal collar sitting immediately underneath it. You can now easily lift out the plastic cam, the cam washer, and the slotted control ball itself.
Look straight down into the empty metal base. You will clearly see two small rubber circles with thin metal springs sitting underneath them. Use a pair of tweezers or a small flathead screwdriver to gently pull out the old seats and springs. Push the new springs and rubber seats firmly into the holes so they sit flush. Put the control ball back into the socket, followed by the cam pieces, ensuring the alignment peg fits into the slot. Screw the dome cap back down tightly and reattach the heavy metal handle.
|
Ball Faucet Step |
Action |
Focus |
|
Step 1: Handle Removal |
Loosen set screw with Allen wrench. |
Store screw safely. |
|
Step 2: Dome Removal |
Unscrew dome cap and collar. |
Tape pliers to avoid scratches. |
|
Step 3: Ball Extraction |
Lift out cam, washer, and ball. |
Note the ball slot position. |
|
Step 4: Seat Swap |
Use tweezers to swap springs and seats. |
Ensure springs point upward. |
Fixing a Cartridge Faucet
Take off the main handle by popping off the top decorative cap and removing the screw, or by loosening the side set screw with your Allen wrench. Lift the handle smoothly away from the base and set it aside. You will likely see a small, U-shaped metal or plastic retaining clip holding the internal cartridge in place. Grab the front edge of this clip with your needle-nose pliers and pull it straight out toward your body.
Grab the top stem of the plastic cartridge firmly with your pliers and pull it straight up toward the ceiling. Sometimes hard water makes it stick firmly to the walls, so wiggle it gently back and forth while pulling upward. Take this old, broken cartridge to the hardware store and buy an exact visual duplicate. Rub some clear plumber’s grease thoroughly on the exterior O-rings of the new cartridge. Slide it smoothly down into the empty slot, push the retaining clip back into place, and reattach the top handle.
|
Cartridge Step |
Action |
Focus |
|
Step 1: Handle Removal |
Take off top screw or side set screw. |
Pull handle up and away. |
|
Step 2: Clip Removal |
Pull out the U-shaped retaining clip. |
Do not bend the metal clip. |
|
Step 3: Extraction |
Grip cartridge and pull straight up. |
Wiggle gently if stuck. |
|
Step 4: Replacement |
Grease new O-rings and insert fully. |
Align the side plastic tabs. |
Fixing a Ceramic Disk Faucet
Begin by removing the heavy top handle by loosening the set screw located at the base with an Allen wrench. You will immediately see a decorative metal cover called an escutcheon sitting over the mechanics. Twist this metal cover counterclockwise by hand to remove it and expose the internal hardware. Underneath, the main ceramic cylinder is held firmly in place by two or three long metal mounting screws. Take these screws completely out and lift the entire cylinder unit straight up out of the brass housing.
Turn the cylinder gently upside down in your hands. You will notice several recessed rubber seals pressed into the bottom plate. Carefully pry these old, flattened seals out with the tip of a small screwdriver. Use an old toothbrush and some white vinegar to vigorously scrub away any crusty mineral buildup inside the empty brass housing on the sink. Press the new, well-lubricated rubber seals directly into the bottom of the ceramic cylinder. Put the cylinder back into the clean housing, secure the screws tightly, and thread the covers back on.
|
Ceramic Disk Step |
Action |
Focus |
|
Step 1: Handle Removal |
Loosen base set screw. |
Lift handle to expose cover. |
|
Step 2: Cover Removal |
Twist off escutcheon cap. |
Do not use pliers on the finish. |
|
Step 3: Cylinder Extraction |
Remove mounting screws and lift. |
Keep the whole unit intact. |
|
Step 4: Seal Swap |
Pry out bottom seals and replace. |
Clean the brass base thoroughly. |
Troubleshooting Common Post-Repair Issues
Sometimes you finish the entire repair, confidently turn the water valves back on, and things do not work perfectly right away. Do not panic or assume you broke something permanently. This happens frequently to beginners, and the specific fixes are usually very simple adjustments.
Most post-repair problems involve trapped debris in the lines or parts that were tightened a little too aggressively. Knowing how to fix a leaky faucet also means knowing how to troubleshoot these minor hiccups quickly.
|
Common Problem |
Most Likely Cause |
Quick Solution |
|
Continuous Drip |
Corroded brass valve seat inside base. |
Grind the seat flat with a dresser tool. |
|
Sputtering Water |
Air trapped in the empty water lines. |
Let the faucet run for 60 seconds. |
|
Low Water Pressure |
Mineral debris stuck in the aerator screen. |
Unscrew the aerator and rinse it clean. |
|
Extremely Stiff Handle |
Packing nut is tightened down too hard. |
Loosen the main packing nut a quarter turn. |
The Faucet Still Drips
If the spout continues to drip annoyingly after you replaced the main washer, you might have a physically damaged valve seat. The seat is the brass metal ring inside the base that the rubber washer presses against to form a seal. If fast-moving water has eroded a small channel into this brass over the years, a new, flat washer will not properly seal it.
You can buy an inexpensive valve seat dresser tool at the store to grind the rough brass flat again. You should also double-check the rubber O-rings on the body of the stem and replace them if they look torn.
|
Fix for Continuing Drips |
Action to Take |
Expected Outcome |
|
Check the Valve Seat |
Inspect internal brass for deep scratches. |
Determines if grinding is needed. |
|
Use a Seat Dresser |
Grind the rough brass ring flat. |
Creates a smooth surface for the washer. |
|
Inspect Body O-Rings |
Look for torn rubber on the stem body. |
Prevents water from bypassing the valve. |
|
Re-tighten Hardware |
Ensure parts are snug, not loose. |
Seals any remaining microscopic gaps. |
Water Pressure Drops After Repair
This is a very common and highly frustrating issue that scares many first-time DIYers. When you turned the water valves back on under the sink, the sudden, aggressive rush of water probably knocked some rust or mineral scale loose from the inside walls of the older pipes.
This loose debris travels straight up the pipe and gets heavily trapped in the aerator. The aerator is the little mesh screen cap screwed onto the very tip of the spout. Simply unscrew it counterclockwise with your fingers, rinse the chunks of debris out in another sink, and screw it back into place.
|
Pressure Drop Fix |
Action to Take |
Expected Outcome |
|
Locate Aerator |
Find the mesh cap at the spout tip. |
Prepares for debris removal. |
|
Unscrew Aerator |
Twist counterclockwise by hand. |
Exposes the clogged screen inside. |
|
Clean the Mesh |
Run water backward through the screen. |
Flushes out rust and white scale rocks. |
|
Reinstall Cap |
Screw aerator back on firmly. |
Restores full, even water pressure instantly. |
The Handle is Hard to Turn
If you have to practically fight the handle to turn the water on, you almost certainly tightened something too much during the final reassembly process. If you have a compression setup, loosen the large top packing nut just a tiny bit until the handle moves smoothly without binding.
If you completely forgot to use clear plumber’s grease on the new rubber parts, the dry, sticky rubber will create massive internal friction against the metal. Always take the time to properly lubricate new rubber parts to keep the handles gliding effortlessly.
|
Stiff Handle Fix |
Action to Take |
Expected Outcome |
|
Loosen Packing Nut |
Back the large nut off a quarter turn. |
Relieves crushing pressure on the stem. |
|
Apply Plumber’s Grease |
Coat all new rubber parts thoroughly. |
Reduces metal-on-rubber friction instantly. |
|
Check Alignment Tabs |
Ensure the cartridge sits perfectly straight. |
Prevents plastic housing from binding. |
|
Test Movement |
Move handle before locking final screws. |
Ensures smooth daily operation. |
DIY vs. Professional: When to Call a Plumber
Knowing how to fix a leaky faucet is a fantastic life skill, but you also need to accurately know your own limits. Most simple residential drips take about 15 minutes to fix and cost roughly five dollars in replacement parts. Calling a professional plumbing service to simply swap a rubber washer is an expensive overkill for your wallet.
However, some plumbing situations require a licensed, insured expert to prevent massive, irreversible water damage to your home. You must evaluate the physical condition of your aging pipes before you start yanking on things with a heavy steel wrench.
|
Repair Scenario |
Recommendation |
Underlying Reasoning |
|
Basic sink spout drip |
DIY Repair |
Cheap parts and a very easy, safe process. |
|
Rusted, stuck shutoff valves |
Call a Pro |
Forcing them can shatter the main wall pipe. |
|
Cracked main brass housing |
Call a Pro |
Whole unit needs a complex, tricky replacement. |
|
Water leaking inside the walls |
Call a Pro |
Requires cutting drywall and active pipe soldering. |
If you reach under the sink to start the job and the shutoff valves are heavily covered in green corrosion and refuse to turn, stop immediately. Do not use heavy pliers to try and force them past their breaking point.
If you accidentally snap that fragile valve, high-pressure water will flood your home endlessly until the city comes out to shut off your main street supply. A seasoned plumber can safely cut and replace those ancient valves. Similarly, if you take the handle apart and visually discover that the main brass housing is physically cracked in half, no amount of rubber washers will save it.
Preventive Maintenance for a Leak-Free Home
The absolute smartest way to handle annoying plumbing problems is to proactively stop them before they ever start. A tiny amount of regular, easy maintenance greatly extends the functional life of your expensive hardware and prevents sudden emergency repair sessions.
Changing your family’s daily water habits and keeping the internal parts totally clean will keep the water flowing exactly where it should. A savvy homeowner stays ahead of the curve and protects their plumbing investments.
|
Maintenance Task |
Recommended Frequency |
Long-Term Benefit |
|
Gentle handle operation |
Every single use |
Prevents crushing internal rubber washers early. |
|
Routine aerator cleaning |
Every 6 months |
Keeps water pressure high and streams clear. |
|
Vinegar hardware soaking |
Once a year |
Dissolves harsh mineral buildup safely. |
|
Check under sink connections |
Once a month |
Catches hidden, slow supply line leaks early. |
First, intentionally train your entire family to stop cranking the sink handles down with maximum physical force. People often twist the handles extremely hard, mistakenly thinking it stops leaks, but that intense pressure actually crushes and destroys the delicate rubber washers inside prematurely.
Turn the handle gently just until the water stops flowing, and no further. If you live in a city with notoriously hard water, calcium minerals will destroy your plumbing over time. Remove your aerators twice a year and soak them deeply in white vinegar to dissolve those damaging calcium rocks.
Final Thoughts
Ultimately, knowing how to fix a leaky faucet confidently saves you significant money, protects your beautiful home from hidden moisture damage, and conserves a highly precious natural resource. It might seem a little bit intimidating the very first time you pull a handle off and stare at the plumbing mechanics.
However, once you clearly see the simple, logical mechanics inside the brass body, the fear disappears completely. Take your time, systematically lay out your parts, always turn the water off first, and match your tiny parts exactly at the local hardware store. Taking complete care of your own home maintenance builds immense confidence and keeps your property in top condition for years to come.
Frequently Asked Questions (FAQs) About Fix Leaky Faucet
Can I use WD-40 to lubricate plumbing parts?
Absolutely not. Standard WD-40 is a harsh solvent, not a permanent lubricant, and it will actually degrade and melt rubber O-rings over time. It is also highly toxic and should never, under any circumstances, be used on pipes carrying your family’s drinking water. Always use a dedicated, food-grade silicone plumber’s grease to keep parts moving smoothly.
Why does my faucet leak from the base instead of the spout?
Leaks gathering at the base usually indicate worn-out exterior O-rings located around the main body of the valve stem or the cartridge, rather than a bad seat washer at the bottom. The water actively escapes out the sides of the internal mechanism and safely puddles around the bottom metal plate sitting directly on your counter. Swapping those side O-rings usually fixes this specific issue.
Do I need special white thread tape to reassemble the handle?
You generally do not need Teflon tape for the internal handles, stems, and cartridges of a standard sink. The thick rubber washers and tight O-rings create the necessary watertight seal under pressure. Thread tape is only used on raw threaded pipe connections, like where the metal supply lines tightly connect to the shutoff valves under the sink basin.
What causes a faucet to vibrate and hum loudly when I turn it on?
This startling noise, often referred to in the trades as a water hammer or harmonic vibration, is almost always caused by a loose washer inside the mechanism flapping rapidly in the fast water stream. Taking the unit apart, inspecting the stem, and tightening the tiny retaining screw holding the washer in place will usually solve the loud noise completely.


