
A hole in the wall always looks worse once you notice it. A tiny nail mark catches the light. A loose wall anchor leaves a rough crater. A doorknob punch can make the whole room feel unfinished.
The good news is simple: most wall holes are fixable without replacing the whole wall. The trick is choosing the right repair for the size of the damage. If you try to fix hole in wall damage with the wrong material, the patch may crack, shrink, bulge, or show through the paint.
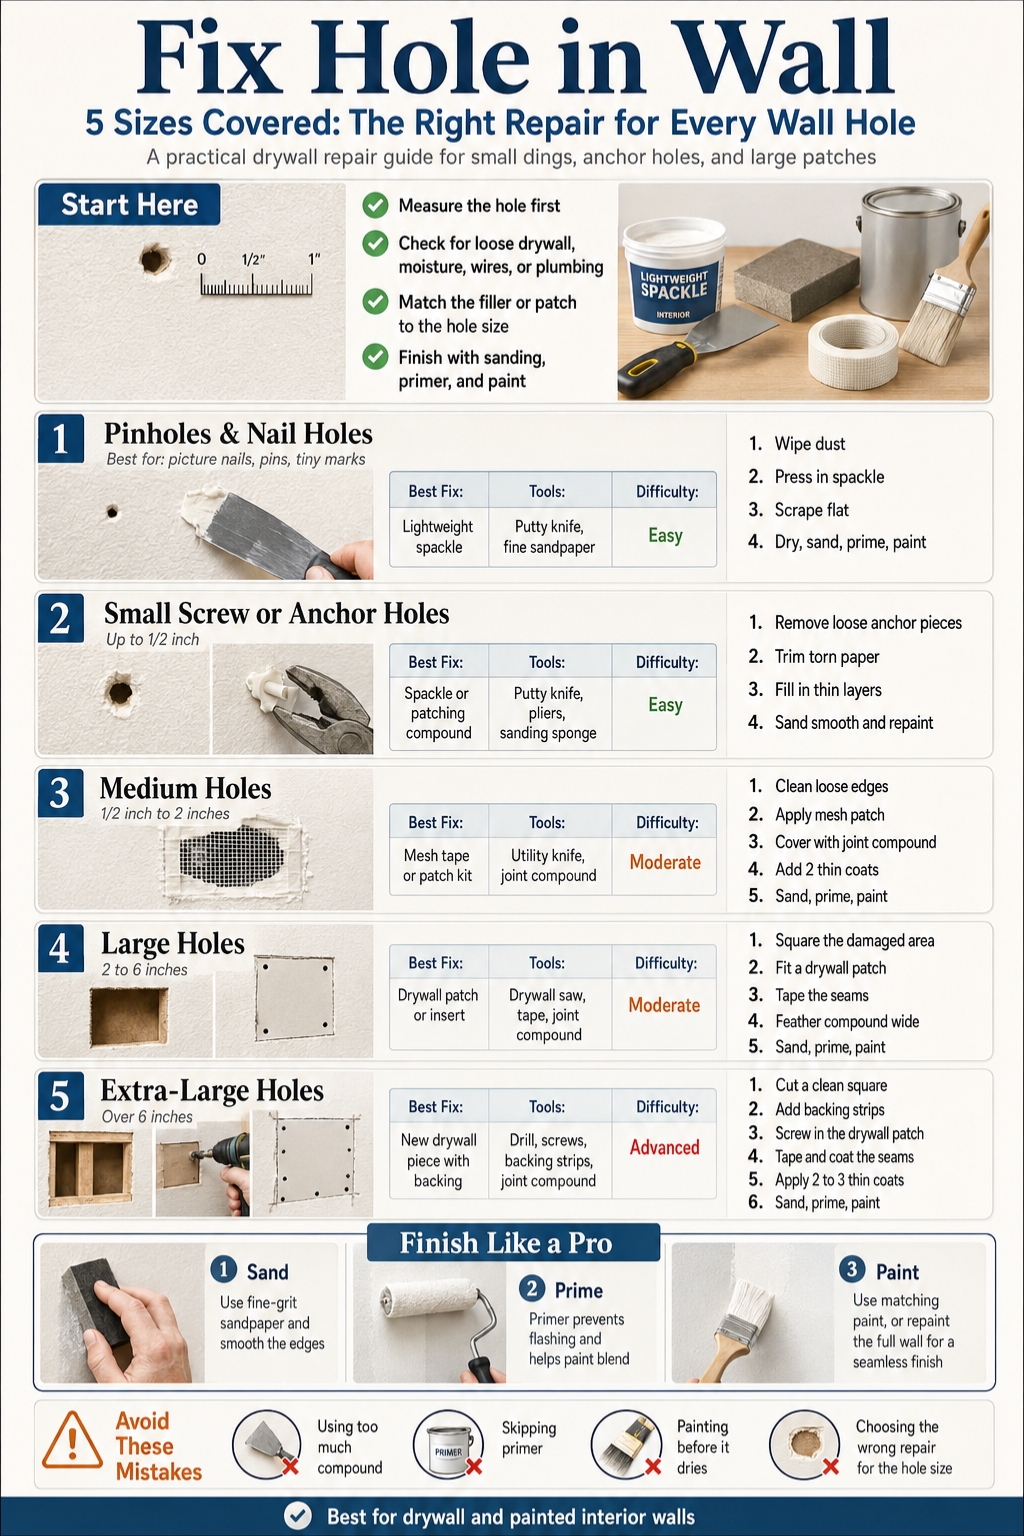
This guide covers five common wall hole sizes, from small nail holes to large drywall openings. You’ll learn what tools to use, when spackle is enough, when joint compound works better, and when a patch needs backing support. The goal is not just to fill the hole. The goal is to make the repair disappear.
Before You Start: Check the Wall and the Damage
Before you touch the filler, look closely at the wall. Most modern interior walls are drywall, but some older homes use plaster, and some buildings have concrete, brick, or masonry walls. Each surface needs a different repair method.
This guide focuses mainly on drywall and plasterboard wall repair. The steps also help with many painted interior walls, but masonry holes need different fillers and anchors.
Also check what caused the damage. A clean nail hole is easy. A torn anchor hole is messier. A hole near an outlet, pipe, or damp area deserves more caution.
|
What to Check |
Why It Matters |
|
Wall type |
Drywall, plaster, and masonry need different materials |
|
Hole size |
The repair method changes as the hole gets bigger |
|
Loose edges |
Weak drywall paper can make the patch fail |
|
Moisture |
Damp walls may mean leaks or mold |
|
Nearby wiring |
Cutting blindly can be dangerous |
|
Paint age |
Old paint may not match after touch-up |
Drywall, plaster, or masonry?
Drywall usually sounds hollow when you tap it. It has a paper face and a gypsum core. Most small holes in drywall can be fixed with spackle, joint compound, mesh tape, or a drywall patch.
Plaster feels harder and more solid. It may crack differently and can need patching plaster or a bonding product. Masonry, brick, and concrete walls need masonry filler or cement-based repair products.
Check for safety before cutting
Do not cut into a wall without checking the area first. Look for outlets, switches, plumbing fixtures, cable lines, or signs that something may run behind the wall.
For large holes, shine a flashlight into the opening before trimming it. If the damage is close to electrical wires, plumbing, or wet drywall, stop and call a professional.
Watch older painted walls
Homes built before 1978 may contain lead-based paint in some countries, especially in the United States. Sanding, scraping, or cutting painted surfaces can create unsafe dust if lead paint is present.
If the wall is old, damaged, or peeling, test first or get professional help. Do not dry-sand unknown old paint around children, pregnant people, or pets.
Tools and Materials You May Need
You do not need every tool for every repair. A tiny nail hole may only need spackle, a putty knife, sandpaper, primer, and paint. A large drywall hole may need a utility knife, drywall patch, screws, wood backing strips, tape, and joint compound.
The best approach is to measure the hole first. Then buy only what matches the repair.
|
Repair Size |
Main Material |
Helpful Tools |
|
Nail holes |
Lightweight spackle |
Putty knife, fine sandpaper |
|
Small screw holes |
Spackle or patching compound |
Putty knife, sanding sponge |
|
Medium holes |
Mesh tape or patch kit |
Utility knife, joint compound |
|
Large holes |
Drywall patch or California patch |
Drywall saw, tape, compound |
|
Extra-large holes |
New drywall piece |
Drill, screws, backing strips |
Basic tools for small wall holes
For nail holes, pinholes, and shallow dents, keep it simple. Use lightweight spackle, a small putty knife, a sanding sponge, primer, and matching paint.
A two-inch putty knife works well for small repairs. A wider knife helps feather edges on bigger patches.
Read Also: How to Install a Ceiling Fan: Complete Step-by-Step Guide
Tools for medium and large holes
Medium and large holes need more support. You may need self-adhesive mesh patches, drywall tape, joint compound, drywall screws, backing strips, and a replacement piece of drywall.
A utility knife helps trim loose paper. A drywall saw helps cut a clean square or rectangle around larger damage.
Spackle vs joint compound
Spackle is best for small holes, nail marks, shallow dents, and quick touch-ups. It dries faster and is easy to sand.
Joint compound is better for larger repairs, seams, drywall tape, and feathering wide areas. It often needs more drying time, but it gives a smoother finish on bigger patches.
How to Fix Hole in Wall Damage by Size
The size of the hole decides the repair. This is where many DIY repairs go wrong. People use too much filler on a big hole or use a large patch for a tiny mark.
Measure the opening, not just the damaged paint around it. If the drywall paper is torn, trim weak edges before deciding which method to use.
A clean repair starts with a clean surface. Remove dust, loose paper, crumbling drywall, and old anchors before adding filler or compound.
|
Hole Size |
Common Cause |
Best Repair Method |
|
Pinholes and nail holes |
Picture hooks, pins, small nails |
Lightweight spackle |
|
Under 1/2 inch |
Screws, small anchors |
Spackle or patching compound |
|
1/2 to 2 inches |
Anchor blowouts, small impact damage |
Mesh tape or patch kit |
|
2 to 6 inches |
Doorknob hit, furniture impact |
Patch kit or drywall insert |
|
Over 6 inches |
Large impact, access cut, broken panel |
New drywall piece with backing |
Why size matters
Small holes only need a filler that sits flush with the wall. Medium holes need something to bridge the opening. Large holes need solid support behind the patch.
If there is no support, the filler may crack or fall inward. That is why a proper repair is not only about covering the surface.
Use thin layers
Thin layers dry better and sand more cleanly. Thick blobs of compound may feel faster, but they often shrink, crack, or leave a raised patch.
For medium and large repairs, two or three thin coats usually look better than one heavy coat.
Think about the finish from the beginning
Paint shows texture. Even if the hole is filled, the repair can still show if the surface is rough, dusty, or unprimed.
Plan for sanding, priming, and painting before you start. Those finishing steps matter as much as the patch itself.
Size 1: How to Fix Nail Holes and Pinholes
Nail holes are the easiest wall holes to repair. These marks usually come from picture frames, small hooks, pins, or light decorations.
The main goal is to fill the tiny opening without creating a raised spot. Use only a small amount of spackle. More filler does not mean a better repair.
This is the fastest way to fix hole in wall damage when the mark is tiny and the drywall around it is firm.
|
Step |
What to Do |
|
1 |
Wipe dust from the area |
|
2 |
Press spackle into the hole |
|
3 |
Scrape off extra filler |
|
4 |
Let it dry fully |
|
5 |
Sand lightly |
|
6 |
Prime and touch up paint |
What you need
Use lightweight spackle, a small putty knife, fine-grit sandpaper, a clean cloth, primer, and matching paint.
For very tiny holes, you can apply spackle with your finger, but a putty knife gives a flatter result.
Step-by-step repair
Clean the hole and the area around it. Press a small amount of spackle into the hole. Hold the putty knife at a slight angle and scrape across the surface.
Let the spackle dry according to the label. Sand it lightly until the surface feels flat. Wipe off dust, prime the spot, and touch up with paint.
Mistake to avoid
Do not leave a bump. Tiny holes often show after painting because the filler sits above the wall surface.
Run your hand over the patch before painting. If you can feel it, you may see it later.
Size 2: How to Fix Small Screw or Wall Anchor Holes
Small screw holes are a little different from nail holes. They can leave a deeper opening, especially if a plastic wall anchor pulled out with the screw.
Before filling the hole, remove anything loose. Old plastic anchors, torn drywall paper, and crumbly edges can stop the patch from bonding well.
If the hole is clean and small, spackle is enough. If the anchor ripped out a chunk, treat it as a medium hole.
|
Problem |
Best Fix |
|
Clean screw hole |
Fill with spackle |
|
Plastic anchor still inside |
Remove or trim it first |
|
Torn drywall paper |
Cut away loose paper |
|
Deep small hole |
Use two thin coats |
|
Crater around anchor |
Use mesh tape or patching compound |
Remove old anchors carefully
If the anchor is loose, pull it out with pliers. If it will not come out cleanly, push it slightly into the wall or trim the exposed part.
Do not keep digging if the drywall starts breaking. A small repair can become a larger one fast.
Fill in layers
For deeper screw holes, use two light coats instead of one thick fill. Press the first coat into the hole and scrape it flat. Let it dry, then add a second coat if the surface sinks.
Small holes often shrink a little as they dry. A second coat gives a cleaner finish.
Sand and paint
Sand gently. Do not tear the drywall paper around the hole. Wipe the dust before priming.
Paint touch-ups work best when you have the original paint. If the wall paint has faded, you may need to repaint a wider area.
Size 3: How to Fix Medium Holes From 1/2 Inch to 2 Inches
Medium holes need more than filler. They are often too wide for spackle alone because there is nothing behind the filler to hold it.
These holes commonly come from failed wall anchors, doorstops, cable holes, small accidents, or removed hardware. A mesh patch or drywall repair kit is usually the safest choice.
This is one of the most common DIY wall repairs because it sits between “easy touch-up” and “real drywall patch.”
|
Repair Option |
Best For |
|
Mesh tape |
Narrow holes and rough anchor damage |
|
Self-adhesive patch |
Round or square holes up to a few inches |
|
Joint compound |
Covering tape and feathering edges |
|
Spackle |
Shallow surface damage only |
|
Patch kit |
Beginners who want everything in one pack |
Clean the hole first
Use a utility knife to cut away loose paper and broken drywall. Sand rough edges lightly. The patch needs a firm surface to stick to.
Do not patch over dust. Dust weakens adhesion and can make the compound peel later.
Apply mesh tape or patch
Place mesh tape or a self-adhesive patch over the hole. Make sure it extends beyond the damaged area.
Spread joint compound over the patch with a putty knife. Use enough to cover the mesh, but do not pile it on. Feather the edges wider than the patch so the repair blends into the wall.
Add a second coat
After the first coat dries, check the surface. If you can see the mesh or feel an edge, add a second thin coat.
Sand only after the compound is fully dry. Then wipe the wall, prime the spot, and paint.
Size 4: How to Fix Large Holes From 2 to 6 Inches
Large holes need structure. A doorknob hole, furniture hit, or broken drywall section cannot be repaired cleanly with spackle alone.
For this size, you have a few options. A strong mesh patch may work for some holes. A California patch can work well for clean drywall damage. A fitted drywall insert gives a stronger repair.
If you want to fix hole in wall damage that is wider than a few inches, slow down and build the patch properly.
|
Method |
Best Use |
Difficulty |
|
Mesh patch kit |
Simple round or square holes |
Easy |
|
California patch |
Medium-large drywall holes |
Moderate |
|
Drywall insert |
Cleaner, stronger repair |
Moderate |
|
Backing strip patch |
Holes without stud support |
Moderate |
|
Professional repair |
Highly visible or textured walls |
Higher cost but cleaner finish |
Square the damaged area
Large holes are easier to patch when the opening is clean. Use a utility knife or drywall saw to cut the damaged area into a square or rectangle.
Do not cut deeper than needed. Check behind the wall before trimming.
Use a drywall patch kit
For many holes in this range, a self-adhesive drywall patch kit works well. Place the patch over the hole and cover it with joint compound.
Feather the compound several inches beyond the patch. If you only cover the patch itself, the repair may look like a raised square after painting.
Use a California patch
A California patch uses a piece of drywall with extra paper left around the front edges. The paper acts like tape and helps blend the patch into the wall.
This method can create a clean finish, but beginners may find it harder than using a ready-made patch kit.
Size 5: How to Fix Extra-Large Holes Over 6 Inches
Extra-large holes need a new piece of drywall. Compound alone cannot fill a wide open space. It needs backing support, screws, tape, compound, sanding, primer, and paint.
This repair takes more time, but it is still manageable if the area is safe and the wall is dry. The key is creating a solid patch that does not move.
If the hole is near plumbing, wiring, mold, or water damage, call a professional before closing the wall.
|
Step |
Purpose |
|
Cut a clean opening |
Makes the patch easier to fit |
|
Add backing strips |
Gives the patch something to screw into |
|
Cut drywall piece |
Replaces the missing wall section |
|
Tape seams |
Helps prevent cracks |
|
Apply compound |
Blends the patch into the wall |
|
Sand and prime |
Prepares the wall for paint |
Cut the hole into a clean shape
Use a utility knife or drywall saw to turn the damage into a clean square or rectangle. Remove loose drywall, old screws, and crumbling edges.
Measure the opening carefully. Cut a replacement drywall piece to fit inside the opening with a small gap around the edges.
Add backing strips
Place wood backing strips behind the existing drywall. Hold each strip in place and screw through the wall into the strip.
The backing strips should sit firmly behind the opening. Then place the drywall patch over them and screw the patch into the strips.
Tape, compound, and feather
Apply drywall tape over the seams. Cover the tape with joint compound. Let it dry, then add another coat.
For a large patch, expect two or three coats. Each coat should spread wider than the last. This feathering makes the repair less visible.
Sanding, Priming, and Painting the Wall
A patch can be strong but still look bad. The finish is what people see. Sanding, priming, and paint blending decide whether the repair disappears or stands out.
Do not rush this stage. Paint will not hide thick ridges, rough compound, or dusty surfaces. It often makes them easier to see.
Use light pressure when sanding. The goal is to smooth the patch, not damage the drywall paper around it.
|
Finish Step |
Why It Matters |
|
Sanding |
Removes ridges and rough edges |
|
Dust removal |
Helps primer and paint stick |
|
Primer |
Prevents dull or shiny repair spots |
|
Paint touch-up |
Restores color |
|
Full wall repaint |
Helps when old paint no longer matches |
Sand with the right grit
Use fine-grit sandpaper or a sanding sponge for most small repairs. For rough dried compound, start with a slightly coarser grit and finish with a finer one.
Avoid very coarse sandpaper on drywall. It can scratch the paper and create a bigger surface problem.
Prime before painting
Primer helps the patched area absorb paint more evenly. Without primer, spackle or joint compound can flash through the paint as a dull or shiny spot.
This matters even more with semi-gloss, satin, or bright lighting. Smooth walls show mistakes faster than textured walls.
Blend the paint
Use leftover paint if you have it. Stir it well before applying. If the paint on the wall is old or sun-faded, a small touch-up may still show.
For the cleanest result, repaint from corner to corner on that wall. It takes longer, but it hides color differences better.
Common Mistakes That Make Wall Repairs Look Bad
Most bad wall repairs fail for simple reasons. The filler is too thick. The patch is not supported. The sanding is uneven. The paint goes on before the compound dries.
A wall patch is not hard, but it does reward patience. Thin coats, clean edges, and proper drying time make the difference.
If you are repairing a wall before moving out of a rental, do not rush the paint stage. A rushed patch can look more obvious than the original hole.
|
Mistake |
What Happens |
|
Using too much compound |
Shrinking, cracking, hard sanding |
|
Skipping primer |
Patch shows through paint |
|
Not feathering edges |
Raised outline appears |
|
Painting too soon |
Soft patch or uneven finish |
|
Wrong repair method |
Hole cracks or collapses |
|
Ignoring texture |
Smooth patch stands out |
Using too much compound
Heavy compound looks useful at first, but it dries slowly and sands poorly. It may also shrink and leave a dip.
Use thin coats. Let each coat dry before adding the next one.
Skipping primer
Primer is not optional if you want a clean finish. Joint compound and spackle absorb paint differently from painted drywall.
A small repair may look fine wet, then dry into a dull spot. Primer helps prevent that.
Not feathering the patch
Feathering means spreading the compound wider and thinner at the edges. It blends the patch into the wall.
Without feathering, the repair can show as a square, circle, or raised island under paint.
How Long Does It Take to Fix a Hole in the Wall?
The repair time depends on the hole size and drying time. Small nail holes can be finished quickly. Large patches may take a day or two because the compound needs time to dry between coats.
Do not judge by active work time only. The waiting time matters more than the time spent holding a putty knife.
Always follow the product label for drying times. Temperature, humidity, and coat thickness can change how long the patch takes to dry.
|
Hole Size |
Active Work Time |
Total Project Time |
|
Nail holes |
10 to 20 minutes |
Same day in many cases |
|
Small screw holes |
15 to 30 minutes |
Same day or next day |
|
Medium holes |
30 to 60 minutes |
Often 1 day |
|
Large holes |
1 to 3 hours |
1 to 2 days |
|
Extra-large holes |
2 to 4 hours |
2 days or more |
Small repairs
Small repairs are quick because they need less material. Some lightweight spackles dry fast, but drying time depends on the product and the depth of the hole.
Even with quick-dry filler, sand gently and prime before painting.
Medium repairs
Medium repairs usually need at least one patch layer and one finish layer. That means more drying time.
If you can still feel the patch edge after sanding, add another thin coat instead of trying to hide it with paint.
Large repairs
Large drywall repairs usually take longer because they involve cutting, fitting, taping, coating, sanding, priming, and painting.
The work is not complicated, but each stage needs time.
DIY Cost vs Hiring a Professional
Small wall holes are usually affordable to repair yourself. If you already have paint, sandpaper, and a putty knife, the cost may be low.
Large holes cost more because you may need drywall pieces, screws, backing strips, tape, compound, primer, and paint. Tools can also add cost if you do not own them.
Hiring a professional makes sense when the repair is large, textured, wet, moldy, close to utilities, or in a very visible area.
|
Repair Type |
DIY Makes Sense? |
Hire a Pro? |
|
Nail holes |
Yes |
Rarely |
|
Screw holes |
Yes |
Rarely |
|
Medium anchor damage |
Usually |
Sometimes |
|
Doorknob hole |
Usually |
Sometimes |
|
Extra-large hole |
Maybe |
Often |
|
Water-damaged wall |
No, not until source is fixed |
Yes |
When DIY makes sense
DIY is a good choice for small nail holes, screw holes, shallow dents, and simple drywall patch kits.
These repairs need basic tools and a little patience. Most homeowners and renters can handle them.
When hiring makes sense
Hire help if the wall is textured and you need the finish matched perfectly. Also hire a professional if the hole is near wiring, plumbing, mold, or water damage.
A bad large patch can be hard to hide. Paying for a clean finish may save time and frustration.
Rental move-out repairs
If you rent, check your lease before patching or painting. Some landlords prefer to handle repairs themselves. Others allow small patching but may not allow repainting.
Take photos after the repair. Keep the work clean and neutral.
Final Thoughts
The best way to fix hole in wall damage is to match the repair to the size of the hole. Tiny nail marks need spackle. Small screw holes may need filler and a second coat. Medium holes need mesh tape or a patch. Large and extra-large holes need drywall support, tape, compound, sanding, primer, and paint.
Do not rush the finish. A strong patch can still look poor if it is not sanded and primed. Thin coats, clean edges, and proper drying time are what make the wall look normal again.
Measure first. Patch second. Paint last. That simple order will save you from most wall repair mistakes.
FAQs About Fixing Holes in Walls
Can I fix a wall hole with only paint?
No. Paint may cover a stain or tiny scuff, but it will not fill a hole. You need spackle, joint compound, mesh, or a drywall patch first.
What is the best filler for tiny nail holes?
Lightweight spackle is usually the easiest choice for tiny nail holes and pinholes. It is simple to apply, dries quickly, and sands smooth.
Can I use toothpaste to fix a hole in the wall?
Toothpaste is not a proper wall repair material. It may hide a tiny mark for a short time, but it can shrink, crack, stain, or fail under paint.
How do I fix a hole from a drywall anchor?
Remove loose anchor pieces first. If the hole is small, fill it with spackle in thin layers. If the anchor tore out a wider chunk, use mesh tape or a patch kit.
Why does my wall patch still show after painting?
The patch may show because it was not sanded flat, not feathered wide enough, or not primed before painting. Old paint color mismatch can also make repairs visible.
Do I need mesh tape for every hole?
No. Nail holes and small screw holes do not need mesh tape. Use mesh tape or a patch when the hole is too wide for filler to hold by itself.
How many coats of joint compound do I need?
Small repairs may need one coat. Medium and large repairs often need two or three thin coats. Add each coat only after the previous one dries.
Can I patch a hole in a textured wall?
Yes, but matching the texture can be harder than filling the hole. You may need spray texture, a texture sponge, or professional help for a seamless finish.
Should I repaint the whole wall after patching?
For tiny holes, touch-up paint may be enough. For larger patches, older paint, or glossy finishes, repainting the full wall often gives a cleaner result.
When should I not repair a wall hole myself?
Do not repair it yourself if the wall is wet, moldy, soft, near live wiring, near plumbing, or likely to contain lead-based paint. Fix the cause first or call a professional.


