
Learning how to replace a toilet seat is one of the most rewarding and surprisingly straightforward home improvement projects you will ever undertake. It demands absolutely no plumbing expertise and saves you from paying hefty contractor callout fees for a task that takes less than ten minutes to complete.
Whether you are dealing with cracked plastic that pinches the skin, a loose hinge that makes you slide sideways every time you sit down, or simply a faded color that ruins your bathroom aesthetic, taking matters into your own hands is highly beneficial. Changing this single fixture can completely refresh your space while eliminating years of hidden bacteria and trapped odors that standard cleaning brushes cannot reach.
Through this comprehensive guide, you will master the exact steps needed to detach rusted hardware, sanitize the porcelain deck, and mount a brand new lid with perfect alignment. You will feel empowered to handle minor bathroom maintenance with total confidence and ease. Let us dive into the details of upgrading your bathroom hardware the right way.
Why You Should Learn How to Replace a Toilet Seat?
Understanding the core reasons behind this maintenance task can motivate you to finally stop putting off that much-needed bathroom upgrade. Dealing with an aging or damaged lid is a daily nuisance that detracts from the comfort of your home and potentially compromises your family hygiene.
Small hairline fractures in plastic or chipped paint on wooden models create microscopic canyons where bacteria and organic matter thrive, defying even the strongest bleach sprays. Beyond the cleanliness factor, the physical discomfort of a shifting base can be alarming and potentially dangerous for elderly family members or young children who rely on a stable surface. Upgrading allows you to introduce modern ergonomic designs that support better posture and weight distribution.
It also gives you the perfect excuse to integrate premium features like whisper-quiet hinges that stop the lid from slamming shut and startling everyone in the middle of the night. By mastering how to replace a toilet seat, you take absolute control over your bathroom environment and ensure a safer, cleaner, and much more inviting space for guests and residents alike.
|
Benefit Category |
Specific Advantage |
Impact on Daily Life |
|
Hygiene |
Removes trapped bacteria hidden inside cracks |
Eliminates lingering odors and makes cleaning faster |
|
Comfort |
Provides better ergonomic support |
Stops annoying side-to-side wobbling when sitting |
|
Aesthetics |
Instantly brightens the bathroom space |
Replaces yellowed or faded materials with fresh finishes |
|
Safety |
Prevents pinching from cracked edges |
Stops heavy lids from slamming down on fingers |
Noticeable Signs of Wear and Tear
Over the years, the materials used in standard bathroom fixtures take a serious beating from constant weight, high moisture levels, and abrasive chemical cleaners. You will likely start noticing small hairline cracks developing along the plastic rim or the painted finish peeling away from wooden models.
These tiny crevices become perfect breeding grounds for bacteria and odors that no amount of scrubbing can fully eliminate. If you see permanent yellow discoloration, deep scratches, or find that the hardware constantly loosen up no matter how hard you tighten the nuts, your fixture has reached the absolute end of its functional life.
Immediate Hygiene and Comfort Benefits
Swapping out old bathroom hardware provides an instant reset for your daily cleaning routine. The hidden area underneath the rear hinges is notorious for collecting grime, and putting on a fresh fixture means you get to scrub that area completely clean before mounting anything new.
Furthermore, newer models are designed with better weight distribution and contouring, making them far more comfortable to sit on for extended periods. You also eliminate the frustrating experience of shifting sideways when you sit down, creating a much safer and more stable environment for everyone in the household.
Upgrading Your Bathroom Aesthetics
A stained or chipped lid can easily ruin the appearance of an otherwise spotless and beautifully decorated bathroom. Because the fixture is often one of the largest visual elements in the room, placing a bright, gleaming new lid on top makes the entire space look cleaner and better maintained.
You can even use this opportunity to subtly change the room decor by choosing a sleek matte black finish, a natural wood grain texture, or a heavy-duty ceramic-style material that feels incredibly premium to the touch.
1: Choosing the Perfect Replacement Seat
Buying a new bathroom fixture without verifying your measurements is a guaranteed way to end up frustrated and returning items to the hardware store. Every porcelain bowl has specific dimensions, and slapping an incorrectly sized lid on top will result in unsightly overhangs or exposed rims that gather dust. You must carefully measure the distance between the rear mounting holes, the widest point of the bowl, and the total length from the hinges to the front edge.
These exact numbers will dictate whether you should be shopping in the round or elongated section of the home improvement aisle. Once you have the dimensions locked down, you can start exploring the vast array of materials available, from heavy-duty enameled wood that resists chilling temperatures to high-impact plastics that shrug off chemical cleaners. You also have the freedom to select advanced ergonomic upgrades, such as quick-release buttons that allow you to lift the entire unit away for deep cleaning. Making an informed decision during the shopping phase guarantees a flawless installation process later on.
|
Measurement Type |
Standard Dimensions |
What It Determines for Purchase |
|
Bolt Hole Distance |
5.5 inches |
Ensures the hinges align perfectly with the porcelain holes |
|
Bowl Width |
14 to 14.5 inches |
Ensures the sides sit flush without awkward overhang |
|
Bowl Length |
16.5 inches or 18.5 inches |
Dictates whether you need a round or elongated model |
|
Hardware Style |
Top-fix or bottom-fix |
Determines how the bolts will anchor to the ceramic deck |
Getting the Right Measurements for Your Bowl
Grab a standard retractable tape measure and prepare to take three distinct measurements from your existing porcelain bowl. First, find the two mounting holes at the very back of the rim where the hinges attach, and measure the exact distance between the centers of these two holes.
For almost all residential fixtures in North America, this distance will be precisely five and a half inches. Next, measure the width of the bowl across its widest point from left to right. Finally, measure the length starting from the imaginary center line between the two rear mounting holes straight down to the very front outer edge of the rim.
Round vs. Elongated Toilet Bowls Explained
Your length measurement is the critical factor that dictates the overall shape of the replacement you need to buy. If your tape measure reads approximately sixteen and a half inches from the back holes to the front rim, you have a round bowl. These are very common in older homes or small powder rooms where saving floor space is an important priority.
If your measurement comes out closer to eighteen and a half inches, you have an elongated bowl. Elongated designs have become the standard in modern construction because the extended oval shape provides significantly more sitting surface and overall comfort.
Picking the Best Material: Plastic, Wood, or Resin
The material you select drastically impacts both the price and the daily feel of your bathroom fixture. Standard polypropylene plastic is lightweight, very affordable, and highly resistant to chemical cleaners, though it can scratch if you use abrasive scrubbing pads.
Duroplast is a heavier, higher-quality plastic that mimics the cold, solid feel of actual ceramic and resists scratching beautifully over time. Molded or enameled wood offers a substantial, heavy feel and tends to stay much warmer to the touch during cold winter mornings, though the painted finish can eventually chip if dropped heavily.
2: Gathering Your Tools and Prepping the Space
Being fully prepared before you begin ensures that you will not end up stuck with half a dismantled bathroom fixture and missing parts. This project is famous for requiring very few hand tools, but the environment you are working in demands a good and thoughtful hygiene strategy. Taking five minutes to gather your gear and clean the surrounding area makes the physical labor much more pleasant and prevents you from cross-contaminating your household tool kit. You will need a simple flathead screwdriver to pry open the decorative covers and pliers to grip the hidden nuts underneath the rim.
It is also incredibly wise to prepare for worst-case scenarios, such as bringing along penetrating oil to loosen rusty threads that refuse to budge. Clearing the floor of trash cans and decorative items gives you the physical space required to twist your arms and shoulders under the bowl safely. A little bit of prep work ensures the entire process flows smoothly from beginning to end without unnecessary interruptions.
|
Essential Item |
Purpose During Installation |
Why You Need It |
|
Flathead Screwdriver |
Prying open plastic hinge covers |
Prevents you from breaking the plastic protective flaps |
|
Adjustable Wrench |
Gripping the nuts underneath the rim |
Provides leverage when standard finger tightening fails |
|
Penetrating Oil |
Loosening heavily rusted metal hardware |
Saves the porcelain from cracking under brute force |
|
Disinfectant Gloves |
Protecting your hands from germs |
Keeps the process sanitary while handling old bathroom parts |
Must-Have Tools for a Smooth Swap
You do not need an advanced plumbing kit or heavy machinery for this job. A standard flathead screwdriver is essential for gently prying open the decorative plastic caps that hide the rear hinges from plain sight.
You will also need a pair of slip-joint pliers, an adjustable wrench, or a dedicated deep socket wrench to grip the fastening nuts located underneath the porcelain rim. If your current fixture has been installed for a decade or more, it is highly recommended to bring a can of penetrating oil to help break down any rust on the metal parts.
Essential Safety and Hygiene Steps
Because you are working in an environment that naturally harbors bacteria, personal protection is an absolute must. Slip on a pair of thick rubber cleaning gloves before you touch any part of the old hardware or reach beneath the rim.
Bring a trash bag directly into the bathroom so you can immediately discard the old fixture and any gross paper towels without walking them through your clean house. It is also wise to wear safety glasses if you anticipate having to saw through metal bolts, as rusty metal flakes can easily fly upward while you work.
Clearing the Workspace for Easy Access
The nuts securing your fixture are located in a very awkward, tight space underneath the back of the porcelain bowl. Clear away any trash cans, plungers, or decorative items sitting on the floor next to the fixture to give your shoulders and arms maximum room to maneuver.
Lay down an old towel or a foam kneeling pad on the hard bathroom tile. You will likely need to get your face fairly close to the floor to look up underneath the rim, so making the floor comfortable and clean beforehand will save your knees and back from unnecessary strain.
3: Step-by-Step Guide to Removing the Old Seat
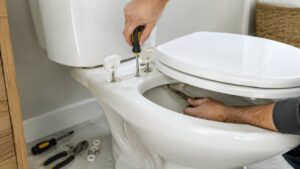
Removing the existing hardware is often the only challenging part of this entire DIY project because of the harsh environment these parts endure. The area around the back of the bowl is frequently exposed to moisture, cleaning chemicals, and poor ventilation, which can easily cause metal parts to fuse together over the years. Knowing how to carefully dismantle these pieces without cracking the fragile porcelain bowl underneath is the absolute key to a successful swap.
You must start by exposing the bolt heads hidden beneath the plastic hinge covers without aggressively scratching the ceramic glaze. From there, it is a matter of stabilizing the bottom nut while you carefully unscrew the top bolt in a counter-clockwise motion. If you encounter severe resistance, you must practice extreme patience rather than applying brute force, utilizing chemical lubricants to dissolve the mineral bonds. Taking your time during removal prevents costly mistakes that could ruin your entire toilet setup.
|
Removal Step |
Action Required |
Troubleshooting Tip |
|
1. Expose Bolts |
Pry open the rear plastic hinge covers |
Use a flathead screwdriver gently to avoid scratching porcelain |
|
2. Secure Bottom Nut |
Grip the nut underneath the rim with pliers |
If it spins freely, pull downward on the nut to catch threads |
|
3. Unthread Top Bolt |
Turn the top screw counter-clockwise |
Apply penetrating oil if a metal bolt refuses to turn |
|
4. Remove Assembly |
Lift the entire unit straight up and away |
Check for any remaining rubber washers stuck to the top deck |
Finding and Popping the Hinge Caps
Look at the very back of your current lid where it connects directly to the porcelain bowl. You will see two small plastic covers or flaps sitting completely flat against the surface. These caps protect the mounting hardware from moisture, urine, and dust.
Take your flathead screwdriver, find the small indentation at the back edge of the cap, and gently pry it upward until it releases. It should pop open like a tiny trapdoor, revealing the head of the bolt inside, but be careful not to scratch the surrounding glossy porcelain.
Loosening Plastic and Metal Hardware
Once the top bolt heads are fully exposed, reach one hand underneath the side of the porcelain bowl until you feel the threaded bolt poking through. If your hardware is made of white plastic, this process is usually an absolute breeze.
Simply hold the bottom plastic wingnut tight with your fingers while you use your screwdriver to back the top bolt out counter-clockwise. If the setup uses metal bolts, you will likely need your pliers to hold the bottom nut securely, as years of moisture usually make metal threads quite sticky and difficult to turn by hand.
Dealing with Stubborn or Rusted Bolts
It is incredibly common to find metal hardware completely locked in place by thick red rust or white calcium buildup. If the top screw refuses to turn, do not try to force it with all your body weight; excessive torque can actually shatter the porcelain ear of the bowl.
Instead, spray penetrating oil generously onto the threads underneath the bowl and let it sit undisturbed for ten to fifteen minutes. If it still will not budge, grip the bottom nut with heavy-duty locking pliers to hold it perfectly still while you apply firm, steady pressure to turn the top screw.
4: Cleaning the Hidden Surface Areas
With the old hardware finally detached and tossed in the trash, you are going to uncover a hidden ring of absolute grime on the flat porcelain deck. This specific area has been completely shielded from your regular cleaning sponge for years, quietly accumulating mineral deposits, sticky soap scum, and bacteria. Taking the time to restore this ceramic surface to a pristine, smooth condition is crucial before you even think about putting the new lid on.
If you skip this step, the fresh rubber mounting pads will sit on top of uneven dirt, causing the new fixture to slide around and loosen up almost immediately. You should employ a safe, non-abrasive chemical cleaner or a natural vinegar paste to break down the hardened calcium without dulling the protective vitreous china glaze. After scrubbing away the dark rings, the final and most important step is ensuring the entire surface is completely bone dry. Preparing a flawless foundation guarantees that your replacement hardware will grip the porcelain tightly for years of reliable use.
|
Cleaning Task |
Best Method |
Why It Matters for Installation |
|
Removing Grime |
Scrub with hot water and dish soap |
Eliminates the sticky base layer of accumulated dirt |
|
Dissolving Minerals |
Apply vinegar and baking soda paste |
Breaks down hard white calcium rings around the mounting holes |
|
Disinfecting |
Spray with antibacterial bathroom cleaner |
Kills hidden germs that cause lingering unpleasant bathroom odors |
|
Drying |
Wipe completely with a microfiber cloth |
Ensures the new rubber hinge pads grip the dry porcelain firmly |
Scrubbing Away Years of Hidden Grime
The dark, crusty rings you see around the mounting holes are a gross combination of hard water minerals and organic matter. If you simply install the new hinges directly over this crusty layer, the replacement lid will never sit perfectly flat against the porcelain.
This uneven contact causes the hinges to slip sideways every time you sit down, leading to the dreaded loose lid syndrome. Grab an old toothbrush and a heavy-duty scrubbing sponge to break down the worst of the sticky residue until the ceramic feels perfectly smooth.
Best Cleaning Agents to Use on Porcelain
Porcelain is an incredibly durable material, but the glossy vitreous china glaze can become permanently dull if you scrub it with harsh abrasives like steel wool or heavy scouring powders. For safe and effective cleaning, mix a thick paste of baking soda and plain white vinegar.
Slather this fizzing mixture directly over the hard mineral rings and let it sit for a few minutes to melt the calcium deposits safely. For heavy discoloration, a standard bathroom bleach spray works wonders, but make sure to rinse it away thoroughly with water afterward.
Drying the Deck for a Secure Fit
Once the porcelain is sparkling clean and feels entirely smooth to the touch, you must dry the entire area completely. Take a clean paper towel or a dry microfiber cloth and wipe away every single drop of moisture from the top deck and the underside of the rim.
Modern replacement hinges rely on thin rubber grip pads that sit directly between the plastic hinge and the slippery ceramic. If the porcelain is wet or greasy from cleaning sprays, those rubber pads will slide around uncontrollably, making it impossible to secure the lid.
5: Installing the New Toilet Seat
Now that you have a beautifully clean and dry canvas, you are finally ready to assemble the new hardware and complete your project. This is arguably the most rewarding part of the process, as you get to see your bathroom aesthetics instantly improve right before your eyes. Most modern fixtures come with simplified hardware kits that make assembly completely intuitive, but paying close attention to visual alignment here will save you from having to loosen and adjust things later.
You must carefully drop the long bolts through the aligned hinges, making sure any included rubber washers are placed exactly as the instruction manual dictates. Hand-tightening the nuts underneath is the best strategy initially, as it leaves enough slack for you to perfectly center the lid over the bowl. Once everything looks symmetrical and flush with the front rim, you can lock the fasteners down firmly with your tools. Snapping the decorative hinge covers closed is the final satisfying step that signifies a job well done.
|
Installation Step |
Action Required |
Pro Tip for Success |
|
1. Position the Seat |
Lay the lid down and align the hinges |
Keep the lid closed during this step to easily judge alignment |
|
2. Drop the Bolts |
Push the long bolts straight down the holes |
Ensure any rubber washers are placed exactly as the manual states |
|
3. Thread the Nuts |
Hand-tighten the bottom nuts clockwise |
Do not use wrenches yet; leave them loose enough to allow sliding |
|
4. Center and Lock |
Adjust the lid so it perfectly matches the rim |
Once aligned, use your tools to tighten firmly and snap caps shut |
Aligning the Hinges with the Mounting Holes
Unpack your brand new fixture and lay out all the included hardware pieces on the bathroom counter so nothing rolls away onto the floor. Carefully place the new lid assembly directly onto the freshly cleaned porcelain deck.
Open the decorative flaps on the new hinges and line up the plastic openings exactly over the holes in the ceramic base. Drop the new bolts straight down through the hinges so they protrude out the bottom of the bowl, ensuring they do not bind on the sides.
Threading and Tightening the Nuts
Reach underneath the rim and begin threading the new nuts onto the hanging bolts. Spin them clockwise by hand until they travel all the way up and lightly touch the underside of the ceramic rim.
At this stage, it is crucial to leave them slightly loose. Do not grab your wrench or screwdriver just yet. You need the entire top assembly to be snug but still capable of sliding around slightly under gentle hand pressure so you can fix the alignment.
Testing for Wiggles and Final Adjustments
Stand up and look directly down at the closed lid from above. Gently push the assembly around until the curved front edge of the lid precisely matches the curved edge of the porcelain rim below it. Run your fingers along the sides to ensure there is no awkward overhang on the left or the right.
Once the position looks absolutely perfect, carefully reach underneath and hold the bottom nut still while you use your screwdriver to tighten the top bolt firmly, then snap the hinge covers down.
Maintenance Tips for a Long-Lasting Toilet Seat
You just learned how to replace a toilet seat, and naturally, you want your hard work to remain looking flawless for as long as possible. The actual lifespan of bathroom hardware is heavily dictated by how you treat it during your weekly household cleaning routine. Treating the plastic or wood surfaces with extreme chemical aggression will rapidly deteriorate the finish and leave it looking aged long before its time. Instead, adopting gentle wiping habits using mild detergents will preserve the glossy shine and prevent microscopic scratches from forming.
Furthermore, mechanical maintenance is just as important as chemical maintenance. The repeated structural forces of people sitting down and shifting their body weight will inevitably cause even the best mounting fasteners to loosen ever so slightly over the months. By performing periodic physical checks and gently snugging up the hardware when necessary, you protect the plastic hinges from bearing uneven stress. Following these basic upkeep rules ensures your fixture remains sanitary, stable, and visually appealing year after year.
|
Maintenance Habit |
Best Practice |
What to Absolutely Avoid |
|
Routine Cleaning |
Use mild dish soap or diluted vinegar |
Never use heavy bleach, ammonia, or harsh aerosol scouring foams |
|
Hinge Checks |
Wiggle the lid gently once a month |
Do not ignore a loose lid, as shifting heavily strains the hinges |
|
Hardware Upkeep |
Snug up underneath nuts if looseness occurs |
Avoid over-tightening with a heavy wrench to prevent cracking |
|
Scratch Prevention |
Wipe surfaces with soft microfiber cloths |
Never use stiff bristle brushes or rough green scouring pads |
Gentle Cleaning Habits to Prevent Damage
The absolute biggest mistake homeowners make is treating their plastic lid the exact same way they treat the heavy porcelain bowl beneath it. Pouring raw bleach or scrubbing with abrasive powders will instantly create microscopic scratches across the sensitive surface of a plastic or wooden lid.
These tiny scratches ruin the glossy finish permanently and act as deep traps for dirt and urine, leading to yellow discoloration that looks terrible. Always use a soft sponge or cloth, and stick to gentle, non-abrasive bathroom sprays.
Routine Checks to Avoid a Wobbly Lid
No matter how perfectly you tightened the nuts during the initial installation, the daily mechanical stress of people sitting down and shifting their weight will eventually cause the hardware to stretch or back out slightly. Make it a regular habit to check the physical stability of your fixture every few months.
If you notice a tiny bit of side-to-side play when you close the lid, pop open the hinge covers immediately and spend thirty seconds tightening the bolts to prevent permanent hinge damage.
When to Adjust the Stay-Tite Fasteners?
Many modern models utilize specialized breakaway nuts designed to snap off a lower section when the perfect torque is reached during installation, theoretically guaranteeing they will never loosen up. However, the rubber friction pads sandwiched between the hinge and the porcelain can still compress flat over the years.
If a seat utilizing these self-locking nuts begins to slide, you can simply take an adjustable wrench, grip the remaining upper portion of the nut underneath the bowl, and give it a quarter-turn tighter to restore stability.
Final Thoughts
Mastering how to replace a toilet seat proves that you do not need to call a costly handyman for every minor bathroom annoyance that pops up in your home. By taking five simple minutes to measure your bowl properly, gathering a few basic hand tools, and understanding how to safely dismantle old hardware, you can instantly elevate the comfort and cleanliness of your space.
Remember to clean the hidden porcelain deck thoroughly during the swap, tighten the hardware carefully without brute force, and stick to gentle cleaning products to protect the finish. Your proactive approach guarantees a beautifully maintained bathroom for years to come.
Frequently Asked Questions (FAQs) About Toilet Seat Replacement
What should I do if my toilet seat hangs over the edge?
If the front edge of your new lid hangs awkwardly over the porcelain, or if the porcelain extends far past the lid, you have unfortunately purchased the wrong shape. You likely bought a round model for an elongated bowl or vice versa. You cannot adjust the hinges enough to fix a massive two-inch discrepancy in length. You will need to clean the hardware, carefully repackage it, and exchange it at the store for the correct shape.
How do I remove a broken snap-off nut?
If you look under the rim and see a plastic nut that looks like the bottom half has been violently broken off, do not panic at all. Premium brands use torque-limiting nuts where the bottom half is intentionally designed to snap away once optimal tightness is achieved during the initial installation. If you need to remove one of these nuts to replace the lid, simply take a standard adjustable wrench, grip the remaining flat sides of the upper nut body, and unscrew it normally.
Why does my toilet seat cover keep falling down?
If your newly installed lid refuses to stay upright and constantly falls forward to hit you in the back, the issue is usually a physical obstruction near the rear hinges. First, push the heavy ceramic lid of your water tank as far backward toward the wall as it will physically go, as it often creeps forward. If the tank lid is fully recessed, you may need to loosen the mounting bolts, slide the entire seat assembly forward by half an inch using the adjustability built into the hinges, and re-tighten.
Can I install a top-fix seat on any toilet?
Yes, top-fix hardware is a fantastic modern plumbing solution that works on almost any fixture. Some high-end skirted toilets have completely smooth ceramic sides, meaning you cannot reach your hand underneath to thread a traditional nut. Top-fix kits use heavy rubber plugs with threaded metal inserts inside them that push down into the top holes of the porcelain deck. As you tighten the bolt from above, the rubber plug expands outward inside the hole, gripping the ceramic tightly from the inside out.


