
A window AC feels like a small miracle on a hot day. It cools one room fast, fits in tight spaces, and costs far less than a central air system. But it also gets dirty fast. Dust clogs the filter. Pollen sticks to the outdoor coil. Moisture collects in the drain pan.
Pet hair, lint, cooking grease, and road dust slowly settle inside the unit. After a while, the AC starts blowing weak air, smelling musty, leaking water, or running longer than usual. That’s when you need to clean window ac unit parts the right way. The good news? You don’t need to be an HVAC technician. You just need safe steps, simple tools, and a little patience.
This guide walks you through the full job. You’ll learn how to clean the filter, grille, coils, fins, drain pan, outdoor side, and cabinet. You’ll also learn how to stop smells, prevent leaks, store the unit, and spot warning signs before they become expensive problems.
Why Cleaning a Window AC Unit Matters?
|
Cleaning Area |
What It Improves |
What You May Notice |
|
Air filter |
Airflow |
Stronger cool air from the vents |
|
Indoor coil |
Heat absorption |
Faster room cooling |
|
Outdoor coil |
Heat release |
Less strain on the unit |
|
Drain pan |
Moisture control |
Fewer musty smells and leaks |
|
Vents and grille |
Air direction |
Cleaner, smoother airflow |
|
Fins |
Heat transfer |
Better cooling efficiency |
|
Cabinet |
Cleanliness |
Less dust and fewer insects inside |
A window AC works by pulling warm room air through a filter. That air passes over a cold coil. The unit sends cooler air back into the room and pushes heat outside. This process sounds simple, but it depends on clean airflow. When dust blocks the filter, the AC cannot pull in enough air. When dirt covers the coils, heat does not move as well. When fins bend or clog, the unit has to work harder.
A dirty window AC may still turn on. It may still blow air. But it won’t cool as well as it should. You may notice the room takes longer to cool. You may hear the unit running more often. You may feel weak airflow from the vents. You may also smell that damp, stale odor that shows up when dust and moisture sit together.
Cleaning helps the unit breathe again. It also helps protect the fan, motor, compressor, and electrical parts from unnecessary strain. Air conditioning uses a large share of household electricity in hot months. A clean unit does not guarantee a huge drop in your energy bill, but it can help the AC run more smoothly. That alone makes regular cleaning worth the effort.
Clean it before the first heat wave, not after the unit starts struggling.
What Gets Dirty Inside a Window AC?
|
AC Part |
What Builds Up There |
Why It Becomes a Problem |
|
Air filter |
Dust, lint, pet hair, pollen |
Blocks airflow |
|
Front grille |
Dust and sticky residue |
Makes vents dirty |
|
Evaporator coil |
Fine dust and moisture |
Weakens cooling |
|
Condenser coil |
Leaves, insects, pollen, road dust |
Makes heat harder to release |
|
Coil fins |
Dirt and bends |
Restricts air movement |
|
Drain pan |
Slime, dirt, water |
Causes odor or leaks |
|
Blower area |
Grime and dust |
Can spread smell |
|
Cabinet |
Bugs, dirt, moisture |
Makes the unit messy inside |
A window AC collects dirt from both sides. The front side faces your room. The back side faces outdoors. Inside the room, the unit pulls in dust, fabric fibers, pet dander, hair, smoke particles, and cooking residue. If the AC is near a kitchen, it may collect a light greasy film. If you have pets, the filter can clog much faster.
Outside, the unit catches pollen, leaves, insects, rain, road dust, and humidity. If your window faces a street, garden, balcony, or construction area, the outdoor coil can get dirty quickly. The filter catches a lot, but it does not catch everything. Fine particles can pass through and stick to the indoor coil. That coil gets cold and damp, so dust clings to it.
The drain pan also needs attention. Your AC removes moisture from the room. Some water collects inside before draining or evaporating. When dust mixes with water, it can create slime and odor. That’s why cleaning only the filter is not always enough. It is a good start, but the full unit needs care too.
A clean AC should not smell sour, musty, or dusty when it starts. If it does, something inside likely needs cleaning.
Safety First: Don’t Skip This Part
|
Safety Step |
What to Do |
Why It Matters |
|
Turn the unit off |
Stop cooling before cleaning |
Prevents moving parts from running |
|
Unplug the AC |
Remove power from the unit |
Lowers shock risk |
|
Keep controls dry |
Avoid spraying buttons or wiring |
Protects electrical parts |
|
Wear gloves |
Protect hands from sharp metal |
Fins and edges can cut skin |
|
Use gentle cleaners |
Stick with soap and AC-safe products |
Prevents damage |
|
Lift with help |
Ask someone to help remove heavy units |
Avoids injury and drops |
|
Follow the manual |
Check model-specific cleaning rules |
Keeps the unit safer |
Before you touch the unit, turn it off and unplug it. Not just off. Unplugged. This matters because a window AC has electrical parts, a fan, and sharp internal pieces. You do not want the unit connected to power while you clean it.
Keep water away from the control panel, display, plug, cord, outlet, reset button, and wiring. A lightly damp cloth is fine for wiping the outside cabinet. A soaked control area is not. Wear gloves if you have them. The thin metal fins can cut your fingers. The cabinet edges can also be sharp, especially on older units.
If you remove the AC from the window, get help. Many window units are heavier than they look. They are also awkward to hold because the weight is not always balanced. Use mild cleaners. Warm water and a little dish soap work for the filter, grille, and plastic parts. Avoid strong chemicals, paint thinner, gasoline, wax cleaner, and heavy degreasers. Do not open sealed refrigerant parts. Do not repair damaged cords. Do not bypass safety plugs. Those jobs belong to trained professionals.
Tools and Supplies You’ll Need
|
Tool or Supply |
Best Use |
Helpful Tip |
|
Vacuum with brush attachment |
Removing loose dust |
Use gentle pressure |
|
Mild dish soap |
Cleaning washable parts |
Rinse well after washing |
|
Warm water |
Washing filter and grille |
Avoid very hot water |
|
Microfiber cloth |
Wiping vents and cabinet |
Wring it out first |
|
Soft brush |
Loosening coil dust |
Brush with the fin direction |
|
Spray bottle |
Light misting where safe |
Do not spray electrical areas |
|
Fin comb |
Straightening bent fins |
Use the right spacing |
|
Gloves |
Hand protection |
Useful around metal edges |
|
Towels |
Catching drips and dust |
Place under the unit |
|
Screwdriver |
Removing some covers |
Keep screws in one cup |
|
Flashlight |
Inspecting hidden areas |
Look for grime, bugs, and mold |
You don’t need expensive tools to clean a window AC. Most of the job uses basic household items. A vacuum with a brush attachment does a lot of the work. It pulls loose dust from the filter, vents, grille, and coil face without pushing dirt deeper inside. A soft brush helps with corners. A clean paintbrush works well. Avoid wire brushes because they can bend fins and scratch surfaces.
A microfiber cloth is perfect for wiping the cabinet and vents. Keep it damp, not dripping wet. Use mild dish soap for washable plastic pieces and reusable filters. Rinse everything well. Soap residue can collect dust later. A fin comb is optional but useful if the coil fins are bent. Bent fins block airflow. Straightening them helps air pass through the coil more easily. Keep a flashlight nearby. It helps you spot slime in the drain pan, dust on the coil, bugs near the outdoor side, and dark buildup around the blower area.
How to Clean Window AC Unit Step by Step?
|
Step |
What You’ll Do |
Why It Helps |
|
1 |
Turn off and unplug the AC |
Keeps the job safe |
|
2 |
Remove the front grille |
Gives access to the filter |
|
3 |
Wash the filter |
Restores airflow |
|
4 |
Vacuum visible dust |
Removes loose debris |
|
5 |
Clean the indoor coil |
Helps cooling performance |
|
6 |
Wipe the drain pan |
Reduces smells and leaks |
|
7 |
Clean the outdoor side |
Helps heat release |
|
8 |
Dry and reassemble |
Prevents moisture problems |
This is the main process to clean window ac unit parts safely. Take your time. Rushing can bend fins, break clips, or leave wet parts inside. Start with a light clean if the AC is only dusty. Leave it in the window and clean the filter, grille, vents, and visible coil. Do a deeper clean if the unit smells musty, leaks water, has weak airflow, or has not been cleaned for a full season. A deep clean is easier when the unit is removed from the window.
After unplugging the unit, remove the front grille. Some covers snap off. Others slide out or use small screws. Check before pulling. If screws are present, place them in a cup so they don’t disappear. Take out the filter and vacuum it first. If it still looks dirty, wash it with warm water and mild soap. Rinse it well and let it dry completely. Vacuum the vents, grille area, and visible coil face. Be gentle. Do not press hard into the fins.
Clean the indoor coil with a soft brush and vacuum. If needed, use an AC-safe coil cleaner and follow the product label. Wipe the drain pan if you can reach it. Remove dirt, bugs, slime, and standing water. Clear visible drain paths, but do not drill extra holes. Clean the outdoor side by brushing away leaves, pollen, and debris. If your manual allows gentle rinsing and the unit is removed, rinse the outdoor coil with low-pressure water. Keep electrical parts dry. Let everything dry before reassembly. Put the filter back only when it is fully dry. Then run fan mode for several minutes before switching to cool mode.
Can You Clean a Window AC Without Removing It?
|
Cleaning Task |
Can You Do It Installed? |
Best Approach |
|
Wash the filter |
Yes |
Remove, wash, dry, reinstall |
|
Clean the front grille |
Yes |
Vacuum and wipe gently |
|
Wipe the vents |
Yes |
Use a damp cloth |
|
Vacuum indoor coil |
Yes |
Use a soft brush attachment |
|
Clean drain pan |
Partly |
Wipe reachable areas |
|
Clean outdoor coil |
Partly |
Brush visible debris |
|
Deep clean cabinet |
Usually no |
Remove unit if safe |
|
Inspect heavy mold |
Better removed |
Use a flashlight first |
Yes, you can clean a window AC while it stays in the window. For routine maintenance, that is often enough. You can wash the filter, clean the grille, wipe the vents, and vacuum visible dust without removing the unit. This is the best option for quick monthly cleaning. But some jobs are hard to do while the AC is installed. The outdoor coil may be hard to reach. The drain pan may be hidden. The bottom of the unit may hold dirt you cannot see from the front.
Remove the unit if it smells musty, leaks inside, has heavy outdoor buildup, or has not been cleaned in a long time. If the AC is installed with brackets, screws, side panels, or a support frame, take care before removing it. The unit can slip if you loosen the wrong part first. Renters should check building rules before removing a window AC. Some apartments require maintenance staff to handle removal. If you can’t remove it safely, do a careful in-window clean and call a technician for deeper service if needed.
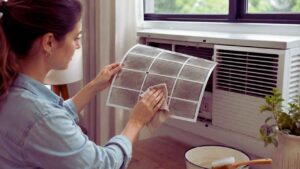
Clean the Filter First: The Small Fix That Matters Most
|
Filter Condition |
What It Means |
What to Do |
|
Light dust |
Normal use |
Vacuum or rinse |
|
Thick gray dust |
Airflow is blocked |
Wash with mild soap |
|
Sticky film |
Grease or smoke residue |
Wash gently and rinse well |
|
Pet hair |
High debris load |
Clean more often |
|
Torn mesh |
Poor filtration |
Replace the filter |
|
Wet filter |
Odor risk |
Let it dry fully |
|
Missing filter |
Coil will get dirty fast |
Replace before use |
The filter is the first part you should clean. It is easy to reach, easy to wash, and has a big effect on airflow. A clogged filter blocks air before it reaches the coil. That makes the AC work harder. It can also cause weak airflow, slow cooling, or ice on the coil. Check the filter every two to four weeks during warm weather. If you run the AC daily, check it every week or two.
Clean it more often if you have pets, live near traffic, cook near the AC, or deal with heavy pollen. A bedroom unit may stay cleaner than a unit near a kitchen or street-facing window. Most window AC filters are washable. Vacuum loose dust first. Then rinse with warm water. Add mild dish soap if the filter feels greasy or sticky. Rinse until the water runs clear. Shake off extra water. Let the filter air dry fully before reinstalling it. Never run the unit without the filter. Dust will go straight into the coil and blower area, and that makes the next cleaning much harder.
Cleaning Coils and Fins Without Wrecking Them
|
Part |
What It Does |
Safe Cleaning Method |
|
Evaporator coil |
Absorbs heat from indoor air |
Soft brush, vacuum, AC-safe cleaner |
|
Condenser coil |
Releases heat outdoors |
Brush debris, gentle cleaning if allowed |
|
Coil fins |
Help move heat |
Straighten carefully with a fin comb |
|
Blower area |
Moves cooled air |
Wipe only reachable areas |
|
Coil cleaner |
Loosens grime |
Use only as directed |
|
Bent fins |
Block airflow |
Straighten gently, don’t force |
|
Heavy grime |
Reduces cooling |
Consider professional cleaning |
Coils are delicate, so treat them gently. This is not the place for hard scrubbing. The indoor evaporator coil gets cold and damp during cooling. Dust sticks to it over time. If the coil gets too dirty, the room may cool slowly, and the unit may run longer. The outdoor condenser coil releases heat outside. It often collects pollen, leaves, dust, insects, and grass clippings. If that coil is blocked, the AC cannot dump heat well.
Use a soft brush first. Brush in the same direction as the fins. Then vacuum loose dirt with a brush attachment. If the fins are bent, use a fin comb. Move slowly. Don’t force the metal back into place with a screwdriver or knife. If the coil is greasy or packed with grime, use a coil cleaner made for air conditioners. Read the label and follow the directions.
Avoid pressure washers. They can flatten fins and push water into the wrong places. If the blower wheel is covered in black grime or mold-like buildup, basic cleaning may not be enough. That may call for professional service or replacement.
Musty Smells, Mold, and When to Worry
|
Symptom |
Possible Cause |
What to Do First |
|
Musty smell |
Damp dust inside the AC |
Clean filter, coil, and pan |
|
Sour smell |
Standing water or slime |
Wipe the drain pan |
|
Black flakes |
Dirt, foam, or possible mold |
Stop and inspect |
|
Smell after storage |
Unit was stored damp |
Deep clean and dry |
|
Smell returns fast |
Hidden buildup |
Consider service |
|
Visible fuzzy growth |
Possible mold |
Avoid running it |
|
Allergy symptoms |
Dirty or moldy airflow |
Clean or replace unit |
A window AC creates moisture. That is normal. Warm room air hits the cold coil, and water forms. The problem starts when that moisture mixes with dust and stays inside the unit. That damp dust can smell musty. It can also support mildew or mold growth in some cases. Start with basic cleaning. Wash the filter. Vacuum the coil face. Wipe the drain pan. Clear visible debris. Let the unit dry before using it again.
If the smell is mild, this often helps. If the smell is strong, inspect deeper with a flashlight. Look for fuzzy growth, black or green patches, slime, or dirty foam. Don’t ignore heavy buildup. Be more careful if someone in your home has asthma, allergies, chronic lung disease, or a weak immune system. Mold and damp indoor air can bother sensitive people.
Black flakes coming out of the vents are a warning sign. They may be dirt, old foam, or mold. Turn off the AC, unplug it, and inspect before using it again. Some recalled U-shaped window AC models had drainage-related mold concerns. If your unit is a U-shaped model, check the model number through the official recall channel. If it is recalled, follow the official instructions.
Why Your Window AC Drips Water Indoors?
|
Water Problem |
Common Cause |
What to Check |
|
Water dripping inside |
Wrong tilt or blocked drain path |
Installation angle and pan |
|
Water dripping outside |
Normal condensation |
Usually not a problem |
|
Water pooling inside |
Dirt or slime buildup |
Drain pan and channels |
|
Ice melting into room |
Frozen coil |
Filter and airflow |
|
Leak after cleaning |
Loose grille or filter |
Recheck reassembly |
|
Sudden heavy leak |
Clogged path or poor support |
Turn off and inspect |
|
Recurring leak |
Deeper issue |
Call a technician |
A little water dripping outside is normal. Your AC removes humidity from the room, so water has to go somewhere. Water dripping inside is different. It usually means something is wrong. The unit may not be tilted correctly. The drain pan may be dirty. The drain path may be blocked. The coil may have frozen and then melted. Poor airflow can also lead to water problems.
Turn off and unplug the AC before inspecting it. Start with the filter. A dirty filter can reduce airflow and cause the coil to freeze. When that ice melts, water may drip where it should not. Check the grille and filter placement. If parts are not seated correctly after cleaning, air and water may move oddly.
Look at the window angle. Many window AC units need a slight tilt toward the outside, but always follow your manual. Too much tilt or the wrong tilt can cause problems. If the drain pan has slime or debris, wipe what you can reach. Don’t drill extra holes because some units are designed to hold a small amount of water. If water keeps leaking indoors after cleaning and checking the setup, stop using the unit and get help.
How Often Should You Clean a Window AC Unit?
|
Task |
Normal Use |
Heavy Use |
|
Check filter |
Monthly |
Every 1–2 weeks |
|
Wash filter |
Monthly |
Every 2 weeks |
|
Wipe grille |
Monthly |
Every 2–4 weeks |
|
Vacuum visible coil |
Start of season |
Mid-season too |
|
Clean drain pan |
Start and end of season |
Monthly if odor appears |
|
Clean outdoor side |
Once per season |
2–3 times per season |
|
Deep clean |
Once a year |
Before and after summer |
There is no perfect schedule for every home. Your cleaning routine depends on how often you use the AC and how dusty your space gets. A bedroom unit used only at night may stay clean for weeks. A unit near a kitchen, pet bed, busy road, or dusty window may need cleaning much more often. Use your filter as the guide. If the filter looks dirty, clean it. Don’t wait for weak airflow.
During peak summer, check the filter every two weeks. If the AC runs every day, weekly checks are even better. Clean the grille and vents monthly. Dust on the front panel can blow back into the room and make the unit look neglected.
Do a deeper clean before summer starts. That means filter, grille, visible coils, drain pan, cabinet, and outdoor side. Do another clean before storage. A dirty, damp AC stored for months can smell terrible next season.
Troubleshooting After Cleaning
|
Problem |
Possible Cause |
What to Try |
|
AC won’t start |
Outlet, breaker, cord, reset button |
Check power safely |
|
Weak airflow |
Wet filter or blocked vent |
Dry filter and clear vents |
|
Not cold enough |
Wrong mode or dirty coil |
Check settings and coil |
|
Ice forms |
Poor airflow or refrigerant issue |
Clean filter and let ice melt |
|
Loud vibration |
Loose panel or poor window fit |
Tighten and support unit |
|
Smell remains |
Hidden grime or mold |
Inspect deeper |
|
Water leaks inside |
Tilt or drain issue |
Check pan and installation |
Sometimes cleaning fixes the problem right away. Other times, it reveals a deeper issue. If the AC won’t start, check the outlet, breaker, plug, and reset button. If the cord looks damaged, stop using it. If airflow feels weak, check the filter first. It may still be damp, clogged, or seated incorrectly. Also make sure curtains, blinds, furniture, or bedding are not blocking the vents.
If the AC runs but does not cool, check the mode. Make sure it is set to cool, not fan. Give the compressor a few minutes to start. If ice appears on the coil, turn off cooling and let the ice melt. Don’t scrape it. Clean the filter and check airflow before using the AC again.
If the unit vibrates, check the front panel, side panels, and window support. A loose installation can make the AC noisy. If you smell burning, see smoke, hear grinding, or the breaker keeps tripping, stop using the unit. Those are not normal cleaning problems.
Pro Tips to Help Your Window AC Cool Better
|
Tip |
Why It Helps |
|
Seal side gaps |
Keeps hot outdoor air out |
|
Use foam insulation |
Reduces leaks around panels |
|
Keep vents clear |
Helps air move freely |
|
Close curtains |
Blocks strong sunlight |
|
Shade the room |
Lowers heat load |
|
Use fan mode after cooling |
Helps dry moisture |
|
Avoid very low settings |
Reduces strain |
|
Match BTU to room size |
Improves comfort |
Cleaning helps, but the room setup matters too. Seal gaps around the side panels. Hot air can sneak in around a poorly fitted window AC. Foam strips or weatherstripping can help. Keep the front of the unit clear. Don’t block it with curtains, beds, desks, sofas, plants, or laundry baskets.
Close blinds during the hottest part of the day. Sunlight can heat a room fast, especially through west-facing windows. Use fan mode for a few minutes after cooling. This can help dry moisture inside the unit and reduce stale smells.
Do not set the thermostat extremely low. It won’t cool the room faster. It usually just makes the AC run longer. Match the AC size to the room. A unit that is too small may run nonstop. A unit that is too large may cool quickly but leave the room damp. A clean AC, sealed window, and clear airflow can make a small unit feel much stronger.
What Not to Do When Cleaning a Window AC?
|
Mistake |
Why It’s Bad |
Better Move |
|
Cleaning while plugged in |
Shock risk |
Unplug first |
|
Using a pressure washer |
Bends fins |
Clean gently |
|
Running without filter |
Dirt enters the coil |
Use a dry filter |
|
Using harsh chemicals |
Can damage parts |
Use mild soap |
|
Spraying controls |
Electrical risk |
Wipe lightly |
|
Forcing the cover |
Breaks clips |
Check screws first |
|
Ignoring mold |
Health concern |
Inspect or replace |
|
Storing wet |
Causes odor and rust |
Dry fully |
The biggest mistake is using too much force. Window AC parts are not built for rough cleaning. The fins bend easily. Plastic clips can snap. Electrical areas must stay dry. Don’t use scented spray to hide odor. A nice smell does not fix damp dirt, slime, or mold.
Don’t reinstall a wet filter. That can bring musty air back into the room. Don’t put the filter in the dishwasher. Heat and water pressure can damage the mesh. Don’t use bleach inside the unit unless your manual clearly allows it. Strong fumes and harsh chemicals can create other problems. Don’t take apart more than you can put back together. If you remove panels, take photos as you go. It makes reassembly much easier.
When to Call a Professional or Replace the Unit?
|
Warning Sign |
What It May Mean |
|
Burning smell |
Electrical fault |
|
Smoke |
Serious safety issue |
|
Grinding sound |
Fan or motor problem |
|
Breaker keeps tripping |
Electrical problem |
|
Ice keeps returning |
Airflow or refrigerant issue |
|
Heavy mold inside |
Unsafe contamination |
|
Damaged cord |
Fire or shock risk |
|
Weak cooling after deep clean |
Aging or failing unit |
Basic cleaning is safe for most people. Repair work is different. Call a professional if the unit has electrical trouble, refrigerant concerns, repeated icing, serious leaks, or heavy mold. Do not repair damaged power cords. Do not bypass safety plugs. Do not open sealed refrigerant lines.
Replacement may make more sense if the unit is old, rusty, unsafe, or still smells bad after a proper clean. If the cabinet has heavy rust, the plug feels hot, or the cord is cracked, don’t ignore it. Those are safety concerns.
If the AC cools poorly after you clean the filter, coils, vents, and outdoor side, the problem may be deeper than dirt. Many window AC units cost less to replace than repair when major parts fail. Compare repair cost with replacement cost before spending money.
Read Also: How to Replace a Light Fixture Safely Without Electrician
Storage Tips for the Off-Season
|
Storage Step |
Why It Helps |
|
Clean before storage |
Stops grime from hardening |
|
Dry fully |
Reduces mold risk |
|
Store upright |
Protects internal parts |
|
Cover loosely |
Keeps dust off |
|
Avoid damp spaces |
Prevents rust and odor |
|
Keep screws and manual |
Makes setup easier |
|
Inspect before reuse |
Catches problems early |
Don’t store a dirty AC. It may smell worse when you bring it out next season. At the end of the season, clean the filter, grille, visible coils, drain pan, and cabinet. Let the unit dry fully before covering it. Store the unit upright. Don’t lay it on its side.
Choose a dry space. A damp basement, wet balcony, or humid storage room can cause rust and odor. If you use a cover, make sure the unit is dry first. Trapped moisture can make mold and mildew problems worse. Keep screws, brackets, side panels, and the manual together. Put small parts in a labeled bag. Before reinstalling the AC next season, inspect the cord, plug, filter, cabinet, window seal, and support bracket.
Quick Window AC Cleaning Checklist
|
Cleaning Task |
Done? |
|
Turn off and unplug the AC |
☐ |
|
Remove the front grille carefully |
☐ |
|
Wash and dry the filter |
☐ |
|
Vacuum vents and grille |
☐ |
|
Clean the visible evaporator coil |
☐ |
|
Wipe the reachable drain pan |
☐ |
|
Clear outdoor debris |
☐ |
|
Check fins for bends |
☐ |
|
Dry washed parts fully |
☐ |
|
Reinstall the filter before use |
☐ |
|
Run fan mode after cleaning |
☐ |
|
Check for leaks, smells, and airflow |
☐ |
A checklist keeps the job simple. It also helps you avoid skipping small but important steps. Start with power safety. Turn the AC off and unplug it before touching anything inside. Then clean the filter. This is the most important routine step because airflow starts there.
Next, clean the grille, vents, and visible dust. These areas collect dirt quickly and are easy to reach. After that, inspect the coil and drain pan. Work gently. Don’t bend fins or flood the unit. Before turning the AC back on, make sure every washed part is dry. A dry filter matters more than people think. Run fan mode for a short time after cleaning. Then switch to cooling and check airflow, smell, noise, and water movement.
Final Thoughts
A window AC does not need complicated care. It needs steady care. Clean the filter. Keep the coils clear. Wipe the drain pan. Don’t block the vents. Let every washed part dry before putting it back. The safest way to clean window ac unit parts is simple. Unplug it first. Clean gently. Keep electrical areas dry. Follow the manual.
Do this before summer, during heavy use, and before storage. Your AC will cool better, smell fresher, and run with less strain. Small cleaning habits can save you from big summer headaches.
Frequently Asked Questions (FAQs) About How to Clean Window AC Unit
Can I clean a window AC unit without removing it?
Yes. You can clean the filter, grille, vents, and visible indoor coil while the AC stays in the window. This is enough for regular care. For a deep clean, removal gives you better access to the outdoor coil, drain pan, and back side.
How often should I clean the filter?
Check it monthly at minimum during cooling season. If you use the AC daily, have pets, or live in a dusty area, check it every one to two weeks. A clean filter helps airflow and reduces strain on the unit.
Can I spray water on a window AC?
Be careful. Some outdoor coils can handle gentle rinsing when the unit is unplugged and removed. But never spray the control panel, cord, plug, sensors, or wiring. Always follow the manual for your model.
Why does my window AC smell musty?
Musty smells usually come from damp dust, dirty coils, standing water, or grime in the drain pan. Clean those areas first. If the smell returns quickly, there may be hidden buildup deeper inside.
Can a dirty window AC make the room less cool?
Yes. A dirty filter or coil blocks airflow and slows heat transfer. The unit may run longer but cool less. Cleaning can often restore stronger airflow and better cooling.
Why is ice forming on my window AC?
Ice can form because of a clogged filter, blocked airflow, dirty coil, very low thermostat setting, or refrigerant problem. Let the ice melt fully. Then clean the filter and check airflow. If ice returns, call a technician.


