
A messy garage doesn’t happen overnight. It starts with a toolbox on the floor. Then come the old paint cans, kids’ bikes, holiday bins, garden tools, sports gear, cardboard boxes, and a few mystery items no one wants to claim. One day, you open the garage door and realize the car has been kicked out of its own room.
The good news? You don’t need custom cabinets or a luxury makeover to fix it. This organized garage budget guide is built for real homes and real mess. You’ll learn how to sort, plan, store, label, and maintain your garage without spending more than needed.
The goal is simple. You want a garage where you can walk safely, find your tools, park if possible, store seasonal items, and stop buying things you already own.
Why Garage Organization Is Worth It Now?
Garage organization matters because the garage has become one of the hardest-working spaces in the home. It is no longer only a parking spot. Many families use it as a storage room, workshop, bike station, garden shed, sports area, and overflow pantry. That heavy use makes clutter grow faster than people expect. A smart budget plan helps you reclaim that space without paying for an expensive custom system.
Professional garage organization can cost real money. Current HomeAdvisor data places many garage organization projects between $505 and $2,152, with an average around $1,323. That price can rise with cabinets, overhead racks, custom shelving, and labor. A DIY plan gives you more control. You can start small, solve the worst problems first, and upgrade later only if needed.
|
Key Point |
What It Means |
Budget Lesson |
|
Professional organization can cost over $1,000 |
Full systems add up fast |
Try DIY fixes first |
|
Garages now serve many roles |
Tools, bikes, storage, gym gear, and hobbies pile up |
Create clear zones |
|
Storage products are a growing market |
More options exist than ever |
Don’t buy before sorting |
|
Clutter leads to repeat spending |
Lost tools and supplies cost money |
Store items where you can see them |
|
Garages hold risky items |
Paint, fuel, pesticides, and tools need care |
Safety must guide your layout |
The Hidden Cost of a Messy Garage
A messy garage costs more than space. It wastes time every time you search for a tool, battery, cord, or cleaning product. It also leads to repeat buying because you forget what you already own. A cluttered garage can damage items too, especially when boxes sit on damp floors or tools stay buried under dust. Once you see the garage as usable square footage, organizing it starts to feel like a smart home upgrade, not just a cleaning job.
You may buy another screwdriver because yours is buried. You may lose batteries, gloves, tape, screws, or car wax. You may damage stored items because they sit on damp floors. You may even park outside while boxes take the best space.
That’s not just annoying. It’s wasteful. A clean garage saves time, money, and stress.
A Budget Garage Can Still Look Good
Budget organization does not mean messy-looking storage. You can create a clean, sharp garage with simple items like matching bins, labels, pegboard, and wall hooks. The trick is to keep the look consistent and the system easy to use. Even basic shelves can look neat when items are grouped and labeled well. A garage does not need luxury cabinets to feel organized.
A garage can look neat with simple choices:
- Matching bins where possible
- Clear labels
- Open shelves
- Wall hooks
- Pegboard
- One color family for containers
- Clean walking paths
You don’t need everything hidden. You need everything easy to find.
Organize Garage Budget: Start With a Real Plan
Before you clean, decide what your garage must do. This one step prevents wasted money and wasted effort. Some garages need to hold a car first. Others need to support hobbies, tools, sports gear, or garden supplies. When you know the main purpose, every storage choice becomes easier.
A good plan also keeps you from copying a garage design that does not match your home. A one-car garage needs different storage than a two-car garage. A rental garage needs removable solutions. A family garage needs simple systems that kids can follow. The best organize garage budget plan fits your life, not someone else’s photo online.
|
Planning Step |
What to Decide |
Why It Helps |
|
Main purpose |
Parking, tools, storage, sports, garden, gym |
Keeps the garage focused |
|
Budget |
$25, $75, $150, $300, or more |
Stops impulse spending |
|
Timeline |
One weekend or a few short sessions |
Reduces overwhelm |
|
Zones |
Tools, sports, garden, seasonal, hazards |
Gives every item a home |
|
Safety rules |
Heavy items low, chemicals locked |
Prevents easy mistakes |
Set Three Clear Goals
A clear goal keeps the project from feeling endless. Instead of saying, “I want the garage clean,” choose three things you want the space to do better. That could be parking one car, clearing the workbench, or moving bikes off the floor. Clear goals help you decide what stays and what leaves. They also stop you from spending money on storage that does not solve the real problem.
Try this:
- I want to park one car inside.
- I want all tools on one wall.
- I want sports gear off the floor.
Now you have a finish line. Every item either supports those goals or gets moved, sold, donated, or tossed.
Choose Your Budget Level
You can improve a garage at almost any price point. A small budget can still cover labels, hooks, reused bins, and basic sorting supplies. A mid-range budget can add shelves, pegboard, or bike hooks. A larger budget can support stronger shelving, overhead racks, or cabinets. The key is to spend in the right order: floor-clearing storage first, cosmetic upgrades later.
|
Budget |
What You Can Do |
|
$0–$25 |
Declutter, reuse boxes, label shelves, use jars, add basic hooks |
|
$25–$75 |
Buy clear bins, small pegboard, hooks, labels, zip ties |
|
$75–$150 |
Add metal shelving, bike hooks, wall racks, stronger bins |
|
$150–$300 |
Build a proper storage wall, add a lockable cabinet, improve tool storage |
|
$300+ |
Add overhead racks, better shelving, cabinets, or a workbench setup |
Spend first on anything that clears the floor. You’ll feel that change right away.
Measure Before Buying Anything
Measuring sounds boring, but it saves money. Many garage storage mistakes happen because shelves are too deep, bins are too tall, or hooks block car doors. A few quick measurements can prevent those problems. Pay close attention to walking paths, garage door tracks, and appliance clearance. Good storage should make the garage easier to move through, not tighter.
Measure:
- Wall width
- Ceiling height
- Shelf depth
- Car-door clearance
- Walking paths
- Garage door tracks
- Space around appliances
- Distance from furnace or water heater
- Room near the house entry door
A shelf that looks perfect online may be too deep for your garage. In a small garage, shallow shelves often work better than bulky cabinets.
Declutter First, Then Buy Storage
Decluttering is the money-saving step most people skip. It feels tempting to buy bins first, but that often turns clutter into labeled clutter. When you sort first, you see what you truly own. You may find duplicates, broken items, old paint, expired products, and gear your family no longer uses. Once those items leave, you need fewer shelves and fewer bins.
This step also makes the garage safer. Old chemicals, leaking cans, sharp tools, and overloaded boxes often hide inside cluttered corners. Sorting helps you spot those risks before you build storage around them. A cleaner garage starts with better decisions, not more containers.
|
Sorting Pile |
What Goes There |
What to Do |
|
Keep |
Useful items you use now |
Group by category |
|
Sell |
Valuable extras or unused gear |
List quickly |
|
Donate |
Good items you don’t need |
Box and remove |
|
Trash |
Broken or useless items |
Toss same day |
|
Hazardous waste |
Paint, oil, pesticides, batteries |
Follow local rules |
Sort by Category, Not by Random Box
Sorting by category gives you a clearer picture of what you own. If you open random boxes one by one, you may miss duplicates and keep too much. Put all tools together, all sports gear together, and all garden supplies together. This method makes decisions faster. It also helps you design zones that match your real items.
Start with:
- Tools
- Hardware
- Garden supplies
- Sports gear
- Car-care items
- Holiday decorations
- Paint and chemicals
- Camping gear
- Kids’ outdoor toys
- Cleaning supplies
Category sorting shows the truth fast. You may find three hammers, five tape rolls, and a dozen half-used screw boxes.
Use The Two-Year Rule.
The two-year rule keeps old clutter from winning. If you have not used something in two years, pause before giving it more space. Some items deserve to stay, such as seasonal tools, expensive equipment, or keepsakes. But many items stay only because no one wants to decide. A budget garage needs honest choices.
Keep an item only if:
- It’s expensive to replace
- It belongs to a clear future project
- It’s seasonal and still useful
- It has real sentimental value
- It supports a hobby you still enjoy
Broken items don’t deserve prime garage space. Neither do “maybe someday” projects with no deadline.
Create a Temporary Decision Box
Some items are hard to sort in one pass. A decision box gives you breathing room without letting clutter spread again. Place unsure items in one box, label it with a date, and give yourself 30 days. If you do not use the item or make a clear plan for it, let it go. This method works well for old project supplies, spare parts, and sentimental items that need a second look.
Put hard-to-decide items in one box and write a date on it. Give yourself 30 days. If you don’t use, miss, repair, or clearly need the item by then, let it go.
Don’t let the decision box become permanent storage.
Sell Before You Spend
Selling unused items is one of the easiest ways to fund a garage refresh. Many garages hold extra tools, bikes, shelves, sports gear, and exercise equipment that still have value. List good items quickly while you still have momentum. If you wait too long, they often slide back into storage. Even a small sale can cover the first round of hooks, labels, or bins.
Good things to sell include:
- Extra tools
- Bikes
- Sports gear
- Exercise equipment
- Shelves
- Camping gear
- Lawn tools
- Storage bins
- Old cabinets
- Workbenches
Even $50 can pay for hooks, labels, and a few solid bins.
Build Garage Zones That Make Sense
Garage zones make storage easier because they give every item a clear home. Without zones, tools land beside sports gear, paint ends up near toys, and garden tools lean wherever there is space. A zone system fixes that. It turns the garage from one large clutter pile into smaller, useful areas. This makes cleanup faster and helps everyone know where things belong.
The best zones follow how you use the garage. Daily items should sit near the house door. Garden tools work best near the garage door or yard access. Tools belong near a workbench or outlet. Seasonal bins can go higher or farther back. Hazardous items need controlled storage away from children, pets, heat, and food.
|
Zone |
Best Location |
Best Items |
|
Daily-use zone |
Near the house door |
Bags, shoes, pet gear, recycling |
|
Tool zone |
Near workbench or outlet |
Tools, hardware, tape, drill bits |
|
Garden zone |
Near garage door |
Rakes, shovels, soil, gloves |
|
Sports zone |
Low and easy to reach |
Balls, helmets, bats, bikes |
|
Seasonal zone |
High shelves or back wall |
Holiday decor, camping gear |
|
Hazard zone |
Locked or controlled area |
Chemicals, fuel, blades, pesticides |
|
Car-care zone |
Near vehicle side |
Oil, washer fluid, towels, tire tools |
Put Daily Items Near the Door
The space near the house door is the easiest area to reach, so use it wisely. This spot should hold things you grab often, not boxes you open twice a year. A small shelf, hook rail, or basket can make this area work hard. It also helps stop clutter from spreading into the kitchen, mudroom, or hallway. Keep this zone simple and easy to reset.
Good choices include:
- Reusable bags
- Dog leash
- Umbrella
- Outdoor shoes
- Bike helmets
- Flashlight
- Recycling bags
- Small repair kit
- Pet supplies
Don’t waste this spot on old paint or holiday bins.
Store Seasonal Items Higher
Seasonal items do not need the easiest storage spots. Holiday decorations, camping pads, patio cushions, and pool gear can live on high shelves or the back wall. Keep these bins labeled and grouped by season. That way, you can pull down one category instead of searching through five mystery boxes. Just remember to keep heavy bins low.
Use high shelves for:
- Holiday decorations
- Patio cushions
- Camping pads
- Pool gear
- Wreaths
- Lightweight coolers
- Extra folding chairs
Keep heavy items low. Lifting a loaded bin over your head is never a good plan.
Create a Dirty Zone
Every garage needs a dirt-friendly area. Garden tools, soil bags, fertilizer, hoses, and muddy boots can spread mess quickly. Give those items one corner or wall section. Add a tray, mat, pallet, or scrap plywood to protect the floor. This small setup keeps dirt from moving into cleaner storage zones.
Garden tools, soil, fertilizer, hoses, and boots bring dirt.
Keep them together on a mat, tray, pallet, or scrap wood base. This keeps the mess from spreading across the whole garage.
Create a Small Drop Zone
A drop zone catches everyday clutter before it spreads. Keep it small, or it will become another junk shelf. A narrow bench, small basket, or short shelf near the door works well. Use it for quick-return items like gloves, keys, flashlights, and reusable bags. Clear it once a week so it stays useful.
Use one small shelf or bench near the door for:
- Keys
- Gloves
- Flashlight
- Reusable bags
- Small packages
- Quick-return tools
Keep it small. A large drop zone becomes a junk zone.
Use Walls Before the Floor
The floor is the most valuable space in your garage. Once the floor fills up, the garage feels cramped fast. Wall storage helps you clear walking paths and protect items from damage. It also makes the garage easier to clean because fewer things sit directly on the floor. If you want a low-cost win, start by moving long, awkward, and bulky items to the walls.
Wall storage does not need to be fancy. Pegboard, hooks, rails, shelves, and magnetic strips all work. The right choice depends on the item. Tools need visibility. Bikes need secure hooks or stands. Garden tools need upright storage. Seasonal bins need shelves. Use each wall for a clear job.
|
Storage Type |
Best For |
Budget Tip |
|
Pegboard |
Hand tools and small supplies |
Start with one panel |
|
Wall hooks |
Ladders, bikes, cords, rakes |
Check weight limits |
|
Rail system |
Flexible bulky storage |
Buy one small section first |
|
Freestanding shelf |
Bins and heavier items |
Best starter buy |
|
Ceiling rack |
Light seasonal items |
Don’t store heavy items overhead |
|
Magnetic strip |
Metal hand tools |
Place near workbench |
|
Open baskets |
Sports gear and kids’ items |
Use where items need quick access |
Pegboard Still Earns Its Place
Pegboard has been around for years because it solves a real problem. It keeps small tools visible, easy to grab, and easy to return. You can start with one small panel above a workbench or shelf. Add hooks, cups, and baskets as needed. For a tighter system, outline each tool so everyone knows where it goes.
Use it for:
- Screwdrivers
- Wrenches
- Pliers
- Tape rolls
- Brushes
- Safety glasses
- Small baskets
- Extension cords
- Garden gloves
If several people use the garage, outline each tool on the board. It makes missing tools easy to spot.
Hooks Are Cheap Problem Solvers
Hooks are one of the best budget buys for garage organization. They handle awkward items that do not fit well on shelves. A few strong hooks can clear ladders, chairs, cords, hoses, and tools from the floor. Just match the hook to the weight of the item. For heavy storage, mount into studs whenever possible.
Use hooks for:
- Folding chairs
- Ladders
- Brooms
- Rakes
- Shovels
- Bikes
- Hoses
- Extension cords
- Strollers
For heavy items, mount hooks into studs when possible. Don’t trust weak anchors with heavy bikes or ladders.
Be Careful With Ceiling Storage
Ceiling storage can be useful, especially in small garages. But it should be used carefully. Store only light, rarely used items overhead. Heavy bins, liquids, paint cans, batteries, and chemicals do not belong above your head. If overhead storage feels unsafe, skip it and use wall shelves instead.
Good overhead items include:
- Light seasonal bins
- Empty coolers
- Holiday wreaths
- Patio cushions
- Camping pads
- Bulky but light decorations
Bad overhead items include:
- Paint cans
- Chemicals
- Batteries
- Heavy tools
- Glass items
- Liquids
- Fuel containers
If you feel nervous walking under it, don’t store it there.
Choose Cheap Storage That Actually Works
The best budget storage is not always the cheapest item in the store. It is the item that solves the right problem and lasts long enough to be worth buying. A weak shelf that bends under bins is not a bargain. A clear bin that stacks well and protects decorations may save money over time. Think function first, price second.
You can also mix bought and reused storage. Use old furniture, jars, crates, buckets, and baskets where they make sense. Then spend money on stronger shelves, lockable storage, or bins for items that need protection. This keeps the budget under control while still improving the garage.
|
Storage Item |
Best Use |
Budget Move |
|
Clear bins |
Seasonal items and grouped supplies |
Buy matching sizes if possible |
|
Open bins |
Sports gear and kids’ items |
Reuse baskets or crates |
|
Metal shelving |
Heavy garage storage |
Worth buying if budget allows |
|
Old dresser |
Small tools and supplies |
Reuse with labels |
|
Glass jars |
Screws, nails, bolts |
Label lids and sides |
|
Lockable cabinet |
Chemicals and sharp tools |
Buy used if possible |
|
Laundry basket |
Balls and outdoor toys |
Cheap and easy |
|
Shoe rack |
Outdoor shoes and small gear |
Reuse from inside the house |
Clear Bins Beat Mystery Boxes
Clear bins make storage easier because you can see what is inside. They are especially useful for seasonal items, cords, decorations, and supplies you do not use every day. Cardboard boxes may work for short-term sorting, but they are not ideal for long-term garage storage. Garages can get damp, dusty, hot, and pest-prone. Clear plastic bins protect items better and reduce duplicate buying.
Use clear bins for:
- Holiday items
- Camping supplies
- Car cleaning products
- Extension cords
- Paint supplies
- Lightbulbs
- Small sports gear
- Extra cords
Clear bins help you see what you own. That means fewer duplicate purchases.
If you prefer opaque bins, label them clearly on at least two sides.
Labels Keep the System Alive
Labels are not just for looks. They keep the system working after the first clean-up. A label tells everyone where things go, which means fewer random piles. Use specific labels instead of vague ones. The clearer the label, the easier it is to reset the garage in a few minutes.
A vague label is almost useless.
Bad label: “Stuff”
Better label: “Car wash towels + wax”
Best label: “Car wash towels, wax, tire brush”
Good labels help everyone use the system, not just the person who organized it.
Reuse What You Already Have
Before buying new storage, walk through your home and look for items you can reuse. Old bookcases, dressers, shoe racks, jars, buckets, and baskets can all work in the garage. A reused dresser can hold small tools, tape, gloves, and hardware. A shoe rack can hold outdoor shoes, sprays, and garden items. Reusing what you already own keeps the budget low.
Try:
- Old bookcase for shoes and bins
- Dresser for small hardware
- File cabinet for manuals and sandpaper
- Kitchen cabinet for car supplies
- Small table as a workbench
- Coffee jars for screws and nails
- Buckets for tall tools
- Crates for sports gear
Just make sure reused furniture is stable and dry.
Store Tools, Sports Gear, and Garden Items Better
Tools, sports gear, and garden tools cause the most garage mess because they are used often. They are also hard to store because they come in different shapes and sizes. If these items do not have simple homes, they end up on the floor. The best fix is visible, easy-to-reach storage. If people can grab and return items quickly, the garage stays cleaner.
Each category needs a different setup. Tools work well on pegboard or in small bins. Balls need open baskets. Bikes need hooks or stands. Garden tools need upright storage. Extension cords need hooks or loops so they do not turn into a tangled pile.
|
Category |
Common Problem |
Budget Fix |
|
Tools |
Lost in drawers |
Pegboard and small bins |
|
Screws and nails |
Mixed together |
Jars or divided cases |
|
Bikes |
Eat floor space |
Wall hooks or stands |
|
Balls |
Roll everywhere |
Laundry basket or bungee corral |
|
Garden tools |
Lean and fall |
Hooks, rail system, or PVC rack |
|
Cords |
Tangle in piles |
Hooks, loops, or labeled bins |
Create a Small Repair Station
A small repair station saves time. You do not need a full workshop or expensive workbench. You just need the basic tools you reach for most often in one spot. Keep them near the house door, workbench, or tool wall. This setup makes quick repairs easier and stops tools from spreading across the garage.
A simple repair station can hold:
- Hammer
- Screwdriver set
- Pliers
- Tape measure
- Utility knife
- Flashlight
- Work gloves
- Duct tape
- Zip ties
- Small hardware box
- Stud finder
- Small level
Keep it near the workbench or house door. You’ll use it more often than you think.
Keep Sports Gear Open
Sports gear needs storage that people will actually use. Closed bins may look neat, but they often fail for daily-use items. Kids and busy adults are more likely to toss balls, helmets, and pads into open bins or baskets. Keep the sports zone low and easy to reach. If each person has a bin, cleanup becomes even easier.
Try:
- Laundry basket for balls
- Hooks for helmets
- Tall bin for bats and rackets
- Crate for pool toys
- Mesh bag for wet gear
- One bin per child
- Low hooks for backpacks or pads
The easier it is to toss gear back, the cleaner the garage stays.
Store Garden Tools Upright
Garden tools can quickly turn into a messy pile if they lean in a corner. Rakes, shovels, brooms, and hoes need upright storage. A wall rack, hooks, PVC slots, or even a tall trash can can work. Keep small garden items together too, so gloves, twine, seed packets, and pruning shears do not disappear.
Use:
- Wall hooks
- Rail system
- Tall trash can
- DIY pallet rack
- PVC pipe slots
- Narrow vertical stand
Keep gloves, twine, pruning shears, seed packets, and plant labels in one small garden caddy.
Store Paint, Fuel, Pesticides, and Batteries Safely
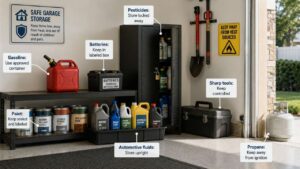
Garage organization is not only about neat shelves. It is also about safety. Garages often hold flammable liquids, pesticides, old paint, automotive fluids, batteries, sharp tools, and power equipment. These items need careful storage because they can create fire, poisoning, spill, and injury risks. A budget plan should still treat safety as a priority.
The safest approach is simple. Keep hazardous items labeled, sealed, upright, and away from heat. Store them out of reach of children and pets. Use a locked cabinet or sturdy bin when possible. Do not place dangerous items on high shelves where they can fall or spill.
|
Item |
Safer Storage Rule |
Budget Action |
|
Paint |
Keep sealed and labeled |
Store low, away from heat |
|
Gasoline |
Keep away from living areas when possible |
Use an approved container |
|
Pesticides |
Keep away from kids and pets |
Use a locked bin or cabinet |
|
Batteries |
Keep contained and protected |
Use a labeled box |
|
Automotive fluids |
Store upright |
Place a tray underneath |
|
Sharp tools |
Keep controlled |
Use a toolbox or locked cabinet |
|
Propane |
Keep away from ignition sources |
Store outside living areas |
Keep Hazardous Products in Original Containers
Original containers matter because they carry instructions, warnings, and disposal information. When you pour chemicals into random bottles or jars, you create confusion and risk. Someone may mistake the product for something else. You may also lose the safety directions. If a container is leaking, damaged, or missing its label, set it aside for proper disposal.
Original labels matter. They show what the product is, how to use it, first-aid steps, and disposal instructions.
Don’t pour chemicals into drink bottles, jars, or random containers. If a container leaks or has no label, treat it as a disposal issue.
Don’t Mix Old Chemicals
Mixing old chemicals is dangerous. Cleaners, pesticides, solvents, oils, and paint products can react badly when combined. Some mixtures can create fumes, heat, or fire risks. When you declutter, keep unknown or questionable products separate. Follow your local household hazardous waste rules instead of pouring anything away.
Never mix leftover cleaners, pesticides, oils, solvents, or paint products.
Mixing products can create fumes, fire risk, or chemical reactions. Keep questionable items separate and check local hazardous waste rules.
Keep Flammable Items Away From Heat
Flammable items need careful placement. Do not store them beside furnaces, water heaters, grills, lawn mowers, or direct sunlight. Keep them away from charging stations and overloaded outlets too. A clean garage should reduce risk, not hide it behind cabinet doors. Store these items low, sealed, and away from everyday traffic.
Store flammable items away from:
- Furnaces
- Water heaters
- Grills
- Lawn mowers
- Cars
- Direct sun
- Charging areas
- Electrical panels
Also avoid overloaded outlets. A cheap extension-cord setup can become a real risk.
Protect Stored Items From Moisture, Heat, and Pests
A garage is not a climate-controlled closet. It can get hot, cold, damp, dusty, and buggy depending on the season. That means some items need extra protection, and some items should not be stored there at all. If you use the wrong containers, moisture and pests can ruin items before you notice. Budget organization should protect what is worth keeping.
Think carefully before storing paper, photos, clothing, fabric, pet food, bird seed, or keepsakes in the garage. These items can attract pests or absorb moisture. If you must store them there, use tight plastic bins and keep them off the floor. Small upgrades like sealed containers and raised shelves can prevent big losses.
|
Risk |
Items Most Affected |
Better Budget Fix |
|
Moisture |
Paper, photos, fabric, cardboard |
Use sealed plastic bins |
|
Heat |
candles, batteries, paint, some cleaners |
Store away from hot areas |
|
Pests |
pet food, bird seed, fabric, cardboard |
Use tight-lid containers |
|
Dust |
tools, sports gear, decorations |
Use lids or covers |
|
Floor water |
boxes, wood, furniture |
Lift items onto shelves |
Avoid Cardboard for Long-Term Storage
Cardboard is cheap, but it does not protect well in a garage. It can absorb moisture, weaken over time, and attract pests. Use it for sorting, not for long-term storage. If you care about an item, place it in a sealed plastic bin instead. This is especially important for sentimental items, paper, fabric, and holiday decorations.
Avoid cardboard for:
- Photos
- Documents
- Clothes
- Books
- Keepsakes
- Pet food
- Fabric decor
- Holiday linens
Use sealed bins for items you truly care about.
Store Food and Seed Properly
Food and seed products can attract pests quickly. Pet food, bird seed, grass seed, and pantry overflow should never sit in open bags on the garage floor. Use tight containers with lids. Keep them on shelves if possible. A sealed container costs less than dealing with pests later.
Pet food, bird seed, grass seed, and pantry overflow can attract pests. Use tight containers. Don’t leave open bags on the floor.
Raise Items Off the Floor
The garage floor is not the safest long-term storage spot. Water can enter from rain, snow, cleaning, leaks, or humidity. A small amount of water can ruin cardboard boxes, wood furniture, paper, and fabric. Raise items onto shelves, pallets, or risers whenever possible. Even a few inches of lift can make a difference.
Use shelves, pallets, scrap wood, plastic risers, or wall hooks. A few inches of lift can save a lot of trouble.
Weekend Plan to Organize Garage Budget
A full garage cleanout can feel overwhelming, but a weekend is enough to make real progress. The trick is to focus on function, not perfection. You do not need to finish every corner at once. Start with the zones that bother you most. Clear the floor, remove obvious clutter, and build one useful storage area at a time.
This plan works best when you prepare before you start. Gather supplies, set a budget, and decide which areas matter most. If you try to clean without a plan, you may spend the whole day moving piles from one side to the other. A simple weekend schedule keeps the project moving.
|
Time Block |
Task |
Result |
|
Friday evening |
Set goal, budget, and supplies |
Clear plan |
|
Saturday morning |
Sort one zone or category |
Less clutter |
|
Saturday afternoon |
Remove trash, donations, and sale items |
Open space |
|
Sunday morning |
Install shelves, hooks, bins, or pegboard |
Better storage |
|
Sunday afternoon |
Label, sweep, and reset |
Usable garage |
Friday: Get Ready
Friday is for planning, not heavy work. Walk through the garage and choose your main targets. Gather bags, boxes, labels, gloves, and basic tools. Set a budget so you do not overspend at the hardware store. Also decide where donations, trash, sale items, and hazardous waste will go.
Gather:
- Trash bags
- Gloves
- Boxes
- Marker
- Painter’s tape
- Labels
- Broom
- Measuring tape
- Drill or screwdriver
- Zip ties
- Old jars
- Cleaning cloths
Don’t buy every storage item yet. Wait until you finish sorting.
Saturday: Sort and Remove
Saturday is the real cleanout day. Start with one category or one wall so the job feels manageable. Sort quickly and avoid overthinking every small item. Remove trash and donations as soon as possible so they do not become new piles. By the end of the day, you should see open floor space.
Good starting points:
- Sports gear
- Garden tools
- Workbench
- Holiday bins
- Paint shelf
- Car-care supplies
Remove trash and donations the same day if you can. Don’t let piles sit for weeks.
Sunday: Build the System
Sunday is for putting the garage back together. Install shelves, hooks, bins, or pegboard based on what remains after decluttering. Do not try to build a perfect system in one day. Focus on the areas that solve the biggest problems. Label everything before you stop, or the garage may drift back into chaos.
Install the basics first:
- One strong shelf
- One pegboard or tool wall
- One row of hooks
- One sports bin
- One labeled donation box
- One safe hazard area
A few finished zones beat a half-finished garage.
Budget Garage Ideas by Garage Type
Every garage has different limits. A one-car garage needs tight storage because every inch matters. A two-car garage can hold more zones but can also collect more clutter. A rental garage needs flexible storage that can move with you. A detached garage may need stronger protection from pests and moisture. Your setup should match your garage type.
Do not force the same plan into every space. Start with the biggest problem in your garage. If floor space is tight, use walls. If your family drops gear everywhere, use open bins. If chemicals are scattered, start with a lockable cabinet. The best budget plan solves the problem you actually have.
|
Garage Type |
Main Problem |
Best Budget Fix |
|
One-car garage |
Limited floor space |
Use shallow shelves and wall hooks |
|
Two-car garage |
Too many mixed zones |
Divide walls by category |
|
Rental garage |
Can’t drill freely |
Use freestanding shelves and carts |
|
Family garage |
Gear lands everywhere |
Use low bins and name labels |
|
Detached garage |
Moisture and pests |
Use sealed bins and raised storage |
|
Garage gym combo |
Equipment eats space |
Use wall hooks and foldable gear |
One-Car Garage
A one-car garage needs strict choices. You may not have room for deep shelves, bulky cabinets, and extra furniture. Keep the car footprint clear first. Use shallow shelves, wall hooks, pegboard, and vertical bike storage. Keep only active items in the garage and move rarely used items elsewhere if possible.
Best ideas:
- Shallow shelves
- Vertical bike hooks
- Pegboard above a small bench
- High shelves for seasonal bins
- Foldable workbench
- Wall-mounted tool racks
The car footprint should come first.
Two-Car Garage
A two-car garage gives you more room, but it can also hide more clutter. Divide the space into walls or zones so categories do not mix. One side can hold tools and garden items. The other can hold sports gear and bikes. Use the back wall for seasonal storage. Keep a clear path between zones.
For example:
- Left wall: tools and hardware
- Right wall: bikes and sports gear
- Back wall: seasonal bins
- Near door: daily-use items
- Corner: garden tools
This keeps categories from mixing.
Rental Garage
A rental garage needs storage that does not damage walls or violate the lease. Freestanding shelves, rolling carts, stackable bins, portable bike stands, and toolboxes work well. Avoid drilling unless your lease allows it. Choose items you can take with you when you move. This keeps your setup useful without risking your deposit.
Good options include:
- Freestanding shelves
- Rolling carts
- Stackable bins
- Portable bike stands
- Tension rods
- Removable hooks
- Crates
- Toolboxes
Avoid drilling unless your lease allows it.
Common Budget Garage Organization Mistakes
Most garage organization mistakes happen when people buy before planning. They purchase bins, shelves, and cabinets before they know what they need to store. Then the garage looks better for a short time but becomes messy again. A strong system starts with sorting, zoning, and safe storage. Products come after that.
Another common mistake is making the system too hard to use. If people need to open three lids to put away a soccer ball, it will land on the floor. If tools are hidden in deep drawers, they will disappear again. Keep daily-use items visible and easy to return. The simpler the system, the longer it lasts.
|
Mistake |
Why It Fails |
Better Move |
|
Buying bins first |
Hides clutter instead of fixing it |
Declutter first |
|
No zones |
Items land anywhere |
Give each category a home |
|
Too much floor storage |
Blocks parking and walking |
Use walls and shelves |
|
Weak shelves |
Sag or tip |
Use strong shelves for heavy items |
|
No labels |
People guess and dump items |
Label bins and shelves |
|
Unsafe chemical storage |
Raises fire or poisoning risk |
Lock and separate hazards |
|
Overfilled shelves |
Hard to maintain |
Leave open space |
|
Keeping too many duplicates |
Wastes storage |
Keep the best, sell or donate extras |
Don’t Copy a Perfect Garage Blindly
A garage photo online may look great, but it may not match your life. Your garage has its own size, climate, budget, and family habits. Instead of copying the whole design, borrow the idea behind it. If you like the wall storage, build a cheaper version. If you like the labels, use that method with your own bins.
Your garage has its own size, climate, habits, and storage needs. Borrow ideas, not the whole design.
Don’t Store Trash Neatly
It is easy to mistake organized clutter for progress. Broken chairs, dead tools, cracked bins, dry paint, and mystery cords do not need better storage. They need a decision. If something is useless, unsafe, or not worth repairing, remove it. The best garage storage is the storage you do not need because the clutter is gone.
Broken chairs, dead tools, cracked bins, dry paint, and mystery cords don’t need better storage. They need to leave.
Don’t Fill Every Inch
Empty space is not wasted space. It gives you room to move, park, sweep, and bring in future items without starting over. Shelves packed to the edge are harder to use and harder to maintain. Leave some breathing room if possible. A garage should feel workable, not stuffed.
Empty space is useful. It helps you move, clean, park, and adjust the system later.
Maintenance Plan: Keep the Garage Clean
A garage does not stay clean by luck. It needs small habits that are easy enough to repeat. The good news is that maintenance takes far less time than the first cleanout. A 10-minute weekly reset can stop clutter from rebuilding. A seasonal review can keep bins, tools, and outdoor gear in the right places.
The key is to make the system easy to follow. If a storage spot is too high, too hidden, or too crowded, people will avoid it. Move frequently used items closer and lower. Use open bins for daily gear. Keep labels clear. A garage stays clean when returning items feels simple.
|
Task |
Frequency |
Time Needed |
|
Floor reset |
Weekly |
10 minutes |
|
Donation box check |
Monthly |
10 minutes |
|
Bin review |
Monthly |
15 minutes |
|
Sweep floor |
Monthly |
15 minutes |
|
Seasonal swap |
Twice a year |
1–2 hours |
|
Safety check |
Twice a year |
20 minutes |
|
Hazardous item review |
Twice a year |
20 minutes |
Use the One-Minute Rule
The one-minute rule is simple. If putting something away takes more than one minute, the storage spot is wrong. Move that item closer, lower, or into an open container. This works especially well for sports gear, garden tools, shoes, and daily supplies. Make the right action easier than dropping the item on the floor.
If putting something away takes more than one minute, the storage spot is wrong. Move it closer. Move it lower. Put it in an open bin. Make the right action the easy action.
Keep a Donation Box
A donation box gives unwanted items a clear exit. Keep one near the garage door or house entry. When you find something useful but no longer needed, place it there right away. When the box fills, remove it from the house. This simple habit stops old clutter from sliding back onto shelves.
Place one donation box near the exit. When it fills, remove it. Don’t let it become another permanent garage box.
Do a Seasonal Reset
A seasonal reset keeps the garage matched to real life. Before summer, bring forward bikes, garden tools, pool gear, and camping supplies. Before winter, move holiday bins, ice melt, snow tools, and cold-weather car supplies where you can reach them. This prevents the garage from fighting your daily routine. It also gives you a reason to remove things you no longer use.
Before summer, bring forward:
- Garden tools
- Bikes
- Camping gear
- Pool toys
- Sports gear
- Car wash supplies
Before winter, bring forward:
- Holiday decor
- Snow tools
- Ice melt
- Winter sports gear
- Cold-weather car supplies
This keeps the garage useful all year.
Final Thoughts
A clean garage does not require a luxury system. It requires fewer unused items, smarter zones, safer storage, and simple habits. Start with sorting, not shopping. Remove what you do not use. Sell or donate what still has value. Then use shelves, hooks, bins, and labels to give everything a clear home.
The best-organized garage budget plan is the one your household can actually follow. Keep daily items easy to reach. Store heavy items low. Keep hazardous products labeled and controlled. Use wall space before floor space. Leave breathing room so the garage stays flexible.
A garage should make life easier, not harder. When it is organized well, you can find tools faster, park with less stress, protect stored items, and stop wasting money on things you already own.
That is the real value of organizing your garage on a budget. You get more space, more control, and a better daily routine without overspending.
Frequently Asked Questions (FAQs) About Organize Garage Budget
How do I organize a garage on a budget without buying new bins?
Use what you already own first. Laundry baskets, crates, jars, buckets, old dressers, shoe racks, and spare shelves can all help. Replace weak cardboard later if the garage gets humid. Start with free sorting first, then spend only where storage needs strength or moisture protection.
What should never be stored in cardboard boxes in a garage?
Avoid cardboard for photos, documents, clothes, books, keepsakes, pet food, and fabric items. Moisture and pests can damage them. Cardboard is fine for short-term sorting, but sealed plastic bins are safer for long-term storage. This is especially true in damp, hot, or pest-prone garages.
How do I organize a garage and still park inside?
Park the car first. Mark the safe boundary with painter’s tape. Build storage around that space. Use shallow shelves near car doors. Keep bikes, tools, and bins off the car’s path. If the car cannot fit after organizing, too much floor space is still being used.
Are garage cabinets better than shelves?
Shelves are cheaper and easier for daily use. Cabinets are better for chemicals, sharp tools, expensive tools, and items you want hidden. Most garages need both, but shelves should come first on a tight budget. Add one lockable cabinet later if you need safer storage for hazardous items.
What should I do with old paint, oil, batteries, and pesticides?
Don’t pour them down drains, on the ground, or into storm sewers. Keep them in original containers when possible and follow your local household hazardous waste program. Set up one labeled box for hazardous items during your cleanout. Keep it away from children, pets, heat, and food until you can dispose of it properly.
How do I organize garage budget if I rent?
Use freestanding shelves, stackable bins, rolling carts, portable bike stands, tension rods, and removable hooks. Avoid drilling unless your lease allows it. Choose storage you can take with you when you move.


