
We have all been there. You put a bowl of leftover chili in the microwave, walk away for a minute, and hear a sudden, ominous pop. When you open the door, it looks like a disaster zone, with red sauce splattered across the ceiling and walls. Cleaning it up usually involves a lot of elbow grease and maybe some strong-smelling chemical sprays that you really do not want lingering near your food.
The good news is you can put the scrub brush down. Learning how to clean microwave with vinegar is the absolute easiest way to melt away crusty messes using nothing but the power of steam. This method is incredibly cheap, perfectly safe, and takes less than ten minutes of actual hands-on work.
Ignoring a dirty microwave does more than just create an ugly sight in your kitchen. Letting layers of baked-on food accumulate actually absorbs the energy from your appliance. This means your food takes longer to heat up and cooks unevenly. Plus, a messy microwave can become a harbor for unpleasant odors that transfer right into your fresh meals. You might be tempted to reach for harsh commercial cleaners, but the secret to a pristine appliance is already sitting in your pantry. Let’s dive into exactly how this works and why you should make the switch today.
Why Vinegar is the King of Kitchen Cleaning
Vinegar is far more than just a tangy ingredient for your salad dressings. It is a natural acid that acts as a highly effective solvent for the exact types of grease, proteins, and carbohydrates found in common food spills. Most kitchen messes are made of fats and sugars that harden significantly when they are repeatedly heated and cooled. Vinegar breaks the chemical bonds of these stubborn stains, transforming them from hard cement into a soft paste that easily wipes away. It is completely non-toxic, ensuring you never have to worry about chemical residues leaching into your family’s next meal.
The Power of Acetic Acid
White vinegar contains about five percent acetic acid. This mild acid is the magic ingredient that gives vinegar its impressive cleaning power. When you heat it up, the acid travels directly with the water vapor and attaches itself to the grease coated on the microwave walls. It aggressively works to lift the grime from the surface rather than just sliding uselessly over it.
An Eco-Friendly Alternative
Switching to natural vinegar helps drastically reduce the number of plastic bottles you buy and keeps harsh, synthetic chemicals out of your local water system. Since it is entirely biodegradable, it is a massive win for both your home and the environment. Many families are moving away from artificial cleaners specifically to avoid the respiratory irritants often found in heavy aerosol sprays.
Cost-Effectiveness of Natural Cleaning
A large jug of white vinegar usually costs just a couple of dollars and easily lasts for months, even if you clean frequently. Compare that to a specialized microwave cleaning spray that might cost five times as much for a tiny, single-use bottle. Using vinegar is a brilliant way to keep your home immaculate while firmly sticking to a household budget.
|
Feature |
Distilled White Vinegar |
Commercial Chemical Cleaners |
|
Toxicity |
Completely non-toxic and food-safe |
Often contains harsh, caustic chemicals |
|
Cost Efficiency |
Extremely inexpensive per use |
Can be very pricey per bottle |
|
Scent Profile |
Strong initially, but fades rapidly |
Artificial fragrances that can linger |
|
Surface Safety |
Safe for most interior plastics and glass |
May be highly abrasive or corrosive |
|
Accessibility |
Found in almost every pantry globally |
Requires a specific trip to the store |
The Essential Supplies You Need to Get Started
Before you start tackling the mess, you need to gather a few basic items from around your kitchen. You do not need any special tools, heavy-duty scrubbers, or expensive equipment to make this method work beautifully. The absolute beauty of this natural cleaning hack is its utter simplicity. Most of these items are likely already sitting in your cabinets or tucked under your sink. Having everything prepared beforehand will make the entire process smooth and fast.
Choosing the Right Bowl
Always use a bowl made of sturdy glass or ceramic. Plastic bowls can sometimes get dangerously hot or even melt if they are not specifically labeled as high-heat microwave-safe. A glass measuring cup is perfect because it allows you to clearly see how rapidly the water is boiling, letting you adjust the timer if needed.
Why a Microfiber Cloth Matters
Microfiber is vastly superior to regular cotton rags or paper towels because the tiny, microscopic fibers reach deep into the small textures of the microwave interior. It physically traps and picks up the grease instead of just smearing it around the walls. If you do not have one handy, a clean dish sponge with a soft scrubbing pad will also do the trick safely.
Read Also: How to Clean Stainless Steel Appliances Without Streaks
The Crucial Role of the Wooden Toothpick
This is a tiny but incredibly important safety tip. When you heat water in a perfectly smooth glass bowl, the liquid can sometimes become superheated. This means it gets hotter than its boiling point without actually forming any bubbles. Adding a simple wooden toothpick gives the bubbles a textured place to form, which completely prevents the boiling water from violently erupting when you touch or move the bowl.
|
Item Required |
Main Purpose |
Best Alternative Substitution |
|
Microwave-Safe Bowl |
Securely holds the water and vinegar |
A large, heat-proof glass measuring cup |
|
White Vinegar |
The active acidic cleaning agent |
Standard apple cider vinegar |
|
Fresh Tap Water |
Creates the necessary steam volume |
Distilled water to prevent hard water spots |
|
Microfiber Cloth |
Wiping away the loosened, soft grime |
A brand new sponge or heavy paper towels |
|
Wooden Toothpick |
Prevents the water from superheating |
A wooden chopstick or unpainted skewer |
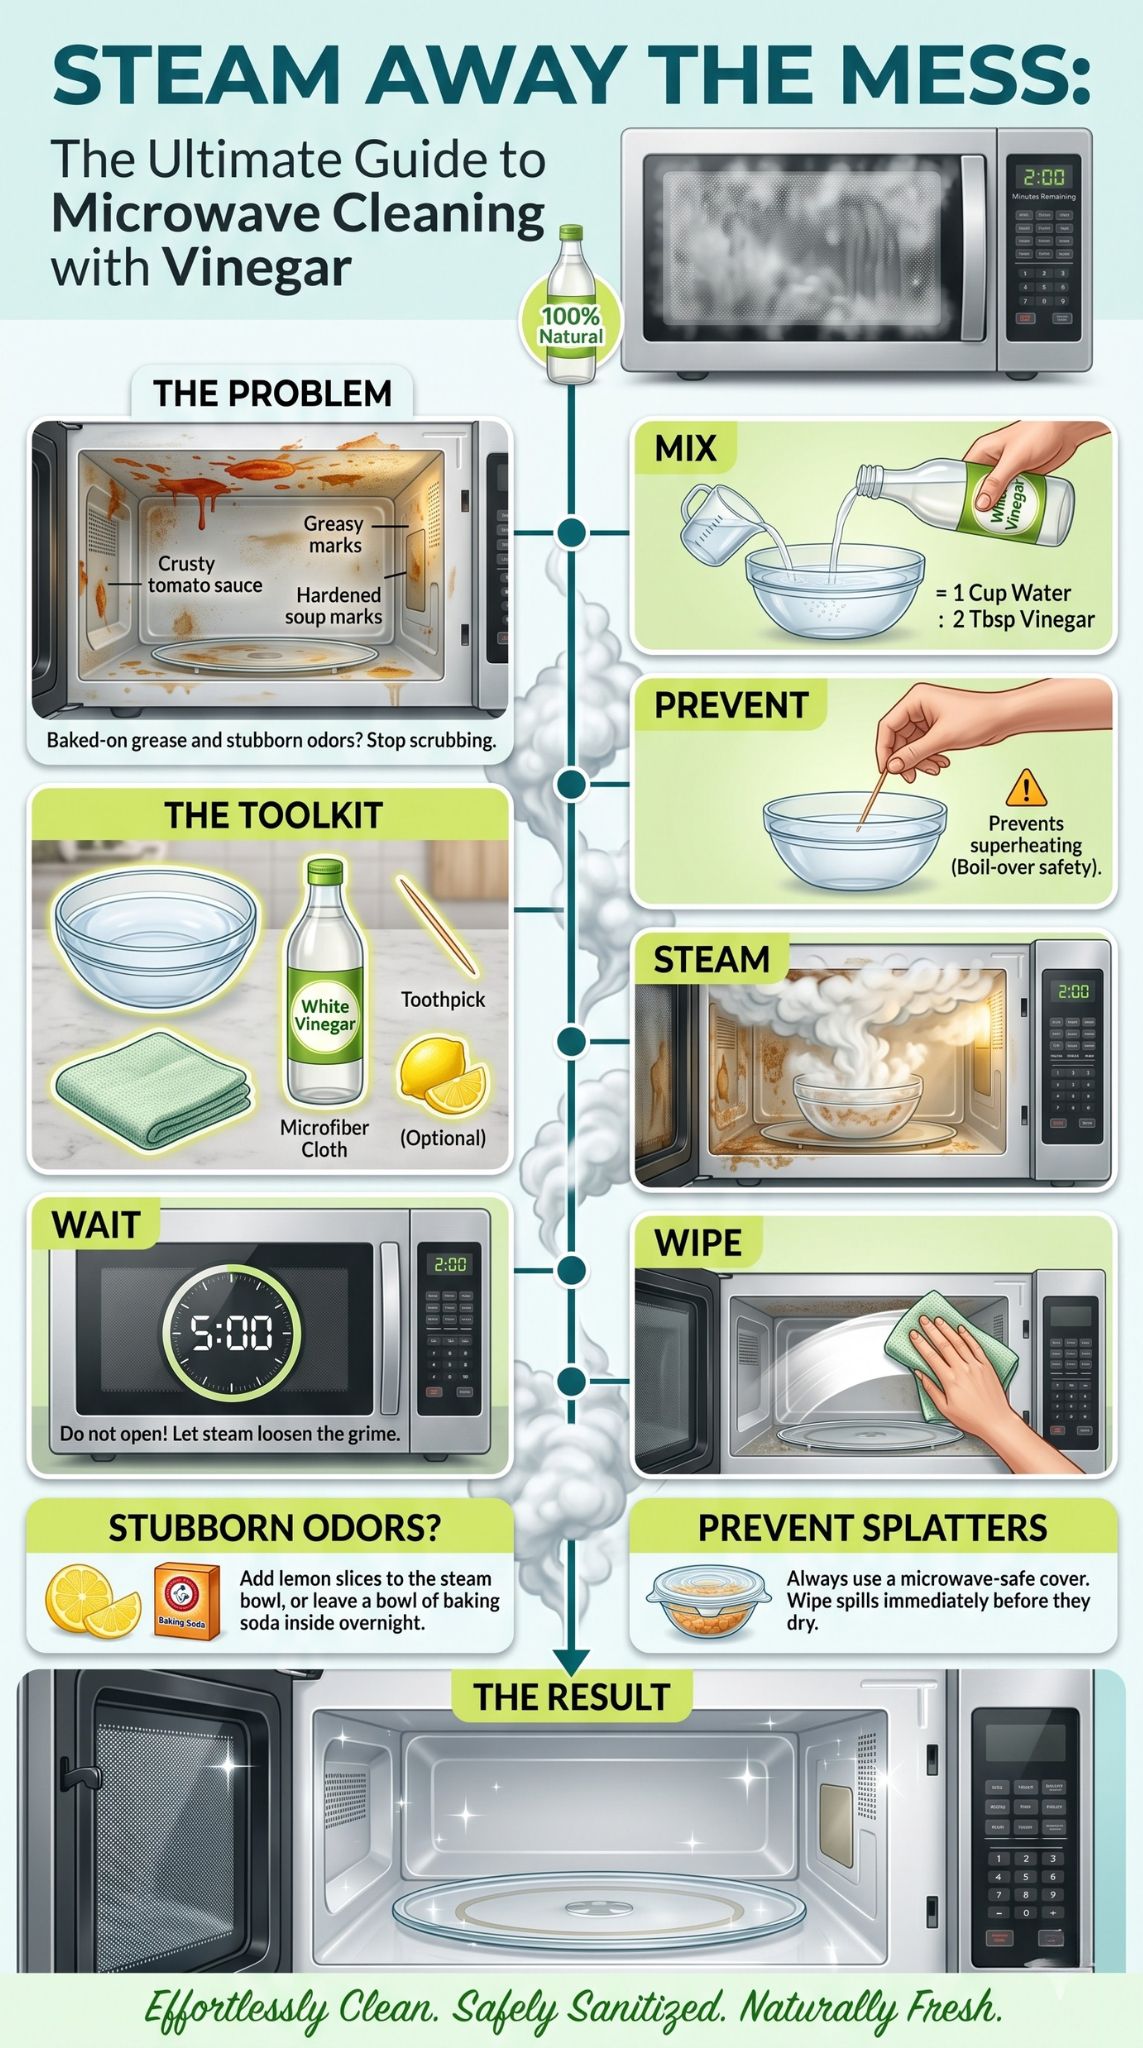
Step-by-Step Instructions on How to Clean Microwave with Vinegar
This entire process is mostly hands-off, letting science do the heavy lifting. You are essentially creating a concentrated mini steam room directly inside your appliance. The hot vapor does all the grueling work of softening the stuck-on food, meaning you do not have to break a sweat scrubbing. Following these exact steps in order ensures that you get the best possible results without running into any safety risks. It really is the most efficient way to handle a terribly dirty microwave.
Preparing the Cleaning Solution
Start by mixing exactly one cup of water with one or two tablespoons of white vinegar inside your glass bowl. You do not need a huge amount of vinegar for this hack to work perfectly. The water provides the necessary steam, and the vinegar provides the intense grease-cutting power. If your microwave is particularly smelly or filthy, you can safely bump up the vinegar to a quarter cup.
Running the Steam Cycle
Place the bowl right in the center of the microwave and run it on high power. You want to watch the front window until it gets completely foggy. This visual cue is a clear sign that the hot steam is filling the chamber and starting to aggressively attack the stains. Usually, three to five minutes is plenty of time for most standard wattages.
The Importance of the Waiting Period
When the timer finally goes off, do not open the door right away. This is where most people make a critical mistake. Keep the door firmly closed for at least five full minutes. This extended waiting period allows the trapped steam to deeply penetrate the hardest, driest food bits. If you open the door too early, all that precious steam escapes into your kitchen and the food splatters will immediately harden up again.
Wiping Down the Interior
After the wait, carefully open the door and remove the hot bowl using oven mitts. Take your damp microfiber cloth and simply wipe down the ceiling, walls, and floor. The previously stuck-on food should literally melt right onto your cloth.
|
Step Number |
Action Required |
Estimated Duration |
|
Step 1 |
Mix 1 cup of water and 1-2 tbsp of white vinegar |
1 Minute |
|
Step 2 |
Heat on the highest setting until rapidly boiling |
3-5 Minutes |
|
Step 3 |
Let the trapped steam sit with the door completely closed |
5 Minutes |
|
Step 4 |
Wipe down the inner walls, ceiling, and door |
2-3 Minutes |
|
Step 5 |
Wash the removable turntable and the plastic roller ring |
2 Minutes |
Managing Strong Odors and Burnt Smells
Microwaves are entirely notorious for grabbing onto horrible smells like burnt popcorn, reheated fish, or spicy curries. These pungent odors can stay trapped in the plastic and metal walls for days, ruining the taste of the next thing you cook. Vinegar is a phenomenal natural deodorizer that does not just temporarily mask smells with perfume but actually neutralizes them at a molecular level. If a simple steam clean does not fully do the trick, there are a few extra professional steps you can take to freshen things up perfectly.
Using Citrus for a Fresh Kitchen Scent
If you happen to strongly dislike the natural smell of vinegar, you can easily modify the formula by adding half a freshly sliced lemon to the bowl. Squeeze the juice right into the water and drop the leftover rind in too. The lemon adds highly effective citric acid to the mix, which helps aggressively cut grease, and it leaves behind a much more pleasant, bright kitchen aroma.
Baking Soda for Deep Deodorizing
For truly terrible, lingering smells, you might need to employ a dry soak. After you successfully finish the vinegar steam clean, place an open box or a small bowl of dry baking soda directly inside the microwave. Close the door and leave it undisturbed for several hours, or ideally overnight. The baking soda is highly porous and will actively pull the remaining odor molecules right out of the trapped air.
Cleaning the Hidden Vent Filters
Sometimes the nasty smell is not actually coming from the inside cooking chamber, but rather from the charcoal or grease filters hidden underneath. If you have a large over-the-range microwave, these filters typically catch heavy grease from your stovetop cooking. Take them out carefully and soak them in very hot water mixed with heavy-duty dish soap to strip away trapped oils that might be smelling rancid.
|
Odor Type |
The Secret Ingredient |
The Application Method |
|
Burnt Popcorn |
Baking Soda |
Leave an open bowl inside overnight |
|
Fish or Heavy Garlic |
Fresh Lemon Slices |
Add directly to the vinegar-water mix |
|
General Mustiness |
Real Vanilla Extract |
Add a single drop to the steaming water bowl |
|
Strong Vinegar Scent |
Essential Oils |
Use sweet orange or lemon oil on the wipe-down cloth |
Cleaning the Turntable and Small Parts
While the intense steam loosens the gunk on the walls, it also greatly loosens the sticky grime on the moving parts. The glass turntable and the delicate plastic ring underneath often heavily collect the most liquid spills and crumbs. These specific parts are incredibly easy to forget, but they desperately need regular attention to keep the microwave rotating smoothly and quietly. A perfectly clean turntable directly prevents that annoying, grinding sound you might hear when heating up your morning coffee.
Removing and Washing the Glass Plate
Once the steam cycle is completely done and the hot bowl is removed, very carefully lift out the heavy glass plate. It might be quite slippery from the grease and steam, so definitely use two hands. You can wash this heavy plate just like a regular dinner plate right in your kitchen sink. If there are heavily stuck-on bits, the steam should have made them very soft and easy to lightly scrub off.
Dealing with the Plastic Roller Ring
The little plastic ring equipped with tiny wheels often gets incredibly sticky from boiled-over liquids. If the wheels cannot easily turn, the interior motor has to work much harder, which can quickly lead to it permanently breaking down. Give the ring a quick, soapy wash in the sink. Always check the tiny wheels to make sure no hair, string, or food fibers are tightly wrapped around them.
Wiping the Bottom Surface and Hub
With the bulky turntable completely out of the way, you finally have full access to the floor of the microwave. This is usually the exact spot where the heaviest, thickest spills settle and bake. Use your vinegar-soaked cloth to wipe this entire area thoroughly. Make sure you get deep into the center hub where the turntable mechanically connects to the rotation motor.
|
Part Name |
Best Cleaning Method |
Dishwasher Safe? |
|
Heavy Glass Turntable |
Warm soapy water or regular dishwasher cycle |
Yes (Top or bottom rack) |
|
Plastic Roller Ring |
Hand wash gently with a soft, soapy sponge |
Usually (Check your specific manual) |
|
Center Support Hub |
Wipe very gently with a damp cloth |
No (It is a fixed mechanical part) |
|
Motor Drive Bushing |
Clean carefully with a Q-tip dipped in vinegar |
No (Sensitive electrical part) |
Maintenance Tips to Keep Your Microwave Clean
The absolute best way to handle a disgustingly dirty microwave is to keep it from ever getting that way in the first place. A few incredibly small daily habits can save you from having to do a grueling deep clean every single week. Most severe messes happen simply because food is left uncovered or heated for way too long. If you stay completely on top of it, knowing how to clean microwave with vinegar becomes a quick, two-minute maintenance task rather than a major weekend chore.
“Prevention is consistently the best cleaning method you can ever use.” ~ Professional Kitchen Organizer
Investing in a Quality Microwave Lid
A simple, reusable plastic or silicone vented lid is honestly the absolute best tool for maintaining a clean microwave. It perfectly keeps all the violent pops, splatters, and sizzles inside the cover instead of painting your walls. Most of these handy covers are very cheap, highly durable, and can be easily tossed in the dishwasher whenever they get messy.
The Power of the Immediate Wipe
If you happen to see a visible splatter right after you finish heating your lunch, wipe it up right then and there with a damp paper towel. When food is fresh and warm, it comes off in one easy second. Once it has been repeatedly heated and cooled three or four times over the week, it becomes as hard as a rock and heavily requires the full vinegar steam treatment.
Proper Ventilation Habits
Right after you heat up something very steamy, like a large bowl of soup or frozen vegetables, purposely leave the microwave door open for a minute or two. This simple act allows the trapped moisture to easily evaporate into the room. If you slam the door closed immediately, that sitting moisture can quickly lead to a terrible musty smell or even contribute to rust forming on the interior metal over a long period.
|
Maintenance Habit |
Primary Benefit |
Recommended Frequency |
|
Always Use a Cover |
Completely prevents all liquid and food splatters |
Every single use |
|
Wipe Spills Fast |
Stops food from baking onto the surface |
Immediately after cooking |
|
Leave Door Open |
Lets damaging, trapped moisture escape safely |
After long, steamy cook times |
|
Check Underneath Vents |
Ensures proper airflow and reduces trapped odors |
At least once a month |
Final Thoughts
Mastering how to clean microwave with vinegar is genuinely one of the most useful and practical kitchen skills you can ever acquire. It reliably saves you money, thoroughly protects your family from unnecessary chemical exposure, and actively keeps your expensive appliances running at peak efficiency for a very long time. There is absolutely no need for fancy gadgets, harsh scrubbers, or expensive chemical products when a simple, everyday bowl of vinegar and water can do the exact same job better than almost anything else on the market.
By smartly making this incredibly simple steam hack a part of your regular kitchen cleaning routine, you directly ensure that your food always tastes incredibly fresh and your cooking space stays perfectly hygienic. The very next time you see a stubborn, crusty mess inside your microwave, absolutely do not reach for the heavy scrub brush. Just grab the bottle of vinegar, set the digital timer, and let the science of hot steam do all the heavy lifting for you. It really is the ultimate, foolproof shortcut to maintaining a beautifully spotless kitchen.
Frequently Asked Questions
When people first learn how to clean microwave with vinegar, they often have a few highly specific questions about the finer details of the process. Every microwave model is a little bit different, and some household messes are much worse than others. Here are the most commonly asked questions people have when attempting this brilliant natural cleaning hack for the very first time.
Can I use apple cider vinegar instead of white vinegar?
Yes, you definitely can. Apple cider vinegar absolutely has the exact same acidic properties as standard white vinegar, so it will break down heavy grease just as well. The only real difference is the lingering smell. Some people find the sweeter scent of apple cider vinegar a bit more pleasant, though it is usually slightly more expensive to use strictly for cleaning.
Is the vinegar acid safe for the interior paint?
White vinegar is a very mild acid, especially when it is heavily diluted with water. It is perfectly safe for the durable enamel or stainless steel interiors found in all modern microwaves. However, you should definitely avoid using pure, undiluted vinegar and leaving it wet on the surface for hours, as that could potentially dull the shiny finish over many years of repeated use.
What if I have an advanced inverter microwave?
The hot vinegar steam method works perfectly and safely for all inverter microwaves too. The specific, advanced technology used to heat the food does not change the basic scientific fact that hot steam loosens dried grime. Just follow the exact same steps and the cleaning results will be identical regardless of your specific microwave’s internal heating technology.
Does this natural method remove permanent yellow stains?
Yellowing on the interior is very often caused by long-term heat damage or the natural aging process of the plastic, which vinegar unfortunately cannot reverse. However, if the yellowing is actually just a thick layer of built-up grease, the intense vinegar steam will strip it right away. If the ugly stain strongly remains after a deep cleaning, it is highly likely a permanent physical change in the plastic itself.
Does vinegar actually kill the bacteria inside the microwave?
While vinegar is a fantastic degreaser, it is not officially registered as a broad-spectrum commercial disinfectant. However, the acetic acid does inherently kill certain types of everyday household bacteria. More importantly, the extremely high heat generated from the rapidly boiling water creates a naturally sanitizing environment. To guarantee bacteria is killed, wiping away the food sources where bacteria breed is your best defense.


