
A raised garden bed is one of those weekend projects that feels bigger than it really is. You don’t need a fancy workshop, a landscaping team, or a truck full of expensive tools. You need a clear plan, the right materials, decent soil, and a few hours of focused work.
If you want to know how to build a raised garden bed, the good news is simple: start small, keep the frame reachable, and don’t overthink the design. A basic wooden bed can help you grow vegetables, herbs, flowers, or pollinator plants in a cleaner and more controlled space.
Raised beds are popular because they solve common garden problems. They help with poor soil, messy layouts, drainage issues, and back-breaking maintenance. They’re also useful for small yards and beginner gardeners who want a neat starting point.
This guide walks through the whole process. You’ll learn how to choose the right size, pick safe materials, build the frame, fill it with soil, and plant it without turning the weekend into a construction nightmare.
Why Build a Raised Garden Bed?
A raised garden bed gives you more control over your growing space. Instead of fighting heavy clay, poor drainage, weeds, or compacted lawn soil, you create a fresh growing zone above the ground. That makes planting easier and gives roots a better place to spread.
Raised beds are also easier to manage. You can reach plants without stepping into the growing area, which helps reduce soil compaction. A narrow, well-planned bed also makes weeding, watering, and harvesting less frustrating.
They’re especially useful for vegetable gardens. Many university extension gardening guides recommend raised beds for improving soil conditions, managing drainage, and making garden work more organized.
|
Key Benefit |
Why It Matters |
|
Better soil control |
You can add a proper soil and compost mix instead of relying on poor native soil |
|
Easier access |
You can weed, water, and harvest without stepping into the bed |
|
Cleaner layout |
The garden looks organized and easier to maintain |
|
Better drainage |
Raised beds can help in areas with slow-draining or compacted soil |
|
Beginner-friendly |
A simple rectangular frame can be built in one weekend |
Better Control Over Soil Quality
One of the biggest reasons to build a raised garden bed is soil control. If your yard has clay, sand, rocks, construction debris, or compacted soil, vegetables may struggle. A raised bed lets you fill the growing area with a better mix.
The University of Minnesota Extension recommends a raised bed soil mix of about one-half to two-thirds topsoil and one-third to one-half plant-based compost. That gives plants mineral soil, organic matter, and better texture without relying on compost alone.
Easier Gardening With Less Bending
Raised beds make gardening feel less like punishment for having knees. Even a 10- to 12-inch bed is easier to work than a flat patch of lawn. Taller beds can help gardeners who want less bending or better access.
Penn State Extension recommends keeping a raised bed no wider than 4 feet for adult gardeners so the middle remains reachable from both sides.
A Cleaner Way to Grow Vegetables
A raised bed keeps the growing area separate from paths, grass, pets, and foot traffic. That matters because soil stays looser when people do not walk on it. It also makes crop rotation, seasonal cleanup, and watering easier.
For a first garden, that simple boundary helps. You know where the garden begins, where the path ends, and where to focus your care.
Best Size and Location for a Raised Garden Bed
Before buying lumber, choose the size and location carefully. This step saves money, time, and back pain. Many raised garden bed mistakes happen before the first screw goes in.
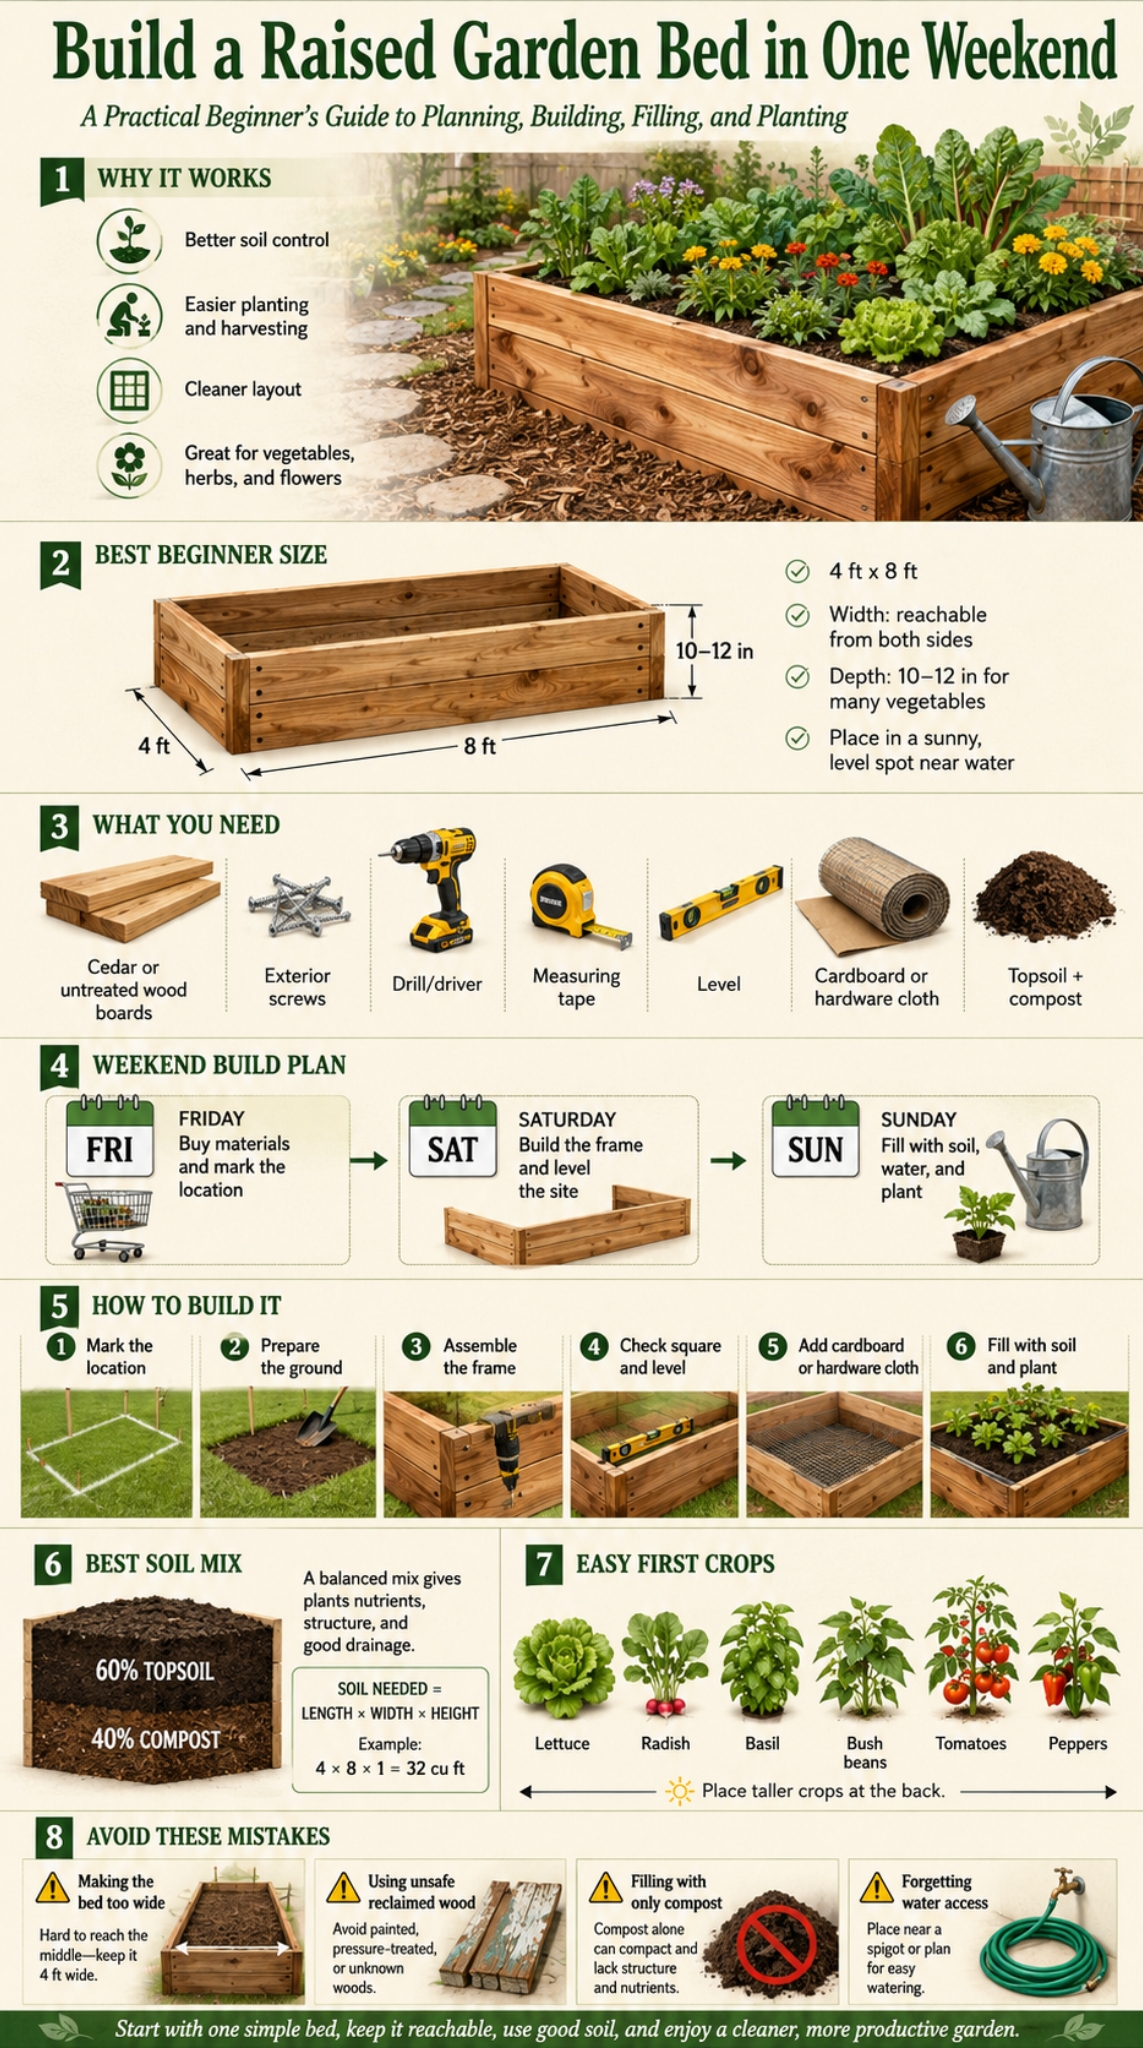
A 4-foot by 8-foot bed is a practical beginner size because it uses common lumber dimensions and gives enough growing space for vegetables. But it is not the only option. The best size depends on your space, reach, budget, and what you want to grow.
Location matters just as much. Most vegetables need strong sun, easy water access, and soil that does not stay soggy. If you place the bed too far from a hose, you’ll regret it during the first hot week.
|
Planning Point |
Beginner Recommendation |
|
Width |
3–4 feet if reachable from both sides |
|
Length |
6–8 feet for a simple first bed |
|
Height |
10–12 inches for many vegetables |
|
Location |
Sunny, level, and near water |
|
Access |
Leave walking space around the bed |
Choose a Reachable Width
Width is more important than length. A bed that is too wide forces you to step inside it, which compacts the soil and makes work harder.
For most adults, 4 feet wide is the upper limit if the bed is accessible from both sides. If the bed sits against a wall or fence, keep it closer to 2 feet wide so you can reach the back without stretching.
Pick a Practical Height
Most beginner raised beds are 10 to 12 inches deep. That depth works for many leafy greens, herbs, beans, and shallow-rooted vegetables. Deeper beds are better for tomatoes, peppers, root crops, and gardeners who want less bending.
The University of Maryland Extension says raised beds on hard surfaces should be at least 8 inches deep for leafy greens, beans, and cucumbers, and 12–24 inches deep for crops such as peppers, tomatoes, and squash.
Find the Right Spot
Choose a level area that gets good sunlight. Most vegetables do best with full sun, though leafy greens can tolerate some partial shade.
Also check drainage. Avoid low spots where rainwater sits for hours. Keep the bed near a water source because raised beds can dry faster than in-ground beds, especially in warm weather.
Materials and Tools You Need
You can build raised garden bed frames from wood, metal, concrete blocks, bricks, or composite boards. For a beginner weekend project, wood is usually the simplest choice. It is easy to cut, easy to screw together, and easy to find at most hardware stores.
Cedar is popular because it resists rot better than many softwoods. Untreated pine or fir costs less, but it may not last as long. Galvanized metal beds are another option if you want a cleaner modern look and less wood maintenance.
The most important rule is safety. Avoid old painted boards, railroad ties, and unknown reclaimed lumber for edible gardens. Older pressure-treated wood may contain chemicals you do not want near food crops. The EPA says chromated arsenicals-treated wood was used in many residential structures before 2004, but manufacturers voluntarily discontinued homeowner-use products in December 2003.
|
Item |
Purpose |
|
Lumber or metal panels |
Main frame |
|
Corner posts or brackets |
Frame support |
|
Exterior screws |
Stronger outdoor fastening |
|
Drill/driver |
Assembly |
|
Measuring tape |
Accurate layout |
|
Level |
Prevents a tilted bed |
|
Cardboard |
Weed suppression |
|
Hardware cloth |
Optional pest barrier |
|
Soil and compost |
Growing medium |
Best Wood Choices
Cedar is the premium beginner choice. It looks good, handles outdoor conditions well, and has natural rot resistance. Pine and fir are cheaper, but they usually break down faster.
If you use pressure-treated lumber, check current product labels and local extension guidance. Modern treated lumber is different from older CCA-treated wood, but many gardeners still prefer untreated wood or naturally rot-resistant wood for edible beds.
Tools for a Simple Weekend Build
You don’t need a full workshop. A drill, saw, measuring tape, level, gloves, and safety glasses are enough for a basic bed.
If you don’t own a saw, ask the hardware store to cut the boards. That one step makes this project much easier for beginners.
Optional Add-Ons
Hardware cloth is useful if your yard has gophers, voles, or other burrowing pests. Cardboard helps suppress grass and weeds under the bed. A simple drip line or soaker hose can save time later, but it is optional for the first weekend.
How to Build a Raised Garden Bed Step by Step
This is the main building section. The goal is not to build the fanciest bed on the internet. The goal is to build a strong, simple frame that holds soil, drains well, and gives plants a good home.
For this guide, imagine a 4-foot by 8-foot wooden bed. It is big enough to grow real food but still small enough for a beginner to manage. You can adjust the length or height based on your space.
This is where the focus keyword fits naturally: how to build a raised garden bed starts with simple measurements, solid corners, and a level frame.
|
Step |
What You Do |
|
1 |
Mark the location |
|
2 |
Prepare the ground |
|
3 |
Cut or organize boards |
|
4 |
Assemble the frame |
|
5 |
Check square and level |
|
6 |
Add cardboard or hardware cloth |
|
7 |
Fill with soil |
|
8 |
Water and plant |
Step 1: Mark the Location
Use stakes, string, spray paint, or even a garden hose to mark the bed outline. Walk around it before building. Make sure you can reach all sides and still move a watering can or wheelbarrow nearby.
This is also the time to check sunlight. A spot that looks sunny in the morning may be shaded by a fence, tree, or building in the afternoon.
Read Also: How to Fix a Squeaky Door Hinge in Under 2 Minutes
Step 2: Prepare the Ground
Remove large weeds, rocks, and debris. If the bed is going over grass, cut the grass short first. You can remove the sod, or you can place overlapping cardboard on top to smother it.
Loosening the soil below the bed can help roots move deeper. It also helps water drain better into the native soil instead of sitting in the raised bed.
Step 3: Cut and Arrange the Boards
For a 4-foot by 8-foot bed, use two 8-foot boards for the long sides and two 4-foot boards for the short sides. If you buy three 8-foot boards, you can cut one in half.
Measure twice before cutting. A small cutting mistake can make the corners uneven and the frame annoying to square.
Step 4: Assemble the Frame
Lay the boards on a flat surface. Attach the short ends to the long boards using exterior screws. Corner posts or brackets make the frame stronger.
Do not fully tighten every screw until you check the shape. A little movement helps you square the corners.
Step 5: Check Square and Level
Measure diagonally from one corner to the opposite corner. Then measure the other diagonal. If both measurements match, the frame is square.
Place the frame in position and use a level. Add or remove soil under the frame until it sits evenly. A level bed looks better and holds water more evenly.
Step 6: Add Weed or Pest Protection
Lay cardboard at the bottom if you are building over grass. Overlap the edges so weeds do not sneak through the gaps.
Use hardware cloth if burrowing pests are a known problem. Avoid solid plastic on the bottom because it blocks drainage.
Step 7: Fill the Bed
Add soil in layers and mix it gently. Water lightly as you fill so the soil settles.
Do not pack the soil down hard. Roots need air spaces as much as they need water and nutrients.
Best Soil Mix for a Raised Garden Bed
Soil is where many raised bed projects go wrong. People build a beautiful frame, then fill it with cheap dirt, pure compost, or heavy clay. The result is poor drainage, weak roots, or plants that look sad after two weeks.
A good raised bed mix should hold moisture but still drain. It should contain mineral soil, organic matter, and enough structure for roots. For most home gardeners, a blend of topsoil and compost works well.
The University of Minnesota Extension recommends roughly one-half to two-thirds topsoil and one-third to one-half plant-based compost for raised beds.
|
Soil Material |
Role in the Bed |
|
Topsoil |
Adds mineral soil and structure |
|
Compost |
Adds organic matter and nutrients |
|
Soilless mix |
Helps with drainage and lighter texture |
|
Mulch |
Reduces evaporation and weeds |
|
Native soil |
Can help connect the bed to the ground below |
Simple Soil Mix for Beginners
A good beginner mix is 60% topsoil and 40% compost. If your topsoil is heavy clay, use less of it and add a lighter growing mix.
Avoid using only compost. Compost is valuable, but too much can create water problems and nutrient imbalance. It can also shrink as it breaks down.
Soil for Beds on Concrete or Patios
If your bed sits on concrete, use a deeper bed and lighter soil. Maryland Extension recommends a 1:1 mix of compost and soilless growing mix for beds on hard surfaces, with topsoil added up to 20% by volume only for beds at least 16 inches deep.
Beds on hard surfaces dry out faster. They also receive reflected heat, so watering needs may be higher in summer.
How Much Soil Do You Need?
Use this simple formula:
Length x Width x Height = cubic feet of soil
For a 4-foot by 8-foot bed that is 1 foot deep:
4 x 8 x 1 = 32 cubic feet
Since 27 cubic feet equals 1 cubic yard, this bed needs about 1.2 cubic yards before settling. UGA Extension uses the same length x width x height method for raised bed soil calculations.
What to Plant in a New Raised Garden Bed
Once the frame is filled, the fun part starts. A raised bed is great for vegetables, herbs, and flowers. But don’t plant everything at once just because the bed looks empty.
Start with easy crops. Leafy greens, radishes, bush beans, herbs, and peppers are good beginner choices. Tomatoes also grow well in raised beds, but they need support and enough spacing.
If this is your first season, keep the planting plan simple. A crowded bed turns into a jungle fast, and not the nice kind.
|
Plant Type |
Beginner-Friendly Options |
|
Leafy greens |
Lettuce, spinach, kale, Swiss chard |
|
Root crops |
Radish, beet, carrot |
|
Herbs |
Basil, parsley, cilantro, chives |
|
Fruiting crops |
Tomato, pepper, cucumber |
|
Flowers |
Marigold, calendula, nasturtium |
Easy Vegetables for Beginners
Lettuce, spinach, and radishes are forgiving crops. They grow fast and do not need huge root space. Bush beans are also simple and productive.
Tomatoes and cucumbers can do well, but give them support. Use cages, stakes, or a trellis so they do not sprawl across the whole bed.
Easy Herbs for Raised Beds
Basil, parsley, chives, cilantro, thyme, and oregano are good choices. Keep aggressive spreaders like mint in containers, not loose in the bed.
Herbs are useful because they fill small gaps and support everyday cooking. They also make the garden feel rewarding even before the vegetables mature.
A Simple 4-Foot by 8-Foot Layout
Place taller crops on the north side if you are in the Northern Hemisphere. This helps reduce shading of smaller plants.
A beginner layout could include two tomato plants at the back, peppers in the middle, herbs along one side, and lettuce or radishes near the front.
Weekend Timeline to Build Raised Garden Bed Projects
A weekend build is realistic if you prepare before starting. The biggest delays usually come from missing screws, underestimating soil volume, or changing the design halfway through.
Buy materials before the weekend if possible. Soil is the heaviest part of the project, so decide whether you’ll use bagged soil, bulk delivery, or pickup from a local garden center.
The simple plan is this: buy on Friday, build on Saturday, fill and plant on Sunday.
|
Day |
Main Task |
Goal |
|
Friday evening |
Buy materials |
Avoid weekend delays |
|
Saturday morning |
Cut and build frame |
Finish structure |
|
Saturday afternoon |
Prepare ground |
Set bed level |
|
Sunday morning |
Fill with soil |
Let soil settle |
|
Sunday afternoon |
Plant and water |
Finish the garden |
Friday: Buy and Plan
Confirm the bed size before buying anything. Make your shopping list and include screws, soil, compost, cardboard, and optional hardware cloth.
If using lumber, check the boards for warping. Straight boards make assembly much easier.
Saturday: Build the Frame
Build the frame in the morning while you still have energy. Place the frame where you want it, check level, and fix any uneven spots before filling.
Do not rush this part. Once the bed is full of soil, moving it becomes a real workout.
Sunday: Fill, Water, and Plant
Fill the bed in layers. Water lightly as you go. Add more mix after the first settling.
Plant seedlings or seeds in the afternoon. Add labels so you remember what went where. Future you will appreciate that small act of organization.
Common Mistakes to Avoid
The easiest way to ruin a raised bed is to make it too wide, fill it with the wrong material, or place it somewhere inconvenient. The project is simple, but small choices matter.
When people build raised garden bed projects for the first time, they often focus too much on the frame and not enough on soil, drainage, and access. A pretty frame is nice, but plants care more about root space and water movement.
Use this section as a quick quality check before you start building.
|
Mistake |
Better Choice |
|
Bed too wide |
Keep it reachable from both sides |
|
Unsafe reclaimed wood |
Use safe, known materials |
|
Only compost inside |
Mix topsoil and compost |
|
Poor water access |
Build near a hose |
|
No drainage plan |
Avoid plastic bottoms |
|
Crowded planting |
Follow spacing needs |
Making the Bed Too Wide
A wide bed looks productive, but it becomes hard to maintain. If you cannot reach the center comfortably, you will step inside. That compacts the soil and defeats part of the purpose.
Stick with 3 to 4 feet wide for beds accessible from both sides. Use 2 feet if the bed sits against a fence.
Using Unsafe Materials
Do not use railroad ties, unknown treated lumber, or old painted boards for edible gardens. They may contain chemicals that are not suitable near vegetables.
If you want a rustic look, choose new cedar or untreated boards instead of mystery scrap wood.
Forgetting Water Access
A bed 80 feet from the nearest hose may seem fine in spring. In July, it becomes a daily annoyance.
Put the bed where watering is simple. A soaker hose or drip line can make the job easier, especially during hot weather.
Raised Garden Bed Maintenance After the First Weekend
The project does not end when the bed is built. A raised bed needs watering, seasonal compost, mulch, and occasional topping up. The good news is that maintenance is simple if you stay consistent.
Raised beds can dry faster than in-ground gardens because they sit above the surrounding soil. Wind, sun, and warm frame materials can speed up drying. Check moisture often during the first few weeks.
Good maintenance is mostly about small habits. Water deeply, mulch lightly, remove weeds early, and refresh the soil each season.
|
Maintenance Task |
How Often |
|
Check moisture |
Several times per week in warm weather |
|
Water deeply |
When top soil feels dry |
|
Pull weeds |
Weekly |
|
Add mulch |
After plants establish |
|
Add compost |
Before each growing season |
|
Top up soil |
As soil settles |
Watering Tips
Stick your finger 1 to 2 inches into the soil. If it feels dry, water. If it still feels moist, wait.
Deep watering is better than frequent shallow watering. It encourages roots to grow down instead of staying near the surface.
Mulching Tips
Mulch helps keep soil moist and reduces weeds. Use straw, shredded leaves, untreated grass clippings, or fine organic mulch around plants.
Do not bury young seedlings under mulch. Wait until they are established, then add a light layer.
Seasonal Soil Refresh
Add compost before each new season. Compost can be used as a top-dressing and helps improve garden soil organic matter.
Expect soil level to drop over time. Compost breaks down, soil settles, and roots use the space. Top up the bed before planting again.
Final Thoughts
Learning how to build a raised garden bed is less about carpentry and more about planning. If the bed is reachable, level, well-drained, and filled with good soil, you’ve already done most of the hard work.
Start with one simple bed. A 4-foot by 8-foot frame is enough for herbs, greens, peppers, tomatoes, flowers, or a small family vegetable patch. You can always add another bed later once you know what works in your space.
The smartest weekend garden project is not the most expensive one. It is the one you can finish, maintain, and enjoy. Use safe materials, keep the design simple, place it near water, and give your plants a healthy soil mix.
Build it once with care, and that small raised bed can pay you back with food, flowers, and a much better reason to step outside.
FAQs About How to Build a Raised Garden Bed
Can I build a raised garden bed without removing grass?
Yes, you can build over short grass if you use overlapping cardboard at the bottom. The cardboard helps suppress grass and weeds while still allowing water to move through as it breaks down.
Should a raised garden bed have a bottom?
Most raised garden beds do not need a solid bottom. An open bottom helps with drainage and lets roots connect with the soil below. Use hardware cloth only if you have burrowing pests.
Is 6 inches deep enough for a raised garden bed?
Six inches may work for shallow-rooted greens, but it is limiting. A 10- to 12-inch depth is more practical for many vegetables. Tomatoes, peppers, and squash usually benefit from deeper soil.
Can I use potting soil in a raised garden bed?
You can use some potting mix, especially for beds on concrete or patios, but filling a large bed with only potting soil can be expensive. A topsoil and compost blend is often more practical for ground-based beds.
What should I put at the bottom of a raised garden bed?
Use cardboard for weed suppression or hardware cloth for pest protection. Avoid plastic sheeting because it can trap water and cause drainage problems.
How long does a wooden raised bed last?
It depends on the wood, climate, moisture, and soil contact. Cedar usually lasts longer than untreated pine. Thicker boards and good drainage can help extend the life of the bed.
Can I build raised garden bed frames from concrete blocks?
Yes, concrete blocks can work well. They are durable and easy to stack. Just make sure the bed is stable, level, and wide enough to hold soil safely.


