
You turn your back for exactly two seconds, and your toddler transforms your favorite oak dining table into a jet-black abstract masterpiece. Your heart drops. That terrifying word—”permanent”—flashes in your brain.
But let me tell you a secret: it’s not actually permanent. Sharpie ink just relies on a clever chemical trick to stick around. If you know how to break down that specific chemistry, you can wipe the ink away like it never happened. If you need to know how to remove sharpie surfaces without ruining your expensive furniture or fading your fresh wall paint, you’re in the right spot. Let’s skip the panic. You don’t need a hazmat suit or toxic industrial cleaners. I’m going to show you exactly how to fix this using stuff you already have sitting in your bathroom cabinet.
The Real Science of Permanent Marker Stains
Understanding why a marker stains helps you fight it. You can’t scrub away Sharpie with just water and elbow grease. You have to fight chemistry with better chemistry.
Sharpie ink uses three main ingredients to leave a lasting mark. First, you have the colorant. This is the actual pigment that gives the ink its deep black, bright red, or bold blue color. Second, the pen contains an alcohol-based carrier solvent. This liquid—usually a mix of strong alcohols like propanol—keeps the ink wet inside the pen so it flows smoothly onto your stuff. Finally, you have the resin polymer. Think of the resin as the glue. Once the wet alcohol evaporates into the air (which takes about three seconds), the resin dries and binds the colorant tightly to whatever it touches.
To get rid of the stain, you just have to reverse this process. You need to reintroduce a solvent to break the resin’s glue-like grip. That’s exactly why household items like 70% isopropyl rubbing alcohol, aerosol hairspray, and hand sanitizer work so incredibly well. They re-liquefy the dried ink so you can lift it off.
|
Ink Component |
What It Does |
How to Beat It |
|
Resin Polymer |
Acts as glue to bind the dye |
Break it down with strong alcohol |
|
Colorant Dye |
Leaves the visible stain |
Lift it away with an absorbent cloth |
|
Carrier Solvent |
Keeps ink liquid inside the pen |
Reactivate it using a dry erase marker |
How to Remove Sharpie Surfaces on Finished and Unfinished Wood
Wood tables, hardwood floors, and thrifted wooden cabinets take the brunt of marker mishaps. Anyone who flips thrift store furniture knows this struggle, since shops love writing prices in heavy marker right on the wood.
Your main goal here is protecting the wood’s clear coat. If you pour pure acetone or nail polish remover on a table, it strips the varnish, lacquer, or polyurethane right off. You’ll definitely remove the marker, but you’ll leave a permanent, cloudy bald spot that looks way worse.
Finished and Varnished Wood
For shiny, finished wood, 70% to 91% isopropyl rubbing alcohol is your absolute best friend.
1. Prep the pad:
Soak a cotton pad in the alcohol and wring it out so it’s damp, not dripping.
2. Blot, don’t scrub:
Dab the stain gently. If you scrub, you will just smear the wet ink across the table.
3. Swap out early:
Watch the ink bleed into the cotton. As soon as the pad gets dark, grab a clean one so you don’t stamp the ink back onto the wood.
4. Wipe clean:
Wipe the area with a damp cloth when you finish to remove the leftover alcohol.
If you don’t have alcohol, check your pantry for peanut butter. The natural peanut oils break down the ink’s resin over time. Smear a thick layer of creamy peanut butter over the mark, let it sit for ten minutes, and wipe it away.
Unfinished or Raw Wood
Raw wood is highly porous. The ink likely soaked deep into the grain, meaning surface alcohol won’t reach it. Mix standard white toothpaste (skip the gel) with a pinch of baking soda to create a gritty paste. Rub it gently into the wood grain using an old toothbrush. Let it sit for a few minutes, then wipe it clean with a damp rag.
|
Wood Type |
Best Cleaner |
What to Avoid |
|
Polyurethane Finish |
70%-91% Isopropyl alcohol |
Acetone or heavy bleach |
|
Unfinished / Raw |
White toothpaste and baking soda |
Heavy soaking with water |
|
Painted Wood |
Dry erase marker trick |
Magic Erasers (ruins paint) |
|
Varnished Antiques |
Creamy peanut butter |
Hard scrubbing or sandpaper |
Clearing Ink from Painted Walls and Drywall
Walls present a massive headache. Unlike a solid table, drywall acts like a sponge, and interior house paint hates heavy scrubbing. Whenever you try to remove sharpie surfaces on living room walls or hallway drywall, you must tread lightly.
People usually grab a Magic Eraser right away. Yes, melamine foam works, but it acts exactly like micro-sandpaper. If you rub too hard, you’ll scrub the top layer of paint completely off the drywall.
The Viral Sunscreen Hack for Matte Walls
If you have flat, matte, or eggshell paint, grab aerosol spray sunscreen. Recently, a major parenting hack went viral on social media, showing moms using heavy-duty “sport” sunscreen to erase permanent marker from walls and skin. The sunscreen contains the perfect mix of carrier oils and alcohols to dissolve permanent marker without eating through your wall paint.
Spray the sunscreen directly onto the Sharpie line. Hold a paper towel underneath to catch the oily drips, and wipe it away immediately with a clean cloth. You might have to repeat this three times, but it preserves your wall perfectly.
High Gloss and Semi-Gloss Walls
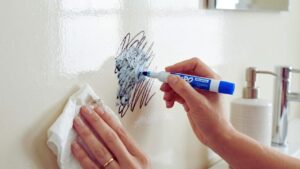
For shiny paint in your kitchen or bathroom, the dry erase marker trick feels like pure magic. Draw directly over the permanent marker lines with a fresh dry erase marker. Make sure you cover every bit of the black ink. The wet solvent in the dry erase pen reactivates the dried permanent ink. Wait five seconds, then wipe it completely clean with a dry paper towel.
|
Wall Paint Finish |
Safe Method |
The Risk |
|
High Gloss / Satin |
Dry erase marker |
Smearing if you let it dry |
|
Flat / Matte |
Aerosol spray sunscreen |
Leaving a greasy oil spot |
|
Wallpaper |
Mild dish soap suds |
Melting the wallpaper glue |
|
Wood Baseboards |
Isopropyl alcohol |
Scratching the glossy trim |
Saving Your Furniture: Leather and Fabric Upholstery
Couches take a beating. But when you need to remove sharpie surfaces involving expensive leather or plush fabric cushions, your strategy has to change entirely. You can’t just spray heavy liquids, or they will soak straight into the foam padding. Once ink gets into the foam, it wicks back up to the surface a week later.
Leather Furniture
Leather is skin. Harsh alcohols dry it out and destroy it. If you scrub rubbing alcohol on a leather sofa, the dye will fade, and the spot will crack over the next few months. I used to think white vinegar was a safe bet here, but modern leather experts explicitly warn against it—vinegar is highly acidic and breaks down the leather’s protective sealant over time.
Instead, use a dedicated pH-neutral leather cleaner. Apply a small amount to a soft cloth and gently rub the stain. If you don’t have leather cleaner, use a dab of coconut oil. The natural oils gently lift the marker without stripping the material. Once the ink is gone, immediately apply a good leather conditioner to rehydrate the spot.
Fabric Upholstery
For cotton, linen, or synthetic fabric couches, use an alcohol-based gel hand sanitizer. The gel is brilliant because it sits right on top of the fabric stain instead of soaking deeply into the cushion. Put a small dollop of sanitizer directly on the ink. Give the alcohol a minute to work, then grab a paper towel and press down hard. Lift straight up. Never wipe or rub fabric. Rubbing forces the wet ink deeper into the weave.
|
Furniture Material |
Go-To Solution |
Crucial Next Step |
|
Genuine Leather |
Coconut oil or Leather cleaner |
Apply heavy leather conditioner |
|
Synthetic Fabric |
Gel hand sanitizer |
Blot dry with a warm, damp cloth |
|
Microfiber |
Rubbing alcohol on a Q-tip |
Fluff the dry fibers with a stiff brush |
|
Wood Chair Legs |
Peanut butter or alcohol |
Wipe completely clean with a wet rag |
Tackling Carpets and Soft Surfaces
Dropping a Sharpie on a light-colored carpet induces pure panic. Carpets are tricky because the fibers are long, giving the ink plenty of surface area to grab onto.
If you have a synthetic carpet (nylon or polyester), cheap aerosol hairspray is your lifesaver. Bargain hairspray contains a massive amount of alcohol. Spray the stain until it is saturated. Wait thirty seconds, then blot aggressively with a clean white towel. You will see the ink transfer onto the towel immediately. Keep moving to a clean section of the towel and repeat until the stain vanishes.
For expensive wool rugs, skip the hairspray. Wool is delicate. Use a tiny amount of rubbing alcohol on a cotton swab and apply it only to the stained fibers. Blot gently. If the stain persists, call a professional carpet cleaner before you ruin the expensive wool pile.
|
Carpet Material |
Best Attack Plan |
Caution |
|
Synthetic (Nylon) |
Aerosol hairspray |
Don’t use colored towels to blot |
|
Wool |
Rubbing alcohol (sparingly) |
Never saturate the rug pad beneath |
|
Shag / High Pile |
Gel hand sanitizer |
Separate fibers to clean individually |
|
Indoor/Outdoor |
WD-40 spray |
Wash thoroughly with dish soap |
Rescuing Hard Plastics, Glass, and Game Boards
Fixing non-porous surfaces like plastic storage bins, glass coffee tables, or metal fridges is a breeze. Because the ink can’t sink into a wood grain or a fabric weave, it just sits helplessly on top of the surface.
For hard plastics, standard rubbing alcohol cuts right through the ink in seconds. If you find an old, sun-baked marker stain on a plastic patio chair, spray a little WD-40 on it. The lubricating oil lifts the dye right out of the plastic’s microscopic pores. Just wash the chair with Dawn dish soap afterward to get rid of the greasy WD-40 residue.
One common disaster happens frequently in the tabletop gaming community: accidentally using a permanent marker on a wet-erase Dungeons & Dragons battle map. If you do this, don’t use nail polish remover—it melts the plastic mat entirely. Instead, trace over the mistake with a dry erase marker and wipe it off. The solvents in the dry erase pen will pick up the permanent ink perfectly without destroying the grid lines underneath.
|
Hard Surface Type |
Best Solution |
Advice |
|
Hard Plastics |
Rubbing alcohol or WD-40 |
Wash with soap after using WD-40 |
|
Glass Tables |
Dry erase marker |
Avoid using abrasive scouring pads |
|
D&D Battle Maps |
Dry erase marker or 70% alcohol |
Do not let alcohol soak on printed lines |
|
Stainless Steel |
Dry erase marker |
Always wipe with the grain of the metal |
The Biggest Mistakes When Cleaning Ink
Sometimes our panic causes more damage than the actual marker. People trying to remove sharpie surfaces too fast usually make permanent mistakes that force them to throw the item away. Don’t let a minor accident turn into a ruined piece of furniture.
Stop Scrubbing
I can’t say this enough: do not scrub aggressively. When you apply alcohol, the ink turns back into a liquid. If you rub it, you spread that liquid outward. You will turn a tiny black dot into a massive, shadowy gray smudge. Always press down firmly and blot straight up.
Put the Bleach Away
Never use bleach on colored fabrics or carpets. Yes, bleach will absolutely kill the ink. But it will also permanently destroy the manufacturer’s dye in your sofa, leaving a bright white bleach spot that you can never fix.
Avoid Heat at All Costs
If you try to clean a stain on a shirt or a rug and it gets wet, do not hit it with a hairdryer to dry it faster. Never toss a stained shirt in the clothes dryer. Heat cross-links the polymers in the resin, baking the stain permanently into the fibers. Let everything air dry in a cool room.
|
The Mistake |
The Damage |
The Right Way |
|
Scrubbing wildly |
Smears ink into a huge stain |
Blotting firmly straight up and down |
|
Pouring Acetone |
Melts plastics and wood finishes |
Using Isopropyl alcohol gently |
|
Using a Hairdryer |
Sets the ink permanently |
Letting the spot air dry completely |
|
Grabbing Bleach |
Ruins the original color |
Using color-safe hydrogen peroxide |
Final Thoughts
Accidents happen. But a stray permanent marker doesn’t mean you have to throw out your favorite rug or repaint your entire living room. By understanding a little bit of chemistry and matching your surface with the right household solvent, you can reverse almost any slip of the hand.
Always remember to test your cleaner on a hidden spot first to make sure it won’t bleach the color or strip the finish. Take a deep breath, blot the stain instead of furiously rubbing it, and trust the process. The next time you need to remove sharpie surfaces around your house—whether it’s on a wooden dining table, a painted hallway wall, or your favorite fabric couch—you know exactly which cabinet to open to save your stuff.
Frequently Asked Questions (FAQs) About Remove Sharpie Surfaces
Most guides tell you to grab rubbing alcohol, but real life gets a bit more complicated. I dug into what people are actually searching for when they deal with major marker disasters. Here are the answers you really need.
Does the color of the Sharpie actually matter?
Yes, big time. Red and blue Sharpies use completely different chemical dye structures than the standard black ones. Red ink is notoriously difficult to remove because the red pigment particles are incredibly small. They penetrate way deeper into microscopic pores. You usually have to let your alcohol or hairspray sit twice as long to lift red ink.
How do I safely get permanent marker off my kids’ skin?
Skip the harsh scrubbing and alcohol. Oil-based products break down the marker perfectly without irritating sensitive skin. Slather the spot with baby oil, coconut oil, or olive oil. Let it sit for a few minutes, then wipe it away with a warm washcloth. For stubborn spots, a gentle sugar scrub provides just enough exfoliation to lift the ink out of the pores.
How long does it take for a Sharpie to become totally permanent?
The ink feels dry to the touch in seconds. But the resin actually takes about 24 hours to fully cure and harden. If you catch a stain on your table within the first few hours, your chances of wiping it away cleanly are huge. Once it cures for a week, you have a much tougher fight ahead.
Why didn’t the dry erase trick work for me?
If you scribbled over the Sharpie with a dry erase marker and it just sat there, your dry erase marker is probably old. This trick relies entirely on the wet carrier solvent inside a fresh marker mixing with the dried permanent ink. Go buy a brand new, juicy dry erase marker and try it again.


