
Stepping outside to find your once-green yard turned into a crispy, brown wasteland is incredibly frustrating. You spend your weekends trying to keep the property looking sharp, but the summer heat, hidden bugs, or poor dirt can quickly ruin your hard work. Many homeowners panic when they see large brown patches.
They assume the only fix is hiring an expensive landscaping crew to rip out all the dirt and lay down thousands of dollars in fresh sod. Fortunately, bringing your yard back to life is a very manageable weekend project that you can handle yourself. Learning how to revive a dead lawn is simply a matter of following a proven process, using the right tools, and staying consistent with your water hose.
You do not need a degree in horticulture to get green grass growing again. If you follow a clear plan, you can completely transform your property in exactly four weeks. This guide breaks the entire recovery process down into a strict 30-day timeline. You will learn exactly how to clear away the dead material, fix the underlying soil issues, and put down fresh seeds that actually sprout. All it takes is a little sweat equity, some quality grass seed, and the patience to water your dirt every single day until the green shoots arrive.
Is Your Lawn Dead or Just Dormant?
You must figure out the current state of your grass before you spend a single dollar on new seeds or fertilizer. Grass has a built-in survival mechanism that triggers when the weather gets too hot or rainfall completely stops. The plant stops pushing energy into the green leaves on the surface and goes to sleep to protect its root system underground. This sleeping state is called dormancy.
Dormant turf looks completely brown, crunchy, and lifeless on the surface, but it is fully alive below the dirt. True plant death means the cellular structure has failed entirely and the roots have rotted away. Identifying the difference between a sleeping yard and a dead yard will save you hours of unnecessary physical labor. You might just need to turn on your sprinklers instead of renting heavy machinery.
|
Grass Status |
Root Condition |
Crown Appearance |
Required Action |
|
Dormant |
Firm and deep in the soil |
White or pale green base |
Deep watering schedule |
|
Dead |
Dry, brittle, and dusty |
Dark brown or black base |
Full removal and reseeding |
|
Dying |
Weak but still attached |
Yellowing or pale brown |
Immediate soil correction |
The Tug Test
Walk outside and find the worst-looking patch in your entire yard. Reach down and grab a thick handful of the brown blades right where they meet the soil. Pull straight upward with a firm, steady force and pay close attention to what happens next. If the clump rips out of the ground immediately with dry, dusty roots attached, those specific plants are gone forever. Dead roots lose their physical grip on the dirt and crumble easily in your hands. If the grass fights your pull and stays firmly anchored in the earth, the root system is alive and simply waiting for cooler weather to return.
The Crown Test
Get down on your hands and knees to inspect an individual grass plant very closely. Look for the exact spot where the grass blades meet the root system just above the soil line. This tiny intersection is known as the crown, and it acts as the biological heart of the plant. Squeeze the crown gently between your thumb and index finger to feel its texture. A healthy, dormant grass plant will have a firm crown that is white or pale green inside. A plant that has died will have a crown that feels mushy, hollow, or completely dried out and dark brown.
The Watering Test
If you are still unsure after pulling on the grass and checking the crowns, you can force the grass to reveal its status. Pick a small, two-foot square section of the brown yard. Water this specific square heavily every single day for one full week. If the grass is simply dormant, the steady supply of moisture will wake it up, and you will see green color returning to the blades. If the square remains entirely brown and crispy after a week of heavy soaking, you can confidently confirm the grass is dead and proceed with a full recovery plan.
What Causes a Lawn to Die?
Grass rarely dies for no reason at all. Finding out exactly what killed your yard is a crucial step in the recovery process because you have to fix the root cause before planting anything new. If you skip this investigation phase, your fresh seeds will eventually die from the exact same problem next season. Yards typically fail due to severe environmental stress, bad yard care habits, or aggressive insects living underground.
Figuring out the culprit requires you to look at the patterns of the dead patches, test the hardness of your dirt, and sometimes dig a small hole to look for bugs. Once you identify the enemy, you can change your maintenance routine to ensure your new grass survives for years to come.
|
Threat Category |
Visible Damage Sign |
Warning Indicator |
Prevention Method |
|
Drought Stress |
Uniform brown color across yard |
Footprints stay visible |
Water deeply twice a week |
|
Soil Compaction |
Dirt is hard as rock |
Water runs down driveway |
Annual core aeration |
|
Pest Infestation |
Irregular patches that peel back |
Birds digging in yard |
Targeted insect control |
|
Fungal Disease |
Perfect brown circles |
Dusty coating on blades |
Avoid evening watering |
|
Poor Mowing |
Jagged and torn blade tips |
Exposed dirt patches |
Sharpen blades annually |
Heat and Drought Stress
Summer brings high temperatures that bake the moisture out of the topsoil faster than rain can replace it. Cool-season grass varieties simply cannot survive long periods without heavy hydration. The blades will start to fold in half and turn a pale gray or yellow color before eventually turning entirely brown. You can spot early drought stress if your footprints remain flat in the yard long after you walk across it. Without water, the plant cannot move food from the soil up into its leaves, causing it to starve.
Compacted Soil
The dirt beneath your grass takes a heavy beating from constant foot traffic, backyard sports, and heavy riding mowers. All of this weight pushes the soil particles tightly together, crushing the tiny pockets of air underground. When the dirt gets too hard, water runs right off the surface instead of soaking down into the roots. Oxygen can no longer reach the root system, causing the plants to slowly suffocate. You can test for compaction by trying to push a standard screwdriver directly into the ground. If the metal stops after an inch, your dirt is dangerously compacted.
Pests and Fungal Diseases
Many yards fall victim to silent attacks from bugs living under the surface of the dirt. White grubs are the most common destroyer, acting like underground caterpillars that eat grass roots for every single meal. You might have a grub problem if crows or raccoons constantly dig small holes in your yard looking for snacks. Fungal diseases are another massive threat that spreads rapidly during hot, humid weather. Fungus usually shows up as strange circular brown patches or powdery coatings on the leaves.
Poor Mowing Habits
Most people cut their grass way too short in an attempt to avoid mowing the following weekend. Scalping the yard removes the upper portion of the blade that captures sunlight for photosynthesis, starving the plant of energy. It also exposes the delicate base of the plant to the blistering summer sun. Using a dull mower blade makes the problem much worse by tearing the grass instead of slicing it cleanly. A torn blade of grass turns yellow at the tip, loses moisture rapidly, and becomes highly vulnerable to disease.
Step-by-Step Guide to Reviving Your Dead Lawn
Once you know why the grass died and have confirmed it is not just sleeping, you can begin the physical work of fixing it. This guide breaks the massive yard renovation project down into four distinct weekly phases.
Taking it one week at a time prevents you from getting overwhelmed, skipping steps, and wasting money on ruined seeds. You must follow these exact steps in order because each week sets the foundation for the next stage of growth.
|
Project Week |
Main Focus Area |
Primary Tools Needed |
Estimated Time Needed |
|
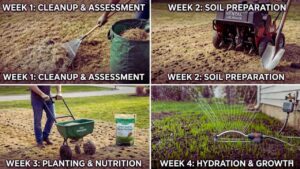
Week 1 |
Cleanup and Assessment |
Dethatching rake and bags |
4 to 6 hours |
|
Week 2 |
Soil Preparation |
Core aerator and shovel |
5 to 7 hours |
|
Week 3 |
Planting and Nutrition |
Broadcast spreader and seed |
3 to 4 hours |
|
Week 4 |
Hydration and Growth |
Hose and sprinkler timer |
2 hours weekly |
Week 1: Assessment and Yard Cleanup
You cannot plant tiny new seeds in a yard covered in old trash, weeds, and thick dead grass. The first seven days are dedicated strictly to demolition and clearing the canvas. Removing the physical barriers allows air, water, and sunlight to actually reach the dirt where the new seeds will live. Take your time during this cleanup phase because a clean surface makes planting incredibly easy.
Step 1: Clear Debris and Dethatch
Start your weekend by walking the entire property to pick up fallen branches, rocks, kids toys, and large leaves. Once the surface is clear, you have to tackle the thatch layer hiding underneath. Thatch is a thick, spongy barrier of dead roots and stems that sits right on top of the soil. A thick thatch layer acts like a waterproof tarp that blocks rain from reaching the dirt. Rent a power dethatcher or use a heavy metal spring rake to rip all of this dead material out of the yard. Rake the loose debris into large piles and bag it up for disposal.
Step 2: Test and Amend Your Soil
Seeds will absolutely refuse to grow if the dirt chemistry is completely unbalanced. Drive to a local garden center and buy a simple soil testing kit. Take small dirt samples from a few different areas of your yard, mix them together in a cup, and perform the test. The results will reveal your current pH level and highlight any missing nutrients. If your soil is highly acidic, you will need to buy a bag of lime and spread it across the yard to balance the chemistry before planting.
Step 3: Tackle the Weeds
Weeds are opportunistic plants that aggressively steal water and sunlight from weak grass. You have to eliminate them before you put your expensive new seeds down. Walk around and pull broadleaf weeds out by hand, making sure you pull the entire root up so they do not grow back. If your yard is absolutely covered in weeds, you can spray a selective herbicide to kill them off. You must read the chemical label very carefully before spraying anything, as some weed killers require you to wait three full weeks before you are allowed to plant new grass seed.
Week 2: Breathing Life Back into the Soil
Your yard is clean, but the dirt is likely baked hard from the sun and previous foot traffic. Week two focuses entirely on breaking up the ground so roots can push downward easily. Soft, rich soil is the secret ingredient to rapid seed germination and long-term yard health. Spending physical effort here dramatically reduces how much water you will need to use later in the summer.
Step 4: Aerate the Lawn
Core aeration is the single most important step for long-term yard success. Head back to the hardware store and rent a motorized core aerator for the afternoon. This heavy machine drives hollow metal tubes into the earth and pulls out thousands of small mud plugs. Pulling these plugs out instantly relieves the extreme pressure holding the dirt together. The empty holes act as direct vertical tunnels for water, oxygen, and liquid fertilizer to reach deep underground. Leave the mud plugs sitting on the grass, as they will dissolve during the next rainstorm.
Step 5: Top Dress with Compost
Your newly aerated yard now has thousands of holes waiting to be filled with quality nutrients. Buy several bags of high-quality organic compost or screened topsoil. Dump small piles around the yard and use a push broom or the flat side of a rake to spread it very thin. You only want a quarter-inch layer of compost covering the surface. The rich dirt will fall naturally into the aeration holes, creating deep pockets of perfect growing material that holds moisture incredibly well.
Week 3: Reseeding and Feeding
The heavy preparation is officially over, and the planting phase finally begins. Overseeding is the process of dropping new seeds directly over the prepared ground to fill in all the dead spots. Doing this correctly ensures you get an even, thick carpet of grass instead of ugly random patches of green mixed with mud.
Step 6: Choose the Right Grass Seed
Do not grab the cheapest bag of seed on the shelf without reading the label first. You have to pick a grass type that matches your specific geographic climate and yard conditions. If you live in a northern state with cold winters, buy cool-season seeds like tall fescue or Kentucky bluegrass, which grow best in the early fall. If you live in a hot southern climate, you need warm-season varieties like Bermuda or Zoysia grass. You also need to check how much direct sunlight your yard gets during the day and buy a shade-tolerant mix if necessary.
Step 7: Overseed and Apply Starter Fertilizer
Pour your chosen seed into a broadcast push spreader to guarantee even distribution across the property. Walk at a steady pace in straight lines across the yard, slightly overlapping your wheel marks like you are mowing. Go back to the completely bare dirt patches and sprinkle a little extra seed by hand just to be safe. Once all the seed is down, take a leaf rake and lightly massage the seeds into the compost layer so they actually touch the dirt. Finish the day by spreading a starter fertilizer that is high in phosphorus to push rapid root growth.
Week 4: Hydration and Germination
Your physical labor is basically done, but your mental focus has to stay sharp. The final week determines if your seeds actually turn into grass or just die baking in the dirt. Water management is the absolute key to success during this fragile stage, and you cannot miss a single day of irrigation.
Step 8: Stick to a Strict Watering Schedule
Grass seeds are incredibly delicate and will die within a few hours if they completely dry out under the sun. Your goal is to keep the top inch of the soil constantly damp, feeling exactly like a wrung-out kitchen sponge. You will likely need to run your sprinklers two or three times a day for about ten minutes each session. Avoid turning the water on full blast, as heavy streams will wash your expensive seeds down the driveway and into the street gutter.
Step 9: Keep Off the Grass
You must protect the new growth from any physical damage during the first month of life. Put up small stakes with bright string around the yard perimeter to keep neighbors and delivery drivers off the dirt. Tiny grass sprouts will snap under the weight of a footprint, and they do not have the strength to stand back up. Keep your pets in a separate area because running paws will tear up the loose soil instantly. Give the plants total peace and quiet to establish their root systems securely into the ground.
Ongoing Care to Keep Your Lawn Lush
Congratulations on completing the hardest parts of learning how to revive a dead lawn. Once the thirty days pass and the yard is green again, you have to switch your mindset to maintenance mode. Old habits will simply kill the new grass if you are not careful about how you treat it.
A few smart adjustments to your weekly routine will keep the turf thick, healthy, and green all year long. Establishing these rules now prevents you from having to repeat the 30-day revival process next year.
|
Maintenance Rule |
Ideal Measurement |
Primary Goal |
Long-Term Benefit |
|
Mowing Height |
3 to 3.5 inches tall |
Shade the topsoil |
Blocks weed seeds from sprouting |
|
Watering Volume |
1 to 1.5 inches weekly |
Soak past the topsoil |
Forces roots to grow deeper |
|
Fertilization |
Every 6 to 8 weeks |
Supply steady nutrients |
Maintains rich green color |
Adjust Your Mowing Height
Patience is required before you bring the heavy mower out of the garage. Wait until the new grass is at least three full inches tall before you even think about cutting it. Set your mower wheels to the highest possible setting for that first cut. You should only remove the top third of the grass blade during any single mowing session to avoid shocking the plant. Leaving the grass slightly taller provides natural shade for the soil, which prevents your water from evaporating under the hot afternoon sun.
Water Deeply and Infrequently
You must break the habit of watering your yard every single day once the grass matures. Daily watering creates lazy root systems that stay right near the surface because the water is always easy to reach. Change your timer to water heavily just once or twice a week, aiming for a total of one to one and a half inches of water. This deep soaking forces the water far down into the earth, training the roots to stretch downward to chase the moisture.
Stick to a Feeding Schedule
A thick, aggressive lawn is your best defense against invasive weeds and turf disease. You need to provide steady nutrition to keep the grass pushing new growth throughout the summer. Apply a slow-release nitrogen fertilizer every six to eight weeks during the active growing season. Slow-release formulas feed the plants gently over time instead of blasting them with chemicals all at once, which can burn the blades. Always sweep stray fertilizer granules off your sidewalks and back into the grass.
Final Thoughts
Looking at a ruined yard can feel overwhelming, but discovering how to revive a dead lawn proves that full recovery is entirely possible. You do not need to settle for a brown property or pay extreme professional landscaping fees to get your curb appeal back. By taking the time to test your dirt, pull up the dead thatch, and relieve the compacted soil, you give new seeds the perfect home to thrive.
Staying strictly committed to your watering schedule during week four is the ultimate key to watching those tiny green sprouts appear. Keep your mower blades high, water deeply instead of daily, and enjoy the lush, green results of your hard work.
Frequently Asked Questions (FAQs) About Revive Dead Lawn
Can completely dead grass grow back?
No. Once the crown and root structure of the plant turn dark brown and brittle, the grass is permanently dead. You cannot force a dead plant to regenerate regardless of how much water you apply. You have to remove the dead organic matter and plant fresh seeds or lay new sod to get a green yard again.
Should I water dead grass?
Watering genuinely dead grass is a complete waste of your water bill because the dead roots cannot physically absorb moisture. However, if you perform the tug test and realize the grass is only dormant from the heat, watering it deeply once a week will keep the crowns alive until fall weather arrives.
Can I lay new sod directly over dead grass?
Laying fresh sod directly over old dead grass is a terrible idea that usually results in total failure. The layer of dead turf acts as a physical wall that stops the new sod roots from touching the actual soil. You must use a sod cutter to remove the dead layer entirely before putting any new grass down.
Should I rake my dead grass?
Yes, removing dead grass through vigorous raking or dethatching is required. The dead material blocks sunlight, water, and fresh nutrients from reaching the soil. Raking clears the canvas so your new grass seeds can make direct contact with the dirt, which is necessary for germination.
Does dog urine cause permanent lawn death?
Dog urine contains high concentrations of nitrogen and natural salts that burn grass blades, acting just like a severe chemical fertilizer spill. If left untreated, it will permanently kill the spot. You can save the grass by immediately pouring a bucket of fresh water over the area to dilute the urine.
Why did my grass die in perfect circles?
If your grass dies in distinct, perfect circles, you are almost certainly dealing with a fungal disease like brown patch. Fungal spores spread outward in a radial pattern from a central infection point. You need to apply a turf fungicide and immediately stop watering the yard late in the evening.


