
We have all been there. You look down at your beautiful kitchen or bathroom tile and realize the once-white lines have turned a depressing shade of murky gray. Your first thought is probably the dreaded toothbrush and a bucket of bleach. You imagine yourself spending the entire Saturday on your hands and knees, scrubbing until your wrists ache and your back gives out. It is a miserable job that most of us put off for months.
But here is the good news: you do not have to live like that. If you are working that hard, you are actually doing it wrong. Cleaning grout is more about chemistry and timing than physical force. When you understand how grout works, you can make the transition to a much simpler routine. This guide is designed to show you how to clean tile grout easy so you can get your weekend back. We will look at why grout gets so dirty, the tools that do the work for you, and the secret hacks that professionals use to keep floors looking brand new without the sweat.
Why Grout is Such a Magnet for Grime
Grout is basically the “unprotected” part of your floor. While your ceramic or porcelain tiles are usually glazed and non-porous, grout is a mixture of sand and cement. This means it is full of tiny, microscopic holes that act like a sponge. Every time you mop your floor, you are actually pushing dirty water into these pores. Over time, that water evaporates, but the dirt, grease, and bacteria stay trapped deep inside.
In high-traffic areas like the kitchen, the problem is usually a mix of food spills and cooking oil that has been “polymerized” or hardened over time. In bathrooms, you are fighting soap scum and mold spores that love the damp environment. Understanding this porous nature is the first step in learning how to clean tile grout easy because it reminds us that we need to “lift” the dirt out rather than just rubbing it around the surface.
Key Factors in Grout Discoloration
|
Factor |
Description |
Impact on Cleaning |
|
Porosity |
Grout is a sand-cement mix that absorbs liquids easily. |
Requires “dwell time” for cleaners to penetrate. |
|
Mop Water |
Dirty water settles in the lower grout lines during cleaning. |
Leads to gradual darkening of light grout. |
|
Oil & Grease |
Cooking fats bond with the sand particles in the grout. |
Requires alkaline cleaners to break the bond. |
|
Mold/Mildew |
Organic growth in humid bathroom environments. |
Needs oxygen-based whiteners to kill spores. |
The Difference Between Sanded and Unsanded Grout
Before you start, you should know what kind of grout you have. Sanded grout is used for wider joints (usually 1/8 inch or wider) and is more durable but also more porous. It feels like sandpaper if you run your finger over it. Unsanded grout is used for very thin lines and is smoother, often found on wall tiles or in high-end marble installs. Sanded grout is much harder to clean because the sand grains provide more surface area for dirt to cling to. Knowing this helps you choose the right brush—stiffer for sanded, softer for unsanded—to ensure you do not damage the finish while trying to get it clean.
The Magic of DIY Solutions to Clean Tile Grout Easy
You do not need to run to the store and buy expensive, toxic chemicals to see a massive difference in your floors. In fact, some of the most effective cleaners are sitting in your kitchen right now. The secret to a “no-scrub” DIY approach is allowing the mixture to sit. Most people apply a cleaner and immediately start scrubbing. That is a mistake. You need to let the ingredients react with the grime for at least 15 to 20 minutes.
This waiting period allows the chemical bonds of the dirt to break apart. When you come back to it, the “cleaning” part is often as simple as a quick wipe with a microfiber cloth. This is the absolute best way to clean tile grout easy because it utilizes the power of oxygen and basic pH levels to do the heavy lifting.
The Power of Baking Soda and Hydrogen Peroxide
This is the holy grail of home grout cleaning. Hydrogen peroxide is a natural whitener and a disinfectant, but it is much gentler than chlorine bleach. Baking soda adds a tiny bit of grit and helps create a paste that stays exactly where you put it.
Why This Combo Works
|
Ingredient |
Role in Cleaning |
Benefit |
|
Baking Soda |
Mild abrasive and deodorizer. |
Lifts surface stains without scratching tile. |
|
Hydrogen Peroxide |
Oxidizing agent and whitener. |
Deep cleans pores and kills mold. |
|
Dish Soap |
Degreaser. |
Breaks down kitchen oils and food spills. |
|
Dwell Time |
The “waiting” phase. |
Eliminates the need for aggressive scrubbing. |
How to Mix and Apply the Paste
To make the paste, mix two parts baking soda with one part hydrogen peroxide. If you are cleaning a greasy kitchen floor, add a teaspoon of high-quality dish soap. Apply this thick paste directly onto the grout lines. You can use a spoon or even your finger (wear gloves!) to make sure it is packed into the grooves. Now, walk away. Give it 20 minutes to bubble and work its way into the pores. When you return, you will likely see the paste has turned a dingy gray or brown. That is the dirt being pulled out. Just wipe it away with a wet rag.
Read Also: How to Deep Clean a Mattress in 2026: Step-by-Step Guide
Steam Cleaning: The Ultimate Hands-Off Method
If you want to avoid chemicals entirely, steam is your best friend. A good steam cleaner uses pressurized, high-heat moisture to literally blast the dirt out of the grout pores. It is incredibly satisfying to watch. The heat (usually over 200°F) liquefies grease and kills 99.9% of household bacteria, including the mold that hides in bathroom corners.
This is a favorite method for those who want to clean tile grout easy because there is no residue left behind. When you use soaps or chemical cleaners, if you do not rinse them perfectly, the leftover soap becomes a magnet for new dirt. Steam avoids this problem entirely. You are just using water, which means your floors stay cleaner for much longer.
Professional Steam Results at Home
|
Feature |
Manual Scrubbing |
Steam Cleaning |
|
Effort Level |
High (Physical labor) |
Low (Guiding a machine) |
|
Chemical Use |
High (Bleach/Acids) |
Zero (Distilled water only) |
|
Sanitization |
Moderate |
High (Heat kills bacteria) |
|
Drying Time |
Long |
Very Fast |
Tips for Using a Steamer Correctly
When using a steamer, focus on the small nylon brush attachment. You do not need to push down hard. Let the steam do the work. Move the nozzle slowly along the grout line, and keep a clean towel in your other hand. As the steam lifts the dirt to the surface, you need to wipe it up immediately. If you let it sit, the water will cool down and the dirt will just settle right back into the grout.
~The beauty of steam is that it cleans deep where brushes cannot reach, making it the most efficient way to handle large areas.~
Choosing Commercial Cleaners Without the Harsh Fumes
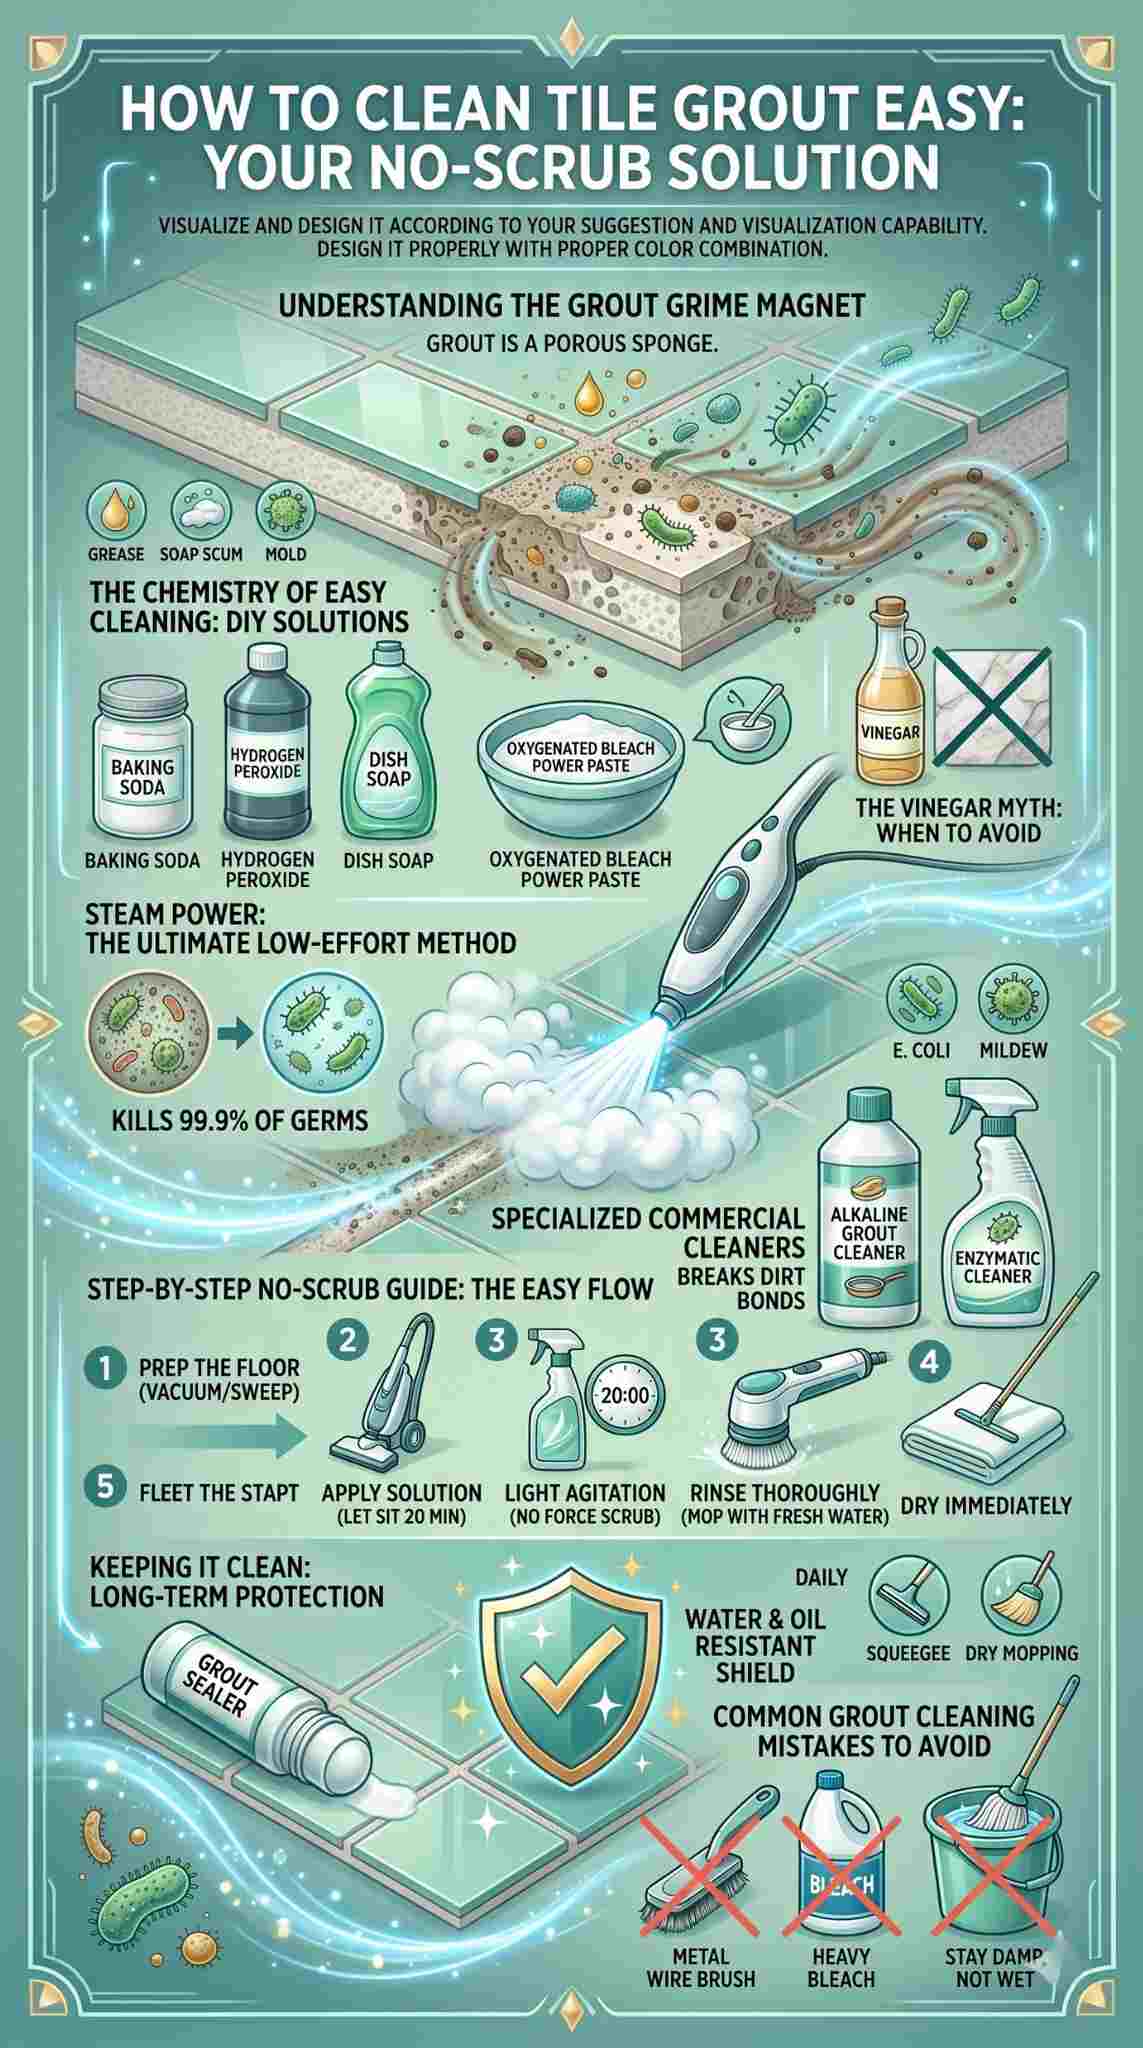
Sometimes the DIY route is not enough for a floor that has been neglected for years. If you are dealing with decades of buildup, you might need a commercial-grade product. However, stay away from the cheap, “smells like a pool” bleach cleaners. Those can actually damage your grout over time by making it brittle. Instead, look for alkaline-based cleaners or oxygenated bleach powders.
These professional-grade products are formulated to break the molecular bond between the soil and the grout surface. They are much safer for your lungs and for the longevity of your flooring. To clean tile grout easy with these products, you still follow the “dwell time” rule. Spray it on, let it work, and then simply rinse.
Top Categories of Grout Cleaners
|
Type |
Best For |
Safety Level |
|
Alkaline Cleaners |
Heavy grease and kitchen floors. |
High (Safe for most stone) |
|
Oxygen Bleach |
Organic stains and whitening. |
High (Non-toxic) |
|
Enzymatic Cleaners |
Pet stains and bathroom mold. |
High (Bio-based) |
|
Acidic Cleaners |
Hard water and mineral deposits. |
Low (Can damage grout if misused) |
The Secret of Alkaline Cleaners
Most dirt in our homes is acidic. To neutralize it and lift it away, you need a cleaner on the opposite end of the pH scale—an alkaline cleaner. These are especially effective in kitchens where grease is the primary problem. They “saponify” the oil, basically turning the grease into a type of soap that can be easily rinsed away. If you have natural stone tiles like marble or slate, alkaline cleaners are the only safe option, as acids will permanently “etch” or dull the surface of the stone.
A Step-by-Step System for Minimal Effort
Success in cleaning grout comes down to your workflow. If you jump around or do not prepare the surface, you will end up working twice as hard. The goal is to clean tile grout easy by being organized and letting the products do the labor. Here is the exact system that professional cleaners use to get through a whole house in a few hours.
First, you have to get the loose stuff out of the way. If you start cleaning a dusty floor, you are just making mud. That mud will sink into the grout and make your job ten times harder.
The No-Scrub Workflow
|
Step |
Action |
Why It Matters |
|
1. Prep |
Vacuum or sweep thoroughly. |
Removes loose grit and hair. |
|
2. Apply |
Saturate grout lines with cleaner. |
Ensures the chemical reaction can start. |
|
3. Dwell |
Wait 15–20 minutes. |
Breaks down stubborn bonds. |
|
4. Agitate |
Lightly brush if needed. |
Helps the cleaner penetrate deep pores. |
|
5. Extract |
Wipe or mop with clean water. |
Removes the lifted dirt for good. |
Why Agitation is Different from Scrubbing
People often confuse these two things. Scrubbing is when you use force to try and scrape dirt off a surface. Agitation is just using a soft brush to move the cleaning solution around so it hits all the “nooks and crannies” of the grout. You do not need to press hard. Just a few light passes with a grout brush or an old electric toothbrush is enough to ensure the cleaner is doing its job. Think of it like brushing your teeth—you are just guiding the bristles, not trying to sand down the enamel.
Prevention Hacks: Never Scrub Again
The most efficient way to clean tile grout easy is to prevent it from getting dirty in the first place. Once you have your grout looking pristine, you need to seal it. Grout sealer is essentially a liquid raincoat for your floor. It fills those microscopic pores so that when you spill coffee or drop a piece of buttery food, the liquid stays on top of the grout instead of soaking in.
Sealing is a simple task that most homeowners ignore. It takes about an hour to do a standard kitchen, but it will save you days of cleaning over the next few years. You should re-apply a sealer once every year, or whenever you notice that water no longer “beads up” on the grout lines.
Daily Habits for Clean Grout
|
Habit |
Frequency |
Benefit |
|
Dry Mopping |
Daily |
Prevents dust from settling in grout. |
|
Squeegee Walls |
After every shower |
Stops mold and soap scum buildup. |
|
Spot Cleaning |
Immediately after spills |
Prevents permanent staining. |
|
Sealing |
Every 12 months |
Provides a waterproof barrier. |
Choosing the Right Sealer
There are two main types of sealers: penetrating and membrane-forming. Penetrating sealers soak into the grout and are best for floor tiles because they do not make the surface slippery. Membrane-forming sealers create a layer on top and are often used for wall tiles. For most homes, a high-quality penetrating sealer is the best choice. It lets the grout “breathe” while still blocking out oils and water.
Common Grout Cleaning Mistakes to Avoid
Even with the best intentions, it is easy to ruin your grout if you use the wrong tools. One of the biggest mistakes people make is using a wire brush. You might think it helps, but it actually scratches the tile and can gouge out the grout itself. This makes the surface even more porous, ensuring that it will get dirty even faster next time.
Another common error is using too much water. If you flood your floor with a mop and bucket, the dirty water just pools in the grout lines. As it dries, it leaves all that dirt behind. Always use a microfiber mop that is damp, not dripping wet.
What to Avoid at All Costs
|
Mistake |
Consequence |
Better Alternative |
|
Wire Brushes |
Scratches tile and ruins grout. |
Nylon grout brushes. |
|
Heavy Bleach |
Makes grout brittle and yellow. |
Oxygen bleach or hydrogen peroxide. |
|
Acid on Stone |
Permanently dulls marble/granite. |
pH-neutral or alkaline cleaners. |
|
Dripping Wet Mops |
Pushes dirt into the grout. |
Microfiber flat mops. |
The Dangers of Vinegar and Lemon
While these are great for many things, they are acidic. Grout is alkaline. When you put acid on an alkaline surface, a chemical reaction happens that slowly dissolves the cement binder in the grout. Over time, your grout will start to crumble or turn into a fine powder. If you must use vinegar, dilute it heavily and use it sparingly. Never use it as your “everyday” cleaner if you want your floors to last.
Final Thoughts
Learning how to clean tile grout easy is all about working smarter, not harder. By shifting your focus from “scrubbing” to “dwell time,” you let chemistry do the heavy lifting for you. Whether you choose a DIY paste of baking soda and peroxide or invest in a high-quality steam cleaner, the key is patience.
Give the products time to work, keep your floors sealed, and stop using methods that actually push dirt into the pores. A little bit of prevention and the right technique will keep your home looking like a showroom without ever having to spend another Saturday on your knees. It is entirely possible to have sparkling floors with minimal effort—you just have to trust the process.
Frequently Asked Questions (FAQs)
Can I use a pressure washer on my indoor tile grout?
It is not recommended. Pressure washers use far too much water and too much force for indoor use. You risk damaging your baseboards, getting water under your subfloor, and even cracking the grout. A steam cleaner is a much safer, high-pressure alternative for indoors.
Why did my grout turn yellow after I cleaned it?
Yellowing usually happens for two reasons: either you used too much bleach, which chemically reacts with the grout, or you left soapy residue behind that has aged and turned color. A deep rinse with clean water and a bit of hydrogen peroxide can usually fix this.
Is there a way to “paint” grout if it is permanently stained?
Yes, you can use a grout colorant or “grout pen.” This is essentially a specialized epoxy paint that sits on top of the grout. It is a great way to “reset” the look of your floor if the stains are too deep to clean.
How long does grout sealer actually last?
In a low-traffic guest bathroom, it might last two or three years. In a busy kitchen, it might only last six to nine months. A good test is to drop a few beads of water on the grout; if they soak in within a minute, it is time to reseal.
Can I clean grout with a magic eraser?
Magic erasers are melamine foam and act like very fine sandpaper. They work great for small spots, but they wear down extremely fast on grout. They are best for “touch-ups” rather than cleaning an entire floor.


