
Replacing a showerhead is one of those small home fixes that feels better than it should. It takes little time. It doesn’t need expensive tools. And in most bathrooms, you don’t need a plumber.
Maybe your shower sprays sideways. Maybe the water pressure feels weak. Maybe the old showerhead looks rusty, clogged, or dated. Or maybe you just want a handheld model that makes rinsing, cleaning, and bathing kids or pets easier.
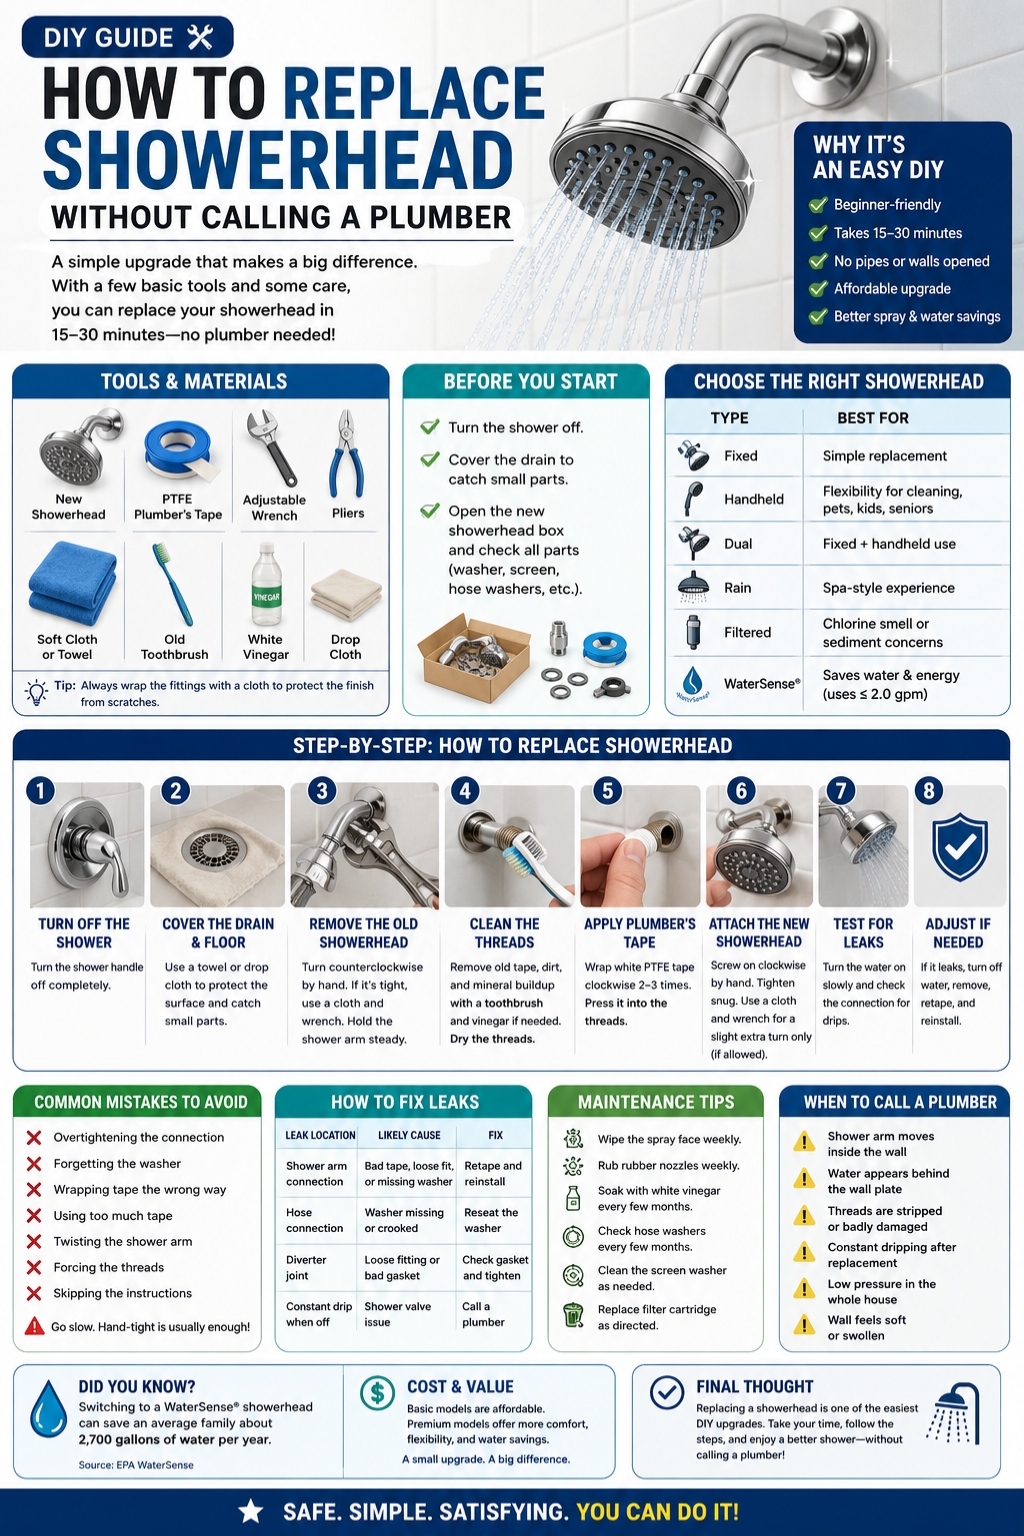
Whatever the reason, this is a job most people can handle with care. You won’t need to open the wall or touch hidden pipes. You’ll usually remove the old showerhead, clean the threads, add plumber’s tape, and screw on the new one.
Still, don’t rush it. A showerhead connects to a shower arm, and that arm goes into the wall. If you twist too hard, force the threads, or skip the washer, you can create a leak. This guide walks you through how to replace showerhead the right way, without turning a simple upgrade into a plumbing problem.
Why Replacing a Showerhead Is Usually an Easy DIY Job
Most showerheads attach to a short pipe coming out of the wall. That pipe is called the shower arm. The showerhead screws onto it.
That’s why this job is simple. You’re not replacing the shower valve. You’re not changing the hot and cold water lines. You’re not cutting pipe. You’re only changing the fixture at the end of the shower arm.
For most homes, the whole job takes 10 to 30 minutes. The hardest part is usually removing an old showerhead that has been stuck there for years.
|
Key Point |
What It Means |
|
DIY level |
Beginner-friendly |
|
Usual time |
10 to 30 minutes |
|
Main connection |
Showerhead to shower arm |
|
Main tools |
Wrench, pliers, towel, plumber’s tape |
|
Main risk |
Twisting or damaging the shower arm |
|
Plumber needed? |
Usually no, unless pipe trouble appears |
When a Showerhead Needs Replacing
You may want a new showerhead if:
- Water sprays in random directions.
- The connection leaks.
- The spray feels weak or uneven.
- The nozzles look clogged.
- Hard water stains keep coming back.
- The finish looks old or rusty.
- You want a handheld, rain, dual, or water-saving model.
This is also a renter-friendly upgrade in many cases. Just keep the old showerhead in a safe place. You can reinstall it before moving out.
Tools and Materials You Need
You don’t need a big toolbox for this job. A few basic items are enough.
The most important thing is to protect the finish. A wrench can scratch chrome, matte black, brushed nickel, brass, and bronze. Always wrap the fitting with a towel or soft cloth before gripping it.
|
Tool or Material |
Why You Need It |
|
New showerhead |
The replacement fixture |
|
PTFE plumber’s tape |
Helps seal threaded connections |
|
Adjustable wrench |
Loosens a tight old showerhead |
|
Pliers |
Holds the shower arm steady if needed |
|
Soft cloth or towel |
Protects the finish from scratches |
|
Old toothbrush |
Cleans old tape and buildup |
|
White vinegar |
Loosens mineral deposits |
|
Small bowl |
Holds washers and small parts |
|
Drop cloth |
Protects the tub or shower floor |
Check the Box First
Before you remove anything, open the new showerhead package and check the parts.
Look for:
- Rubber washer
- Screen washer
- Hose washers
- Mounting bracket
- Diverter valve
- Filter cartridge
- Installation guide
A missing or crooked washer causes many leaks. So don’t toss the packaging too quickly. Small parts often hide inside folded cardboard or plastic bags.
How to Replace Showerhead: Step-by-Step Guide
This is the main process. It works for most standard fixed showerheads. Handheld, dual, rain, and filtered models may include extra parts, so read the product guide too.
|
Step |
What to Do |
Why It Matters |
|
1 |
Turn the shower off |
Stops water at the fixture |
|
2 |
Cover the drain |
Keeps washers from falling in |
|
3 |
Remove the old showerhead |
Clears the shower arm |
|
4 |
Clean the threads |
Helps the new seal work |
|
5 |
Add plumber’s tape |
Helps prevent leaks |
|
6 |
Attach the new showerhead |
Creates the new connection |
|
7 |
Test for leaks |
Confirms the job is done |
|
8 |
Adjust if needed |
Fixes small drips early |
Step 1: Turn Off the Shower
Turn the shower handle fully off. For a basic showerhead swap, you usually don’t need to shut off the whole house water supply.
Still, it helps to know where your main shutoff valve is. You probably won’t need it, but it’s better to know before something goes wrong.
Step 2: Cover the Drain and Floor
Place a towel or drop cloth on the tub or shower floor. Cover the drain too.
This does two things. It protects the surface if you drop a tool. It also stops washers and small parts from sliding into the drain.
Step 3: Remove the Old Showerhead
Start by hand. Hold the shower arm steady with one hand. Turn the old showerhead counterclockwise with the other.
If it doesn’t move, wrap a cloth around the fitting. Use an adjustable wrench and turn slowly.
Don’t yank. Don’t twist hard. And don’t let the shower arm turn with the showerhead. If the arm starts moving, stop and hold it steady with cloth-wrapped pliers.
Step 4: Clean the Shower Arm Threads
Once the old showerhead is off, check the threads on the shower arm.
You may see old tape, rust, soap scum, or white mineral buildup. Remove the old tape with your fingers or an old toothbrush. Wipe the threads clean.
If buildup is stubborn, use a little white vinegar on a cloth. Then dry the threads before adding new tape.
Step 5: Apply Plumber’s Tape
Wrap white PTFE plumber’s tape clockwise around the shower arm threads. Two or three wraps are enough for most showerheads.
Clockwise matters. When you screw the new showerhead on, it turns clockwise too. If the tape is wrapped the wrong way, it may unravel.
Press the tape into the threads with your fingers. Keep it neat. Too much tape can bunch up and cause a bad fit.
Step 6: Attach the New Showerhead
Check the washer inside the new showerhead connector. It should sit flat.
Now screw the new showerhead onto the shower arm by hand. Turn it clockwise until snug.
It should feel smooth. If it feels rough right away, stop. Remove it and start again. You may be cross-threading it.
In many cases, hand-tight is enough. If the instructions allow a wrench, use a cloth and make only a small extra turn. Overtightening can crack plastic parts or strip threads.
Read Also: How to Stop a Running Refrigerator That Won’t Stop
Step 7: Test for Leaks
Turn the shower on slowly. Watch the connection where the showerhead meets the shower arm.
No drips? You’re done.
If water leaks from the joint, turn the shower off. Remove the showerhead, check the washer, remove the tape, apply fresh tape, and reinstall it.
Choosing the Right Showerhead
Before you replace showerhead, think about how you use the shower every day. Don’t buy only by looks. Spray pattern, flow rate, hose length, cleaning needs, and finish all matter.
A fixed showerhead is simple. A handheld showerhead gives you more control. A rain showerhead looks stylish but may feel softer because the water spreads over a wider area. A filtered showerhead may help if your water has chlorine odor or sediment, though it won’t work like a full water softener.
|
Showerhead Type |
Best For |
Watch Out For |
|
Fixed showerhead |
Simple replacement |
Less flexible |
|
Handheld showerhead |
Cleaning, kids, pets, seniors |
Hose quality matters |
|
Dual showerhead |
Fixed and handheld use |
More parts to install |
|
Rain showerhead |
Spa-style feel |
May need more height or reach |
|
Filtered showerhead |
Chlorine smell or sediment concerns |
Filters need replacement |
|
WaterSense showerhead |
Saving water and energy |
Choose a good spray pattern |
Check the Flow Rate
Flow rate tells you how much water the showerhead uses each minute. It is measured in gallons per minute, or gpm.
Many standard showerheads use up to 2.5 gpm. WaterSense-labeled showerheads use 2.0 gpm or less. That means a 10-minute shower with a 2.5 gpm showerhead may use up to 25 gallons, while a 2.0 gpm model may use up to 20 gallons.
That difference adds up, especially in a busy home.
EPA WaterSense says an average family can save about 2,700 gallons of water per year by switching to WaterSense-labeled showerheads. Since showers use hot water, using less water can also reduce water-heating energy.
Fixed or Handheld?
Choose a fixed showerhead if you want the simplest setup. It looks clean and installs fast.
Choose a handheld showerhead if you want more flexibility. It helps with rinsing shampoo, cleaning shower walls, bathing kids, washing pets, and helping older adults shower more comfortably.
For many households, a handheld model is the most practical upgrade.
Match the Bathroom Finish
A new showerhead looks better when it matches the rest of the bathroom.
Common finishes include:
- Chrome
- Brushed nickel
- Stainless steel
- Matte black
- Polished brass
- Oil-rubbed bronze
Chrome is usually easy to match. Brushed nickel hides water spots better. Matte black looks modern but may show soap marks. Brass and bronze look warm, but they need gentler cleaning.
Mistakes to Avoid During Installation
This job is easy, but small mistakes can cause leaks.
The biggest mistake is using too much force. A tight connection feels reassuring, but overtightening can crack the connector, crush the washer, or damage the threads.
|
Mistake |
What Can Go Wrong |
Better Move |
|
Overtightening |
Cracked connector or stripped threads |
Tighten gently |
|
Forgetting the washer |
Leak at the connection |
Check the washer first |
|
Wrapping tape the wrong way |
Tape unravels |
Wrap clockwise |
|
Using too much tape |
Poor fit or bunching |
Use 2 to 3 wraps |
|
Twisting the shower arm |
Hidden pipe damage |
Hold the arm steady |
|
Forcing the threads |
Cross-threading |
Remove and restart |
|
Skipping the instructions |
Wrong setup |
Follow the product guide |
Don’t Remove the Flow Restrictor Too Quickly
Some people remove the flow restrictor because they want stronger spray. That can increase water use and hot water demand. It may also affect how the showerhead was designed to work.
If the spray feels weak, check these first:
- Debris in the screen washer
- Hard water buildup
- Low water pressure in the home
- Wrong spray setting
- Clogged hose
- Loose or blocked diverter
A better-designed showerhead can often improve the feel of the spray without wasting water.
Don’t Use Random Tape
Use white PTFE plumber’s tape for threaded water connections.
Don’t use duct tape. Don’t use electrical tape. Don’t use glue. These won’t seal the connection properly.
Also avoid yellow gas-line tape for a normal showerhead connection. Standard white thread seal tape is the usual choice.
How to Fix Leaks After Installation
A small leak after installation is common. It usually means one part needs a quick reset.
Don’t panic. Turn the water off and check the connection.
|
Leak Location |
Likely Cause |
Fix |
|
Shower arm connection |
Bad tape, loose fit, or missing washer |
Retape and reinstall |
|
Hose connection |
Washer missing or crooked |
Reseat the washer |
|
Diverter joint |
Loose fitting or bad gasket |
Check gasket and hand-tighten |
|
Side of connector |
Cross-threaded fitting |
Remove and start again |
|
Spray face drips briefly |
Water draining from the head |
Usually normal |
|
Constant drip when off |
Shower valve issue |
Call a plumber |
Leak at the Shower Arm
Remove the showerhead. Take off all old tape. Check the washer. Clean the threads. Add fresh tape clockwise. Reinstall the showerhead by hand.
If it still leaks, check the connector. A cracked plastic nut or damaged washer may be the problem.
Leak at the Hose
Handheld showerheads usually leak at the hose when a washer is missing or crooked.
Check both ends of the hose. Seat the washers flat. Then tighten by hand. You usually don’t need a wrench on hose connections.
Dripping After the Shower Is Off
A showerhead may drip for a few minutes after you turn the water off. That is often just trapped water draining out.
But if it drips for hours, the shower valve may be worn. A new showerhead won’t fix that. You may need a new cartridge or valve repair.
When You Should Call a Plumber
Most people can replace showerhead without help. But some signs mean you should stop and call a professional.
|
Warning Sign |
What It May Mean |
|
Shower arm moves inside the wall |
Loose or damaged fitting |
|
Water appears behind the wall plate |
Hidden leak risk |
|
Showerhead will not loosen |
Corrosion or seized threads |
|
Threads are badly stripped |
Shower arm may need replacement |
|
Constant dripping after replacement |
Valve cartridge problem |
|
Weak pressure in the whole house |
Larger plumbing issue |
|
Wall feels soft or swollen |
Possible water damage |
Stop If the Shower Arm Moves
The shower arm should feel solid. If it spins or shifts inside the wall, don’t keep twisting. You could damage the pipe connection behind the wall.
Hold the arm steady if you can. If it still moves too much, call a plumber.
Don’t Ignore Hidden Leaks
If water comes from behind the wall plate, stop using the shower.
That is not a showerhead issue anymore. Water behind the wall can damage drywall, framing, flooring, and nearby rooms. This is the point where a plumber is worth the cost.
Easy Maintenance After You Replace Showerhead
A new showerhead works better when you keep it clean. Hard water minerals can block the nozzles and weaken the spray.
The good news? Maintenance is simple.
|
Maintenance Task |
How Often |
Why It Helps |
|
Wipe the spray face |
Weekly |
Reduces buildup |
|
Rub rubber nozzles |
Weekly |
Keeps spray even |
|
Soak with vinegar |
Every few months |
Loosens mineral deposits |
|
Check hose washers |
Every few months |
Prevents leaks |
|
Clean the screen washer |
As needed |
Restores flow |
|
Replace filter cartridge |
As directed |
Keeps filtered models working |
Simple Vinegar Cleaning Method
For a fixed showerhead, fill a plastic bag with white vinegar. Place it around the showerhead and secure it with a rubber band. Let it soak, then run warm water through the head.
For a removable showerhead, detach it and soak only the parts the manufacturer allows.
Be careful with specialty finishes. Matte black, brass, bronze, and brushed finishes can dull or stain if you use harsh cleaners.
Cost, Savings, and Upgrade Value
A showerhead replacement can be cheap or premium. Basic fixed models are usually affordable. Dual, rain, filtered, and high-end handheld models cost more.
But the value is not only about price. A good showerhead can make the shower feel better every day. It can also make cleaning easier and reduce wasted water.
|
Upgrade Type |
Main Benefit |
Best For |
|
Basic fixed showerhead |
Low-cost replacement |
Simple bathroom refresh |
|
WaterSense model |
Lower water use |
Homes trying to save water |
|
Handheld model |
More control |
Families, pets, seniors |
|
Dual model |
Flexible showering |
Shared bathrooms |
|
Filtered model |
Better water feel |
Chlorine or sediment concerns |
|
Rain showerhead |
Wide, soft spray |
Spa-style bathroom look |
Is a Water-Saving Showerhead Worth It?
Yes, if you pick a good one.
WaterSense-labeled showerheads use less water while still meeting performance standards. That matters because nobody wants a weak, disappointing shower.
Your real savings depend on:
- Shower length
- Number of people in the home
- Old showerhead flow rate
- New showerhead flow rate
- Water heater type
- Local water and energy costs
Even if the savings are small at first, the comfort upgrade can still make the swap worthwhile.
Final Thoughts
You don’t need to be a DIY expert to replace showerhead at home. You just need to work slowly and avoid forcing anything.
Turn the shower off. Cover the drain. Remove the old showerhead. Clean the threads. Wrap plumber’s tape clockwise. Check the washer. Tighten the new showerhead by hand. Then test for leaks.
That’s the whole job in most bathrooms.
Choose a showerhead that fits your real life. A handheld model helps with cleaning and family use. A WaterSense model can reduce water use. A rain showerhead can give the bathroom a softer, spa-style feel.
Call a plumber if the shower arm moves inside the wall, water leaks behind the wall plate, or the shower keeps dripping after the handle is off. But for a normal swap, this is one bathroom upgrade most people can handle with confidence.
Uncommon FAQs About Replacing a Showerhead
These are the questions many people ask once they actually start the job.
|
Question |
Short Answer |
|
Can I replace a showerhead in a rental? |
Usually yes, but keep the old one |
|
Do I need to shut off the main water line? |
Not always, but it adds safety |
|
Why does my new showerhead whistle? |
Debris, pressure, or a washer issue may cause it |
|
Can a showerhead affect hot water use? |
Yes, higher flow uses hot water faster |
|
Should I use tape on plastic threads? |
Check the manufacturer’s instructions |
|
Is a filtered showerhead a water softener? |
No, most filters do not truly soften water |
Can I Replace a Showerhead Without Tools?
Sometimes. If the old showerhead comes off by hand and the new one tightens by hand, you may not need tools.
Still, keep a wrench and towel nearby. Older showerheads often stick harder than expected.
Why Is My New Showerhead Noisy?
A whistle or squeal can come from debris, high water pressure, a loose washer, or a clogged screen.
Remove the showerhead and check the screen washer first. Rinse it, reinstall it, and test again.
Can a Showerhead Improve Water Pressure?
It can improve the feel of the spray. But it can’t fix low pressure coming from the plumbing system.
If every faucet in your home has weak pressure, the problem is bigger than the showerhead.
Can I Install a Rain Showerhead on a Standard Shower Arm?
Usually, yes. But rain showerheads are wider and heavier. They may need more height, better angle, or an extension arm.
Before adding a large rain head, make sure the shower arm feels solid.
Why Does My Handheld Showerhead Leak at the Hose?
The washer is usually missing, crooked, or damaged.
Check both ends of the hose. Seat the washers flat. Tighten by hand and test again.
How Often Should I Replace a Showerhead?
There is no fixed rule. Replace it when cleaning no longer restores the spray, the finish wears out, the connection leaks, or your needs change.


