
You grab an onion, a knife, and a cutting board. You turn around. Nowhere. There isn’t a single flat surface left to work on. Your toaster is elbowing your coffee maker for a tiny sliver of laminate, and a tower of clean dishes threatens to collapse onto the floor at any moment.
I know the exact feeling. Living with zero counter space feels like playing an endless, high-stakes game of Tetris. But you don’t need a sledgehammer, a contractor, or a massive renovation budget to fix this. You just need a completely new strategy.
If you want to organize small kitchen spaces effectively, you have to stop staring at your horizontal surfaces. Look up. Look down. You have walls, ceilings, the backs of cabinet doors, the sink basin itself, and even the baseboards near the floor. By shifting how you view your available square footage, you can turn a cramped, stressful cooking area into a highly functional workspace. Here is exactly how to reclaim your kitchen and permanently ditch the clutter. Let’s get to work.
The Daily Use Only Rule (Decluttering First)
Let’s be honest: you cannot organize clutter. Before you buy a single acrylic bin, floating shelf, or wire basket to organize small kitchen zones, you need to strip the room down to its bare bones. Every single item you keep must earn its rent.
The Psychology of Kitchen Clutter
You walk into a messy room, and your heart rate immediately goes up. Research consistently shows that physical clutter directly spikes cortisol levels, which acts as your body’s primary stress hormone. The kitchen usually stands out as the worst offender because it serves as the central hub of your entire home. When you see stacks of mail next to a pile of dirty dishes and a bulky blender, your brain immediately registers unfinished tasks.
This intense visual noise drains your energy before you even start chopping vegetables for dinner. By removing non-essential items from your direct line of sight, you instantly calm your nervous system. You simply cannot cook a healthy meal when your brain feels overwhelmed by a chaotic environment. Decluttering is not just about making the space look pretty; it remains a strictly required step for daily mental clarity.
|
Clutter Element |
Psychological Impact |
Immediate Action to Take |
|
Visible Mail/Paper |
Triggers anxiety over unpaid bills |
Move to a dedicated office tray immediately |
|
Piled Dirty Dishes |
Creates a sense of daily failure |
Enforce a strict “no dishes in sink overnight” rule |
|
Too Many Appliances |
Causes visual claustrophobia |
Hide non-daily items inside lower cabinets |
|
Crowded Countertops |
Increases cooking frustration |
Clear minimum 24 inches of bare space |
Implementing the Daily Use Rule
Interior designers swear by a ruthless method called the “Daily Use Only” rule to combat this exact problem. If you do not touch an item every single day, it absolutely does not belong on your counter. Period. This one simple rule instantly eliminates up to 60 percent of counter clutter for most households within minutes. Your coffee maker easily makes the cut because you need that caffeine daily.
However, that massive stand mixer you use twice a year to make holiday cookies gets evicted immediately. You must walk your counter right now, touch every item, and mentally tag it as daily, weekly, or rarely used. Be incredibly brutal about this sorting process. Send the weekly items to a cabinet and banish the rare items to a garage shelf.
|
Item Category |
Appliance Examples |
Storage Destination |
|
Daily Use |
Coffee maker, electric kettle |
Keep on the main countertop |
|
Weekly Use |
Toaster, blender, rice cooker |
Store in an appliance garage or lower cabinet |
|
Monthly Use |
Slow cooker, food processor |
Place on a top shelf or inside a pantry closet |
|
Rarely Used |
Waffle maker, turkey roaster |
Move completely out of the kitchen |
The Two-Minute Nightly Reset
Once you clear the space, you have to actively protect it from creeping clutter. Start implementing a strict two-minute nightly reset before your head hits the pillow. Every single evening, spend exactly 120 seconds putting everything back in its designated spot. Wipe down the bare counter, put away the stray olive oil bottle, and load the final dinner plates into the dishwasher.
You will wake up to a completely clear, clean counter the next morning. That small psychological win deeply motivates you to keep the room spotless throughout the entire day. Consistency builds habits, and this tiny time investment pays massive dividends for your sanity.
|
Reset Step |
Time Required |
Purpose of the Action |
|
Clear Trash/Scraps |
30 seconds |
Removes odors and prevents pest attraction |
|
Load Final Dishes |
45 seconds |
Prevents the dreaded morning sink pile-up |
|
Put Away Ingredients |
30 seconds |
Clears the physical footprint of the counter |
|
Wipe Down Surfaces |
15 seconds |
Leaves a shining, satisfying visual finish |
Maximizing Vertical Storage to Organize Small Kitchen Walls
When you completely lack horizontal surfaces, you must build straight up. Your walls serve as giant blank canvases waiting to hold your heaviest gear. Storing items vertically pulls them right up to eye level, saving your back from constant bending.
Slap Up a Magnetic Knife Strip
Standard wooden knife blocks operate as the ultimate space hogs in a tiny cooking area. A chunky wooden block easily eats up a massive square of your premium, limited prep area. You need to toss it out today and upgrade your system. Mount a heavy-duty magnetic strip directly to the wall right above where you normally chop your vegetables.
You can use this strong magnetic bar to safely hold heavy chef’s knives, metal spice tins, and even your kitchen shears. It looks incredibly sleek, keeps dangerous blades away from small children, and frees up instant chopping space. Plus, hanging knives protects their sharp edges much better than shoving them blindly into a dark wooden slot.
|
Knife Storage Type |
Counter Space Used |
Blade Protection Level |
|
Wooden Block |
High (10×10 inches) |
Medium (blades can dull on wood) |
|
Drawer Insert |
None (uses drawer space) |
High (blades rest perfectly flat) |
|
Magnetic Wall Strip |
Zero (uses wall space) |
High (blades touch nothing but the spine) |
|
Loose in Drawer |
None |
Very Poor (highly dangerous and dulls edges) |
Keep Open Shelving to One Wall
People absolutely love the aesthetic of floating shelves, but a hard rule exists for tiny kitchens. You must put them on one single wall only. Not two walls, and definitely not three. If you wrap open shelving around the entire perimeter of the room, you create intense, overwhelming visual noise.
The room will actually feel much smaller, chaotic, and heavily cluttered. Stick to one beautifully curated shelf wall to hold your everyday white plates and clear drinking glasses. This targeted approach creates distinct depth and actually tricks your eye into thinking the narrow room is much wider than its physical footprint.
|
Shelving Strategy |
Visual Effect |
Practicality for Daily Use |
|
Single Wall Shelving |
Expands the room perfectly |
High (easy to grab daily plates) |
|
Wrapped Shelving |
Creates a cramped, cluttered vibe |
Low (hard to keep everything perfectly styled) |
|
Corner Shelving |
Uses dead awkward space |
Medium (items can get pushed back and lost) |
|
Over-Window Shelving |
Blocks natural sunlight |
Poor (makes the room feel instantly darker) |
Pegboards for Your Heavy Gear
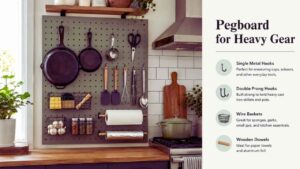
If a traditional ceiling pot rack blocks your overhead lighting, install a custom wall pegboard instead. Julia Child made this exact storage method famous for a very good reason. Grab a heavy-duty wooden pegboard from your local hardware store and paint it to match your wall color perfectly.
Use sturdy metal hooks to hang all your heavy skillets, rubber spatulas, and stainless measuring cups. It looks wonderfully industrial, saves entire base cabinets worth of space, and puts your most-used cooking tools exactly where you need them. You can even draw outlines around the pans so you always know exactly where each item belongs.
|
Pegboard Accessory |
Ideal Items to Hang |
Weight Capacity Rating |
|
Single Metal Hooks |
Measuring cups, scissors, spoons |
Light (under 2 pounds) |
|
Double Prong Hooks |
Heavy cast iron skillets |
Heavy (up to 15 pounds per stud) |
|
Wire Baskets |
Sponges, garlic bulbs, small jars |
Medium (great for bulky but light items) |
|
Wooden Dowels |
Paper towel rolls, aluminum foil |
Light (easy to swap out empty rolls) |
Transforming the Inside of Your Cabinets
Most standard kitchen cabinets are tragic, heartbreaking wastes of vertical space. Think about how you currently store your dishes and plates. You stack your dinner plates, and there is a whole foot of completely empty air just sitting uselessly above them. To organize small kitchen items efficiently, you have to pack that dead air tightly.
Build a Dedicated Appliance Garage
Every single appliance sitting out on your counter steals roughly 18 inches of precious visual space. If you have any cabinet space located near an electrical outlet, immediately turn it into an appliance garage. Store your toaster, smoothie blender, and slow cooker directly behind that closed cabinet door.
You pull them out slightly, plug them in, use them for your meal, and shove them right back out of sight. High-end custom home builders use this trick constantly to maintain perfectly clean lines in luxury spaces. You get the exact same luxury feel in a tiny apartment just by dedicating one specific cabinet to your ugly, bulky machines.
|
Appliance Garage Setup |
Necessary Requirements |
Best Appliances to Hide |
|
Counter-Level Cabinet |
Access to a wall outlet |
Toaster, heavy espresso machine |
|
Pull-Out Lower Shelf |
Heavy-duty sliding tracks |
Stand mixer, bulky food processor |
|
Roll-Top Bread Box |
Sits on the deep corner counter |
Coffee grinder, vitamin bottles |
|
Upper Shelf Station |
Step stool for easy access |
Slow cooker, electric griddle |
Buy Wire Shelf Risers and Tension Rods
Cheap wire shelf risers immediately double your usable cabinet capacity with zero installation effort. Place your large dinner plates safely on the bottom wooden shelf, and put your smaller salad plates on the wire rack directly above them. Now, turn your attention to your chaotic collection of baking sheets.
Stop stacking them completely flat in a messy pile. Flat stacking causes an annoying, loud avalanche every single time you need the bottom pan. Go buy cheap, spring-loaded tension rods and install them vertically between your cabinet shelves to act as tight dividers. Now you can easily slide your heavy metal trays in upright, exactly like books on a library shelf.
|
Cabinet Organizer |
Immediate Problem Solved |
Average Cost to Implement |
|
Wire Shelf Risers |
Captures empty air above short dishes |
Under 15 dollars |
|
Spring Tension Rods |
Stops flat-stacking avalanches |
Under 10 dollars for a multipack |
|
Turntable Lazy Susans |
Rescues spices lost in deep corners |
Around 20 dollars |
|
Under-Shelf Baskets |
Holds flat items like napkins |
Under 15 dollars |
Use the Backs of Your Cabinet Doors
The inside of your standard cabinet door serves as absolute prime real estate for lightweight, annoying items. Stick heavy-duty adhesive hooks directly back there to easily hold measuring spoons, silicone oven mitts, or loud pot lids. You can also mount a slim wire basket to corral your wooden cutting boards, aluminum foil rolls, and frustrating plastic wrap boxes.
This gets those bulky, long boxes completely out of your main sliding drawers. By shifting these lightweight items to the door, you free up a massive amount of deep storage space for your actual pots and pans. Just ensure you measure the interior clearance so the door still closes perfectly flush.
|
Door Storage Trick |
Best Items to Store |
Installation Method |
|
Adhesive Plastic Hooks |
Oven mitts, small measuring spoons |
Peel and stick (zero tools) |
|
Slim Wire Baskets |
Aluminum foil, wax paper, ziplock boxes |
Small wood screws (requires drill) |
|
Command Strip Clips |
Paper recipes, grocery lists |
Peel and stick (zero tools) |
|
Over-Door Hangers |
Large wooden cutting boards |
Simply hang over the top edge |
Rethinking Your Sink Area
Your kitchen sink is basically a massive, gaping hole eating up incredible amounts of potential counter space. With the right clever accessories, it temporarily transforms into a high-functioning, professional prep station. This tactic is an absolute lifesaver when you are cooking a complex meal and completely run out of room.
Grab an Over-the-Sink Cutting Board
Buy a massive, heavy wooden cutting board designed specifically to span perfectly over your sink basin. Some premium models even feature a built-in collapsible silicone colander right in the middle. When you desperately need to chop fresh vegetables, place the heavy board straight across the sink.
You just gained two entire feet of solid, durable prep space out of nowhere. Furthermore, you can smoothly sweep your onion skins and carrot scraps right down the open drain. If you have the colander model, you can wash and chop your cherry tomatoes in one seamless, highly efficient motion.
|
Sink Board Material |
Pros for Small Kitchens |
Maintenance Required |
|
Heavy Bamboo |
Highly durable and naturally antimicrobial |
Needs monthly mineral oil treatment |
|
Thick Plastic |
Extremely lightweight and dishwasher safe |
Scratches easily over time |
|
Acacia Wood |
Beautiful aesthetic, doubles as a serving tray |
Must be hand washed only |
|
Composite Material |
Knife-friendly and resists heavy stains |
Very low maintenance |
Ditch the Bulky Plastic Drying Rack
Throw away that massive, moldy plastic dish drainer sitting permanently next to your sink. They look universally awful, collect nasty hard water stains, and eat up prime real estate. Switch to a roll-up stainless steel drying rack immediately. It unrolls smoothly to sit completely flat across the open sink basin.
Your freshly washed dishes drip dry directly down into the metal drain. When they are completely dry, you roll the metal rack up tightly and toss it out of sight in a drawer. You get your entire counter back instantly, and your kitchen looks much cleaner.
|
Drying Rack Style |
Counter Space Footprint |
Visual Aesthetic |
|
Traditional Plastic Bin |
Massive (takes up an entire side) |
Cluttered and usually heavily stained |
|
Two-Tier Wire Rack |
Medium (goes vertical) |
Busy but holds a lot of items |
|
Roll-Up Over-Sink Rack |
Zero (sits on the sink, stores in a drawer) |
Minimalist and extremely clean |
|
Absorbent Drying Mat |
Medium (folds away when not in use) |
Can look messy and holds damp odors |
Utilizing Toe-Kicks and Hidden Dead Zones
Kneel down on the floor and look closely at the bottom of your cabinets, right near the baseboards. That recessed area is called the toe-kick, and it usually spans about four inches high. In almost every single kitchen, it is just an empty, dark void hidden behind a piece of cheap baseboard wood. When every single inch counts, you have to aggressively claim these hidden dead zones.
Install Toe-Kick Drawers
The hollow space hiding under your heavy base cabinets is totally wasted square footage. You can install clever pull-out toe-kick drawers right down there near the floor. They provide shallow but incredibly wide storage space without adding any visual bulk to the tiny room.
They are absolutely perfect for stashing flat, highly annoying items like metal baking sheets, holiday serving platters, or even your dog’s food bowls. Local hardware stores sell easy conversion kits that let you build these drawers yourself over a weekend. You are quite literally tapping into valuable storage footage you already own but never knew existed.
|
Toe-Kick Storage |
Ideal Hidden Items |
Accessibility Rating |
|
Under Oven Area |
Heavy baking stones, large pizza pans |
Medium (requires bending to the floor) |
|
Under Sink Area |
Spare sponges, emergency trash bags |
Medium (great for overflow supplies) |
|
Under Pantry Area |
Canned pet food, folded step stools |
High (easy to open with your foot) |
|
Under Island Area |
Rarely used holiday serving platters |
Low (best for seasonal items only) |
The Fridge Gap Slide-Out
Check the dark, dusty gap between your bulky refrigerator and the adjacent wall. Do you have three or four inches of dead space there? Buy an ultra-slim, slide-out rolling rack that fits perfectly into that exact tight slot. These hidden racks are absolute lifesavers for holding heavy canned goods, small jars of spices, and tall bottles of cooking oils.
Grab the front handle, pull it straight out when you need a can of black beans, and slide it completely out of sight when you finish cooking. It turns a useless dust-collector into a fully functioning, high-capacity mini pantry.
|
Gap Rack Dimensions |
Storage Capacity Potential |
Best Placement |
|
3-Inch Wide Rack |
Small spice jars, hot sauce bottles |
Between fridge and flat wall |
|
5-Inch Wide Rack |
Standard soup cans, soda boxes |
Between fridge and base cabinet |
|
7-Inch Wide Rack |
Large cereal boxes, bulk flour bags |
Next to a stacked washer/dryer unit |
|
Half-Height Rack |
Oils and vinegars |
Fits perfectly under a low window ledge |
Adding Mobile Storage Solutions
Sometimes you simply cannot cram everything into your existing built-in cabinets, no matter how hard you try. If you want to dynamically organize small kitchen layouts without remodeling, you need to bring in furniture that physically moves with you. Mobile storage serves as the ultimate cheat code for tiny apartments.
Embrace the Rolling Kitchen Cart
A slim, multi-tier rolling metal cart acts as your best friend in a cramped space. Use the sturdy top tier as a bonus prep surface for chopping onions or mixing dough. Put your heavy microwave or daily toaster safely on the middle shelf. Stack your heavy cast iron skillets and large mixing bowls securely on the bottom tier.
When you finish cooking your meal, simply unlock the wheels and roll the entire cart completely out of your way. Push it into an empty corner, slide it down an adjacent hallway, or tuck it neatly into a hall coat closet.
|
Rolling Cart Use Case |
Top Tier Function |
Middle/Bottom Tier Storage |
|
The Prep Station |
Wooden cutting board surface |
Knives, bowls, fresh produce |
|
The Baking Cart |
Stand mixer storage |
Flour, sugar, heavy measuring cups |
|
The Appliance Hub |
Microwave or toaster oven |
Coffee maker, blender, heavy crocks |
|
The Bar Cart |
Shakers, cocktail glasses |
Spirits, wine bottles, ice buckets |
Build an Out-of-Kitchen Breakfast Bar
In a tiny, cramped space, morning traffic jams become the absolute worst part of the day. If you have any living space to spare nearby, aggressively kick your entire coffee station out of the kitchen. Set up a slim console table directly in the dining room or at the edge of the living room space.
Put your coffee maker, heavy espresso machine, fresh beans, and favorite daily mugs right there. You just successfully shifted the entire chaotic morning routine completely out of the cooking zone. This incredible trick instantly frees up your main kitchen counters for actual, serious food prep.
|
Breakfast Bar Item |
Location Strategy |
Benefit to Kitchen Space |
|
Coffee Machine |
Place on dining room console |
Removes bulky machine from main counter |
|
Coffee Mugs |
Hang on wall rack above console |
Frees up one entire upper cabinet |
|
Toaster |
Keep next to the coffee station |
Keeps morning crumb mess out of the prep zone |
|
Sugar and Spoons |
Store in small drawers on console |
Stops people from digging in kitchen drawers |
Handling Trash and Recycling
In a kitchen featuring zero counters, open floor space remains equally rare and incredibly valuable. A standard, large freestanding trash can creates a daily physical nightmare. You trip over it, it blocks the hot oven door, it stops the refrigerator from opening fully, and it just looks messy and gross.
Mount a Pull-Out Under the Sink
A highly visible, massive freestanding trash can stands out as the single biggest visual interruption in a small room. Get rid of it this weekend. Mount a smooth slide-out trash and recycling track directly under your main sink basin.
Yes, you will unfortunately lose a little bit of space for your chemical cleaning supplies, but getting that big plastic bin completely off the floor makes the room feel drastically larger. The simple hardware kits cost less than dinner out, and they take a standard drill and roughly 20 minutes to fully install. Hiding your trash fundamentally elevates the entire look of the room.
|
Trash Bin Style |
Space Required |
Odor Control Effectiveness |
|
Under-sink Slider |
50% of your under-sink cabinet |
Excellent (trapped tightly behind closed doors) |
|
Freestanding Step Can |
2 square feet of floor space |
Good (if the lid seals tightly) |
|
Open Top Floor Bin |
2 square feet of floor space |
Very Poor (odors escape constantly) |
|
Countertop Compost |
Minimal (tucked in a back corner) |
Medium (requires a fresh carbon filter) |
Hang an Over-the-Cabinet-Door Bin
If your under-sink plumbing is a tangled nightmare and you absolutely cannot spare the space, pivot to a hanging door bin. Buy a small, durable hard-plastic bin that hooks directly over a lower cabinet door near your prep zone.
Scrape your wet food prep scraps right into it as you chop your vegetables. Because the bin is intentionally small, it actively forces you to empty it daily into your main outdoor garbage can. This strict daily emptying habit completely eliminates weird kitchen odors and prevents fruit flies from taking over your house.
|
Hanging Bin Type |
Best Use Case |
Maintenance Routine |
|
Inside Door Mount |
Permanent hidden storage |
Wipe down weekly to prevent mold |
|
Outside Door Hook |
Active cooking prep |
Empty immediately after cooking |
|
Mesh Bag Holder |
Dry recycling (paper, boxes) |
Swap out bag when full |
|
Counter-Edge Sweeper |
Catching fast vegetable peels |
Rinse thoroughly after every meal |
Professional Kitchen Guidelines for Small Spaces
When figuring out how to build a space that does not drive you completely crazy, look at the professional playbooks. The National Kitchen and Bath Association sets the strict mathematical rules that high-end architects use to build highly functional homes. Even if you aren’t knocking down drywall, knowing the math helps you arrange your gear properly.
The Landing Space Rule
You strictly need a minimum of 24 inches of totally clear counter space on one side of the sink, and 15 inches directly next to the stove. This is where you urgently put hot pans or safely set down slippery, dirty dishes. Clear these specific zones first when you start decluttering your room today.
If you have appliances sitting in these critical landing zones, you will constantly risk burning yourself or dropping heavy items on the floor. Protect this exact mathematical footage with your life. Use sink covers or mobile carts to physically create this space if it currently does not exist.
|
Landing Zone Area |
Minimum Required Space |
Primary Purpose |
|
Next to Sink |
24 inches |
Setting down dirty dishes and washing prep |
|
Next to Stove |
15 inches |
Safely resting hot pans off the active burner |
|
Next to Fridge |
15 inches |
Setting down heavy groceries while loading |
|
Next to Oven |
15 inches |
Safe transfer space for heavy roasting pans |
The Work Triangle and Clearance
Your main walking work aisle should be at least 42 inches wide for a single cook to operate comfortably. If that new rolling cart you bought pushes your walking aisle down to 30 inches, the cart is dangerously big and needs to leave. Furthermore, the total walking distance between your sink, stove, and fridge is professionally called the “work triangle.”
It should never exceed 26 feet total, or you will exhaust yourself cooking. Keep your heavy salt crocks, cooking oil, and favorite chef’s knife strictly inside this invisible triangle. Anything stored outside this triangle should only be items you touch once a week.
|
NKBA Design Guideline |
The Professional Rule |
How to Actually Apply It Today |
|
Work Triangle Rule |
Total distance under 26 feet |
Store daily cooking tools strictly inside this zone |
|
Single Cook Aisle |
Minimum 42 inches wide |
Tape the floor before buying a mobile island |
|
Two Cook Aisle |
Minimum 48 inches wide |
Keep multiple people from bumping elbows |
|
Corner Clearance |
Doors must open fully 90 degrees |
Don’t put bulky carts blocking cabinet hinges |
Final Thoughts
You absolutely do not need a sprawling, expensive magazine-cover farmhouse island to cook amazing meals or deeply enjoy your home. You just need a thoughtful space that actively works alongside your daily habits rather than fighting against them. It definitely takes a little patience to organize small kitchen spaces effectively, but the core secret remains incredibly simple.
Go strictly vertical, use the hidden backs of your heavy wooden doors, aggressively claim dead zones like the floor toe-kick, and ruthlessly protect every single inch of horizontal prep surface you currently have. Do not try to do it all today. Pick just two or three of these changes—like setting up the daily use rule or ordering an over-the-sink cutting board tonight—and you will instantly feel the massive difference in how you cook, clean, and happily live in your space.
Frequently Asked Questions (FAQs) About Organize Small Kitchen
People take to the internet every single day trying to solve weird, highly specific kitchen layout problems. Here are the honest, tested answers to the frustrating problems standard design guides usually skip over entirely.
How do I store root vegetables if I lack a pantry?
Stop putting them in giant decorative bowls right on your limited counter. Keep your heavy potatoes and messy onions in hanging mesh produce bags instead. Hang them firmly from heavy-duty hooks directly under your upper cabinets or on a blank wall. It completely keeps them off the counter, provides the crucial airflow they need so they do not rot, and adds a cool, rustic farmhouse vibe to the room. Just remember the golden rule of produce: keep onions and potatoes in completely separate bags. Onions naturally release a strong ethylene gas that forcibly causes nearby potatoes to sprout much faster.
I have zero counters, where does the microwave go?
You can literally put it anywhere else in the entire house. Never, ever leave a bulky microwave eating up your horizontal chopping space. Mount it securely under an upper cabinet using a specific bracket kit. Stick it on the strong middle shelf of a rolling utility cart. Or, buy heavy-duty metal shelf brackets and bolt the machine directly to an empty wall at eye level. Just make absolutely sure your thick wall anchors hit a real physical wood stud behind the drywall. Microwaves are incredibly heavy, and they will violently rip right through hollow drywall, destroying your kitchen.
What do I do with tall, odd-shaped water bottles?
They fall over constantly and drive everyone absolutely crazy, don’t they? Buy a cheap, clear acrylic wine rack from any home goods store immediately. Slide it straight onto one of your upper cabinet shelves and purposefully stack your tall metal water bottles horizontally. They slide in and out of the rack incredibly easily, and they will not violently knock each other down like dominoes when you reach for the one trapped in the back. Pro tip for the long term: store them inside the rack with the lids completely off so they can air out and do not smell weird.


