
Sticker residue is small, sticky, and strangely stubborn. You peel off a price tag, jar label, shipping sticker, laptop decal, or wall sticker. The paper comes away. The glue stays. Then dust, lint, and dirt stick to it. Suddenly, a clean surface looks old and grimy.
The good news is simple. You can remove sticker residue from almost any surface without ruining it. The trick is not to use the strongest cleaner first. That’s where people get into trouble. Glass can handle more pressure. Plastic can turn cloudy. Wood can stain. Painted walls can peel. Stone can etch. Screens can lose their coating. Clothing can hold oil stains if you use the wrong hack.
So take it slowly. Start gentle. Test first. Use a plastic scraper, not a knife. Then move to heat, oil, rubbing alcohol, vinegar, or adhesive remover only when the surface can handle it. This guide gives you a safe, surface-by-surface plan that actually makes sense.
Quick Answer: Best Way to Remove Sticker Residue
|
Surface |
Best First Method |
Stronger Option |
Avoid |
|
Glass jar |
Warm soapy soak |
Oil or rubbing alcohol |
Metal knife |
|
Plastic container |
Dish soap and plastic scraper |
Small amount of oil |
Acetone |
|
Stainless steel |
Oil on microfiber cloth |
Alcohol test spot |
Steel wool |
|
Finished wood |
Barely damp soapy cloth |
Tiny oil test |
Heavy soaking |
|
Painted wall |
Warm soapy cloth |
Rubber eraser |
Strong solvent |
|
Laptop lid |
Microfiber cloth |
70% isopropyl alcohol on cloth |
Spraying liquid |
|
Phone screen |
Soft lint-free cloth |
Replace screen protector |
Adhesive remover |
|
Clothing |
Freeze, scrape, pretreat |
Laundry stain remover |
Dryer heat |
|
Natural stone |
Mild soap and water |
Stone-safe cleaner |
Vinegar |
|
Car paint |
Wash, warm, wipe gently |
Auto-safe adhesive remover |
Acetone |
The safest starting method is warm water, dish soap, and gentle rubbing. That works on many fresh stickers and light adhesive marks. Use a plastic scraper or an old card to lift the softened glue. Keep the pressure light. If the residue does not move, don’t scrub harder. Change the method instead.
Heat helps when glue has dried or hardened. Oil helps when the adhesive feels gummy. Rubbing alcohol helps on many hard surfaces, but it can damage some plastics, coatings, and finishes.
Vinegar works on glass and ceramic, but it does not belong on natural stone. Commercial adhesive removers work well on tough residue, but only when the label says they are safe for that surface. The best rule is simple. Start with the lowest-risk method. Move up only when needed.
Why Sticker Residue Sticks So Hard?
|
Cause |
What Happens |
Best Fix |
|
Pressure-sensitive glue |
The adhesive bonds when pressed |
Peel slowly and scrape gently |
|
Heat exposure |
Glue softens, spreads, then hardens |
Hair dryer and plastic scraper |
|
Sunlight |
Adhesive dries and darkens |
Heat plus safe remover |
|
Dust and lint |
Sticky film turns gray or black |
Oil or alcohol if surface-safe |
|
Paper label backing |
Paper tears and traps glue |
Warm soapy soak |
|
Waterproof label |
Resists water |
Heat or oil-based method |
|
Old decal adhesive |
Bonds deeply over time |
Commercial remover if safe |
|
Low-quality sticker |
Glue separates from label |
Repeat gentle cleaning |
Most stickers use pressure-sensitive adhesive. That means the glue sticks when you press it onto a surface. It does not always need water, heat, or drying time to bond. That is why price tags, product labels, tape, decals, and shipping stickers can leave glue behind even when the paper comes off cleanly.
Age makes it worse. A sticker that has been sitting in sunlight for months can leave dark, rubbery residue. Heat from a window, car body, laptop, or kitchen appliance can soften the glue. Then the glue spreads thin and hardens again.
Dust also changes the problem. Fresh glue looks clear or pale. Old glue turns gray or black because it catches lint, skin oil, dirt, and airborne particles. This is why one sticker peels off perfectly while another takes three rounds of cleaning. The sticker, surface, temperature, age, and adhesive type all matter.
Tools and Products You Need
|
Tool or Product |
Best For |
Why It Helps |
Use With Care On |
|
Microfiber cloth |
Almost every surface |
Soft and low-scratch |
Dirty cloth can still scratch |
|
Plastic scraper |
Glass, plastic, metal |
Lifts glue safely |
Painted walls and soft finishes |
|
Old credit card |
Small sticky patches |
Flexible and easy to control |
Delicate paint |
|
Warm water |
Fresh paper labels |
Softens paper and glue |
Wood and electronics |
|
Dish soap |
Washable surfaces |
Breaks grime and oily film |
Raw wood |
|
Hair dryer |
Decals and dry glue |
Softens adhesive |
Thin plastic and paint |
|
Cooking oil |
Glass, metal, some plastic |
Loosens gummy glue |
Fabric and raw wood |
|
White vinegar |
Glass and ceramic |
Helps soften residue |
Stone and screens |
|
Rubbing alcohol |
Glass, metal, some exteriors |
Dissolves many adhesives |
Acrylic, leather, paint |
|
Rubber eraser |
Small dry spots |
Rolls glue away |
Glossy soft finishes |
|
Adhesive remover |
Old tape and decals |
Stronger glue removal |
Porous or delicate surfaces |
You do not need every product on this list. For most jobs, start with four basics: microfiber cloth, warm soapy water, plastic scraper, and patience. A plastic scraper matters because metal blades can scratch. Even glass can scratch if you use a dirty blade or drag grit across the surface.
Dish soap is a good first step because it is mild and easy to rinse. It also removes the oily film left behind by cooking oil or adhesive remover.
A hair dryer can save you from hard scrubbing. Gentle heat softens many adhesives. Keep the dryer moving and use low or medium heat. Rubbing alcohol can be useful, but do not treat it like water. It is flammable and can damage certain coatings, paints, plastics, and finishes. Always test first.
Before You Start: Safety Rules That Prevent Damage
|
Safety Rule |
What It Prevents |
Best Practice |
|
Test in a hidden spot |
Stains, dull spots, color loss |
Wait a few minutes and check |
|
Start gentle |
Unneeded damage |
Use soap before solvents |
|
Use plastic tools |
Scratches and gouges |
Avoid knives and metal blades |
|
Keep liquids controlled |
Swelling and electrical damage |
Dampen the cloth, not the object |
|
Avoid product mixing |
Dangerous fumes |
Use one cleaner at a time |
|
Ventilate the area |
Strong fumes |
Open a window if using solvents |
|
Keep alcohol away from heat |
Fire risk |
No flames, sparks, or smoking |
|
Wash after oil or remover |
Sticky or greasy film |
Finish with mild soap if safe |
Always test first. This sounds boring, but it saves surfaces. Try the cleaner on a hidden corner, underside, or back edge. If the surface changes color, turns dull, feels sticky, or softens, stop. Use one product at a time. Do not mix cleaners. Do not combine bleach with vinegar, ammonia, rubbing alcohol, or other cleaners. That can create dangerous fumes.
Use less liquid around electronics, wood, walls, and furniture seams. A soaked cloth can push moisture into places where it does not belong. If you use rubbing alcohol or adhesive remover, work away from flames, sparks, cigarettes, candles, gas stoves, and hot appliances.
And never rush with a sharp blade. A sticky patch is annoying. A scratched screen, cloudy plastic lid, peeled wall, or stained wood shelf is worse.
How to Remove Sticker Residue from Glass, Jars, and Windows?
|
Glass Item |
Best Method |
Helpful Tip |
Avoid |
|
Glass jar |
Soak in warm soapy water |
Wait 20 to 30 minutes |
Knife scraping |
|
Wine bottle |
Warm water and plastic scraper |
Remove paper first |
Steel wool |
|
Window glass |
Hair dryer and plastic scraper |
Keep heat moving |
Dry scraping |
|
Mirror |
Alcohol on cloth |
Keep liquid away from edges |
Spraying too much |
|
Glass cookware |
Soak, scrape, wash |
Remove all oil before use |
Harsh pads |
|
Car glass |
Heat and plastic scraper |
Be careful with tint |
Razor on tint film |
|
Shower glass |
Soap, vinegar if safe |
Rinse well |
Abrasive scrubbers |
Glass is one of the easiest surfaces to clean, but it still needs care. A metal knife may remove the glue, but it can also leave scratches. For jars and bottles, soak the item in warm water with dish soap for 20 to 30 minutes. Peel away the paper. Rub the sticky glue with your fingers. If it remains, use a plastic scraper.
If the glue still feels gummy, use a few drops of cooking oil. Let it sit for 10 minutes. Scrape again, then wash the glass with dish soap. For windows, warm the residue with a hair dryer for a short time. Use low or medium heat. Keep the dryer moving. Once the adhesive softens, lift it with a plastic scraper.
For mirrors, avoid soaking the edges. Too much liquid near the mirror edge can creep behind the backing. Put rubbing alcohol on the cloth, not directly on the mirror. For car windows, be careful with tint film. Plain glass is stronger than window tint. Use plastic tools and light pressure.
How to Remove Sticker Residue from Plastic?
|
Plastic Type |
Best First Method |
Stronger Option |
Avoid |
|
Food container |
Warm soapy water |
Cooking oil |
Acetone |
|
Storage bin |
Soap and plastic scraper |
Oil test |
Metal blade |
|
Toy plastic |
Mild soap |
Rubber eraser |
Harsh solvent |
|
Acrylic organizer |
Mild soap only |
Manufacturer cleaner |
Rubbing alcohol |
|
Soft-touch plastic |
Dry cloth, then mild soap |
Very careful spot test |
Oil and alcohol |
|
Plastic bottle |
Soak if safe |
Oil and dish soap |
Abrasive scrubber |
|
Appliance plastic |
Damp cloth and soap |
Alcohol test spot |
Nail polish remover |
Plastic is where many sticker-removal hacks go wrong. Some plastics handle oil well. Some turn cloudy when exposed to alcohol. Acrylic can react badly to alcohol, ammonia, acetone, and harsh cleaners. Start with warm soapy water. If the item can be soaked, let it sit for 10 to 20 minutes. If it cannot be soaked, press a damp soapy cloth over the residue.
Scrape gently with an old card. Do not dig into the plastic. If the glue remains, use cooking oil. Put a few drops on a cloth. Rub the sticky patch. Wait 10 minutes. Scrape lightly. Then wash the surface with dish soap to remove the oily film.
Avoid nail polish remover unless you know the plastic can handle acetone. Most of the time, it is not worth the risk. Acetone can melt, haze, or weaken plastic. For clear acrylic, keep it simple. Use mild soap, water, and microfiber only.
How to Remove Sticker Residue from Metal and Stainless Steel?
|
Metal Surface |
Best Method |
Helpful Tip |
Avoid |
|
Stainless steel appliance |
Oil or alcohol on microfiber |
Rub with the grain |
Steel wool |
|
Painted metal |
Mild soap |
Test before alcohol |
Strong solvent |
|
Aluminum |
Soap and soft cloth |
Dry fully |
Harsh alkaline cleaner |
|
Metal tin |
Soak if safe |
Dry to prevent rust |
Leaving wet |
|
Tools |
Adhesive remover |
Ventilate well |
Open flame |
|
Door hardware |
Oil or alcohol test |
Polish after cleaning |
Abrasive pad |
|
Chrome |
Mild soap, then alcohol test |
Buff dry |
Rough scrubbers |
Metal can usually handle more cleaning power than plastic, but finishes still matter. Stainless steel scratches. Painted metal can soften. Aluminum can stain or dull. For stainless steel, use a microfiber cloth and a small amount of cooking oil or rubbing alcohol. Rub with the grain of the metal. Do not scrub in circles.
Once the glue lifts, clean the area with dish soap and water. Dry it fully to prevent streaks. For painted metal, start with soap and water. If that does not work, test alcohol in a hidden spot. If paint transfers to the cloth, stop.
Never use steel wool on stainless steel appliances. It can scratch the finish and may leave tiny particles that rust later.
How to Remove Sticker Residue from Wood and Furniture?
|
Wood or Furniture Type |
Best Method |
Helpful Tip |
Avoid |
|
Finished wood |
Barely damp soapy cloth |
Dry right away |
Soaking |
|
Raw wood |
Rubber eraser |
Work dry first |
Oil-heavy cleaning |
|
Painted furniture |
Warm cloth and plastic scraper |
Test alcohol first |
Hard scrubbing |
|
Laminate furniture |
Soap and soft cloth |
Try oil if safe |
Acetone |
|
Veneer |
Barely damp cloth |
Avoid edge soaking |
Strong solvents |
|
Waxed wood |
Dry cloth |
Use wood-safe cleaner |
Alcohol |
|
Antique furniture |
Professional care |
Test nothing visible |
DIY solvents |
Wood needs a soft touch. Finished wood, unfinished wood, laminate, veneer, painted furniture, and waxed pieces all behave differently. For finished wood, use a barely damp cloth with mild dish soap. Rub gently. Dry the area right away. Do not leave water sitting on the wood.
If the residue stays, test a tiny amount of oil on a hidden spot. If the finish does not change, put a little oil on a cloth and rub the sticky patch. Wipe clean afterward. For raw wood, avoid water and oil if possible. Use a rubber eraser or dry plastic scraper. If glue has sunk into the grain, cleaning may not be enough. Light sanding may be needed.
For antique or expensive furniture, do not experiment with alcohol, vinegar, or commercial adhesive removers. A professional furniture restorer is safer.
How to Remove Sticker Residue from Painted Walls?
|
Wall Surface |
Best Method |
Helpful Tip |
Avoid |
|
Satin paint |
Warm soapy cloth |
Use light pressure |
Strong solvent |
|
Semi-gloss paint |
Mild soap and cloth |
Test first |
Hard scraping |
|
Flat paint |
Dry rubbing first |
Use very little water |
Wet scrubbing |
|
Textured wall |
Soft brush and mild soap |
Work slowly |
Heavy pressure |
|
Wallpaper |
Dry method first |
Avoid soaking |
Vinegar and oil |
|
Rental wall |
Gentle method only |
Stop if paint lifts |
Adhesive remover |
|
Kids’ room wall |
Warm cloth and eraser |
Check paint transfer |
Abrasive pad |
Painted walls are easy to damage, especially flat paint. Scrub too hard and you may create a shiny patch, remove color, or peel the paint. Start with a dry method. Rub the residue gently with your fingers or a clean rubber eraser.
If that does not work, use a warm soapy cloth. Press it on the sticky spot for a short time. Do not soak the wall. Rub lightly. For textured walls, use a soft brush with mild soap. Work with the texture, not against it.
If paint starts coming off on the cloth, stop. At that point, cleaning may do more harm than good.
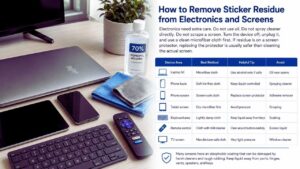
How to Remove Sticker Residue from Electronics and Screens?
|
Device Area |
Best Method |
Helpful Tip |
Avoid |
|
Laptop lid |
Microfiber cloth |
Use alcohol only if safe |
Oil near seams |
|
Phone back |
Soft lint-free cloth |
Keep liquid controlled |
Spraying cleaner |
|
Phone screen |
Screen-safe cloth |
Replace screen protector |
Adhesive remover |
|
Tablet screen |
Dry microfiber first |
Avoid pressure |
Scraping |
|
Keyboard area |
Lightly damp cloth |
Keep liquid away from keys |
Soaking |
|
Remote control |
Cloth with mild cleaner |
Clean around buttons carefully |
Excess liquid |
|
TV screen |
Manufacturer-safe cloth |
Very light pressure |
Window cleaner |
Electronics are the one place where you should ignore most viral cleaning hacks. Do not use oil. Do not spray cleaner directly. Do not scrape a screen. Turn the device off. Unplug it. Remove any case if needed. Use a clean microfiber cloth first.
For a laptop lid, you may be able to use a tiny amount of 70% isopropyl alcohol on a cloth, but only if the device finish can handle it. Keep liquid away from hinges, vents, ports, speakers, and keys. For phones and tablets, be even more careful. Many screens have an oleophobic coating that helps resist fingerprints. Harsh cleaners and rough rubbing can damage that coating.
If the sticky residue is on a screen protector, replace the protector. That is safer than trying to dissolve glue on the actual screen.
How to Remove Sticker Residue from Fabric and Clothing?
|
Fabric Situation |
Best Method |
Helpful Tip |
Avoid |
|
Fresh sticker glue |
Freeze and scrape |
Work before washing |
Hard rubbing |
|
Washed clothing |
Dish soap and pretreat |
Check before drying |
Dryer heat |
|
Cotton |
Pretreat stain |
Wash as label says |
Oil |
|
Polyester |
Freeze first |
Test stain remover |
Acetone |
|
Denim |
Scrape and pretreat |
Use dull edge |
Harsh solvent |
|
Upholstery |
Blot with mild soap |
Don’t soak cushion |
Scrubbing |
|
Delicate fabric |
Professional cleaner |
Follow care label |
DIY solvent |
Sticker residue on clothes often happens after a name tag, size sticker, or child’s sticker goes through the wash. Do not put the item in the dryer until the glue is gone. Heat can set the adhesive deeper into the fabric.
Put the garment in the freezer for 30 to 60 minutes. Once the residue hardens, scrape it gently with a dull edge. Next, rub a small amount of dish soap into the spot. Rinse if the care label allows it. Apply laundry stain remover. Wash as directed.
Check the area before drying. If the glue remains, repeat the treatment. Avoid cooking oil on fabric. You may remove the sticker residue but create a new oil stain.
How to Remove Sticker Residue from Tile, Stone, and Countertops?
|
Surface |
Best Method |
Helpful Tip |
Avoid |
|
Ceramic tile |
Dish soap and plastic scraper |
Rinse well |
Harsh pads |
|
Porcelain |
Warm water and soap |
Dry after cleaning |
Abrasive scrubbers |
|
Marble |
Mild dish soap |
Use soft cloth |
Vinegar |
|
Limestone |
pH-neutral cleaner |
Dry fully |
Lemon juice |
|
Travertine |
Stone-safe cleaner |
Avoid acid |
Scouring powder |
|
Granite |
Mild soap or stone cleaner |
Protect sealer |
Strong solvents |
|
Quartz |
Manufacturer-safe cleaner |
Check care guide |
Aggressive chemicals |
Ceramic tile and porcelain are usually easier to clean. Natural stone needs more caution. Do not use vinegar on marble, limestone, travertine, onyx, or other acid-sensitive stone. Vinegar can etch the surface and leave dull marks.
For stone, use warm water, mild dish soap, and a soft cloth. Let the cloth sit on the sticky area for a short time. Scrape only with plastic. Rinse lightly and dry fully. For granite, quartz, or sealed stone counters, check the manufacturer’s care guide. Some cleaners can weaken sealers or dull the surface over time.
If the residue is thick or old, use a stone-safe adhesive remover recommended for that exact surface.
How to Remove Sticker Residue from Cars, Decals, and Outdoor Surfaces?
|
Surface |
Best Method |
Helpful Tip |
Avoid |
|
Car paint |
Wash, warm, wipe gently |
Use auto-safe remover |
Acetone |
|
Car glass |
Hair dryer and plastic scraper |
Watch for tint film |
Razor on tint |
|
Bike frame |
Mild heat and microfiber |
Test on paint |
Strong solvent |
|
Scooter body |
Soap and gentle heat |
Work slowly |
Abrasive pad |
|
Helmet |
Follow manufacturer care |
Solvents may weaken shell |
Adhesive remover unless approved |
|
Outdoor plastic |
Soap, oil, plastic scraper |
Test first |
Nail polish remover |
|
Mailbox or sign |
Heat and plastic scraper |
Check painted finish |
Metal scraping |
Outdoor stickers are harder because sunlight bakes the glue. Dirt also mixes with adhesive and makes it darker. For car paint, wash the area first. Dirt can scratch paint while you rub. Warm the sticker with a hair dryer. Peel slowly.
If residue remains, use an automotive-safe adhesive remover on a microfiber cloth. Do not pour it directly onto the paint. Follow the product label. Avoid acetone, gasoline, abrasive pads, and kitchen scrubbers on car paint. They can damage the clear coat.
For helmets, be careful. Some solvents can weaken materials or damage protective finishes. Follow the helmet maker’s care instructions.
Natural Methods vs Commercial Adhesive Removers
|
Method |
Best For |
Benefits |
Limits |
|
Warm soapy water |
Fresh labels |
Safe and cheap |
Slow on old glue |
|
Cooking oil |
Glass, metal, some plastic |
Good for gummy residue |
Leaves oily film |
|
Vinegar |
Glass and ceramic |
Cuts some sticky grime |
Unsafe for stone |
|
Rubbing alcohol |
Glass, metal, some exteriors |
Fast drying |
Can damage coatings |
|
Baking soda paste |
Small hard-surface spots |
Mild scrubbing power |
Can scratch |
|
Rubber eraser |
Small dry residue |
No liquid needed |
Slow on large areas |
|
Commercial remover |
Old tape and decals |
Strong and targeted |
Must match surface |
Household methods work well for light residue. They are cheap, easy, and often safer than strong chemicals. Warm soapy water is the first choice for washable surfaces. Oil works well on gummy residue, especially on glass and metal. Vinegar can help on glass and ceramic, but it should stay far away from natural stone.
Rubbing alcohol can work quickly, but it is not safe for every surface. Test it before using it on plastic, paint, wood, screens, or coated finishes.
Commercial adhesive removers are useful for old tape, decals, bumper stickers, and heavy glue. Read the label carefully. Use ventilation. Wash the surface afterward if the label allows it.
Common Mistakes That Make Sticker Residue Worse
|
Mistake |
What Can Go Wrong |
Better Move |
|
Using a knife |
Scratches glass, plastic, paint, or metal |
Use plastic scraper |
|
Scrubbing too hard |
Dulls or damages finish |
Let cleaner sit briefly |
|
Using acetone on plastic |
Melting, clouding, or discoloration |
Use soap or oil |
|
Using vinegar on stone |
Etching and dull marks |
Use stone-safe cleaner |
|
Spraying electronics |
Liquid enters openings |
Dampen cloth instead |
|
Using oil on fabric |
Creates oil stain |
Freeze and pretreat |
|
Mixing cleaners |
Dangerous fumes |
Use one product at a time |
|
Drying clothes too soon |
Heat sets glue |
Check before drying |
The biggest mistake is panic cleaning. You see the sticky mess and grab whatever is nearby. That may be a knife, nail polish remover, vinegar, bleach, or a rough sponge. Slow down. Sticker residue usually responds better to time than force.
Let soap, heat, oil, or remover sit briefly. Then scrape gently. Repeat if needed. Do not mix cleaning products. Do not use bleach for sticker residue. It is not the right tool for the job.
If the surface starts to change color, feel tacky, look dull, or shed paint, stop immediately.
Best Method by Surface: Fast Reference Guide
|
Surface |
First Try |
Second Try |
Skip |
|
Glass jar |
Warm soapy soak |
Oil or alcohol |
Knife |
|
Window |
Hair dryer |
Alcohol on cloth |
Dry scraping |
|
Plastic container |
Soap and scraper |
Cooking oil |
Acetone |
|
Acrylic |
Mild soap |
Manufacturer cleaner |
Alcohol |
|
Stainless steel |
Oil on cloth |
Alcohol test |
Steel wool |
|
Finished wood |
Barely damp cloth |
Tiny oil test |
Soaking |
|
Painted wall |
Warm soapy cloth |
Rubber eraser |
Strong solvent |
|
Laptop lid |
Microfiber cloth |
70% alcohol test |
Oil |
|
Phone screen |
Soft cloth |
Replace protector |
Adhesive remover |
|
Clothing |
Freeze and scrape |
Stain pretreat |
Dryer |
|
Marble |
Mild dish soap |
Stone-safe cleaner |
Vinegar |
|
Car paint |
Wash and heat |
Auto-safe remover |
Acetone |
Use this table when you need a quick choice. It can save you from using the wrong product on the wrong surface. The first-try method is the safest starting point. The second-try method is for residue that does not move. The skip column shows what can cause damage.
If a surface is expensive, delicate, coated, painted, or porous, test before cleaning the visible area. When in doubt, use less liquid, less pressure, and more patience.
Extra Tips for Better Results
|
Tip |
Why It Works |
Best For |
|
Peel slowly |
Leaves less glue behind |
All stickers |
|
Pull at a low angle |
Reduces tearing |
Labels and decals |
|
Warm before peeling |
Softens adhesive |
Glass, metal, cars |
|
Work from the edge |
Controls glue spread |
Large stickers |
|
Use clean cloths |
Prevents scratches |
Glossy surfaces |
|
Let products sit |
Gives cleaner time to work |
Old residue |
|
Wash after oil |
Removes greasy film |
Glass, metal, plastic |
|
Repeat gently |
Prevents damage |
Delicate surfaces |
The best sticker removal starts before the sticker is fully off. Peel slowly and keep the angle low. Pulling straight up often tears the label and leaves more glue behind. If the sticker feels stiff, warm it first. A little heat can soften the adhesive and make the peel cleaner.
Use clean tools. A dirty cloth or scraper can drag grit across the surface and scratch it. Do not expect old glue to disappear in one pass. Two or three gentle rounds are safer than one rough scrub.
After using oil or adhesive remover, clean the area again with mild soap if the surface can handle it. Otherwise, the leftover film can attract more dust.
Final Thoughts
You can remove sticker residue from almost any surface if you choose the right method and slow down. Start with warm soapy water, a microfiber cloth, and a plastic scraper. Try heat when the glue is dry. Use oil on hard, nonporous surfaces. Use rubbing alcohol only after testing. Use vinegar only on surfaces that can handle acid. Save commercial adhesive removers for tough tape, decals, and old glue.
Glass and metal are usually easier. Plastic, acrylic, wood, paint, fabric, stone, car paint, and electronics need more care. Here’s the rule worth remembering: test first, start gentle, and stop if the surface starts to change. A sticky patch is fixable. A scratched screen, cloudy plastic lid, etched countertop, stained shelf, or peeled wall is a much bigger headache.
Frequently Asked Questions (FAQs) About Remove Sticker Residue
Can hand sanitizer remove sticker residue?
Yes, sometimes. Many hand sanitizers contain alcohol, which can loosen adhesive. But sanitizer may also contain fragrance, gel thickeners, and moisturizers. Those can leave a film. Use it only on a test spot first. Wipe the surface clean afterward.
Can baking soda remove sticker residue?
Yes, but be careful. Baking soda acts like a mild abrasive. It can help on sturdy hard surfaces, but it may scratch glossy plastic, screens, soft paint, or polished finishes. Use very light pressure.
Does vinegar remove sticker residue?
Vinegar can help on glass, ceramic, and some metal. It should not be used on marble, limestone, travertine, onyx, or other acid-sensitive stone. It can also be risky on screens, natural wood, and painted surfaces.
Can WD-40 remove sticker residue?
Yes, it can loosen residue on some hard surfaces. Treat it like an oily product. Test first. Use a small amount. Wash the surface afterward if possible. Do not use it on fabric, electronics, raw wood, or porous materials.
Can toothpaste remove sticker residue?
Sometimes, but it is not my first choice. Toothpaste can be abrasive. It may dull or scratch delicate finishes. Use safer methods first, such as soap, heat, oil, or a rubber eraser.
Can I use a magic eraser?
Only on durable surfaces. Melamine sponges can act like very fine sandpaper. They may dull paint, glossy plastic, stainless steel finishes, and coated surfaces. Test first and use almost no pressure.


